


How to install beadboard paneling around the entire room – ensuring the correct placement and using the right glue are crucial. Installing the beadboard is relatively simple, but determining the correct glue to use can be a challenge. This guide attempts to break down the process by discussing things like adhesive options, where it can be applied and techniques for the application of the pertinent material. Regardless of your level of expertise, whether you’re a handyman or you don’t mind hiring someone, this write-up will help set you up for success until such time when you will have to remove the beadboard.
Overview of Beadboard and Its Applications
Although Beadboard is frequently referred to as a style of panel based on the presence of narrow vertical grooves typically equidistantly spaced on the face of the panel, it is easily identified by these grooves even in the absence of any other information. It is usually fabricated from wooden substances like medium-density fiberboard (MDF) or plastic materials such as various types of PVC. Wainscots, ceiling paneling or even the taste wall all can be done in beadboard since it is very easily adaptable to more than a single purpose. Basically, beadboards are also able to be used for decoration purposes, such as adding texture to a room design or as a covering for walls, as it is very durable for use. Because of its water-resistant grades, such as PVC, beadboard is common in such usages as wet places like restrooms and kitchens. Beadboarding is effective both in its usefulness and decoration; therefore, it is easily integrated in various construction decorations as a final touch in the interior environment.
What is Beadboard?
Beadboard is conventionally put up with a variety of materials, each of which provides some pros and cons based on its use and where it is put up. The most common type of beadboard is wood beadboard, typically made from pine, oak, and other hardwoods, which provides a sense of comfort that is very suitable for interior environments featuring classic or even shabby chic designs. On the other hand, MDF and PVC beadboard are new contenders and have their advantages for functional usage. MDF beadboard is affordable, besides allowing a great variety of colors, since it is easy to paint; therefore, it is suitable for hygiene-sensitive indoor areas. On the flip side, PVC beadboard is extremely tough and repels water, rot, and so on, which is suitable for such wet places like bathrooms, kitchens, and even outdoors in some situations. Such bars are made with grooves or “pins” that are fitted in, contributing to the unique appearance and popularity of this paneling. Beadboard is normally sold in the form of regular sections or planks, which can be used in more than one room.
Common Uses of Beadboard Paneling
Beadboard sheets are a very popular and widely used covering, both in private and public buildings, thanks to the beauty and practicality they provide. Find some of the “teaching moments” about the beadboard below.
- Wall Coverings in Bathrooms
Mold-resistant sheets are therefore an excellent choice for bathroom interiors. Wainscoting is often placed on the walls, preventing moisture from splashing on them as well as minimizing any abuse.
- Kitchen Backsplashes
This offers a cost-effective and charming method of installing a wall between lower and upper kitchen cabinets instead of the traditional tile element. Since the surface does not absorb the cleaning, it is perfect in the presence of burning oils, cooking greases, fried compounds, and other kitchen furnaces and the inside surface provides much more traditional or country feeling.
- Ceiling Paneling
Decoration with beadboard is also seen quite often in living rooms, dining halls or, here and there, sleeping areas in houses. This sort of paneling is ideal for locales with a bungalow or camp kind of decoration.
- Cabinet and Furniture Enhancements
Beadboard is also commonly used in cabinetry and designed as cabinet door fronts, especially in kitchens and some other bathrooms. This is also common in purpose-built furniture such as that which has vertical surfaces, like headboards, chests, or body, and hanging shelves that need to be sleek.
- Mudrooms and Entryways
Due to its weight and no fear of it easily staining or getting ruined, this panel is perfect for use in areas that are stepped on on a regular basis for example, mudrooms and entrances, Beadboard can be installed to cover the entire wall or a section of the wall to the top to cover all the dirt that builds up.
- Closet and Pantry Interiors
Closets and pantry interiors are well-crafted using beadboards, which enhances the elegance of the space while not interfering with the lived-in aspect of the available space.
- Exterior Applications
Due to their exterior finishes, they can be installed on porches, which easily accommodate moisture, or even on smaller ceilings like soffits. Their pulverization rate is low and is one of the main reasons for the outside usage.
- Accent Walls
As part of wall design in the living room, dining room or bedroom, beadboard draws the attention of the sight due to its 3D effect.
Types of Glue for Beadboard Installation
When setting up beadboard planks, it is important to choose the right type of adhesive for effective bonding. Here are some common glues, which can be recommended in this case:
- Construction Adhesive
It is the optimum solution for the beadboard mounting system. It is capable of forming a strong joinder and fits well even to drywall, plaster, or wood. Using it is also easy ,as it is easy to fit in a cartridge gun.
- Panel Adhesive
Designed especially for gluing wall panels, this adhesive is based on the principle of containing excellent adhesion within the bonded area, reducing the effect of warping and any eventual detachment. It happens that it functions well in sensitive application areas( like on a vertical plane).
- Liquid Nails
Liquid Nails is a well-known name in construction adhesives; some of their products are ideal for use on paneling. They come reinforced with high moisture resistance characteristics to prevent holding failure.
When using a commercial adhesive, the purpose of use should be read before usage, and the bonded surfaces must be cleaned very well, ensured to be dry, and no foreign particles must be present before the bond is effected. Alternatively, other methods can be applied in connection with screws or nails to offer more security in case the adhesive breaks.
Construction Adhesives: Features and Benefits
- Superior Strength and Versatility
Construction adhesives are very different; they have adhesive strength, which allows bonding, for example, wood, metals, concrete, the tosfen in ceramics, and drywall. Safety is guaranteed based on the tensile strength of high levels of adhesives, which can sometimes go above 450 PSI, and it is this strength that makes them ideal for both indoor and outdoor applications, for example.
- Durability in Challenging Conditions
While numerous adhesives are specifically designed so much so that they are resistant to things like water, varying temperatures and other such climatic conditions; leading to various strengths in the adhesives. For example, rather than exospheric polyurethane adhesives, which have been designed for mostly the outdoor environment yet are capable of withstanding extended periods of water exposure, these provide excellent adhesion and are ideal for use in wet areas and exterior applications.
- Fast Curing Time
Modern Technology Adhesives are adhesives allowing for quick drying, where the materials are able to attach tight in as little as 15 minutes in some cases and in 24 hours are fully set, using a lot of energy and causing faster completion of construction projects.
- Gap-Filling Capabilities
A significant advantage of both of these adhesives is that they cover up gaps between floured, uneven surfaces where an effective connection is achieved even after surfaces and grooves do not overlay each other with matching precision. Being able to span a 3/8″ gap is important when integrity in the built structure is of the essence.
- Ease of Application
Many adhesive products used in the construction sector come in convenient packages such as cartridges and squeeze tubes for precision-based applications. The majority of these products will be low in smell and VOC-free for indoor applications, ensuring health safety is not compromised when using such products.
Best Glue Options for Beadboard Paneling
- Heavy-Duty Construction Adhesive
There also exist strong adhesives that one can classify as high-performance adhesives, as their constituents are based on polyurethane or hybrid polymers that are well designed for beadboard paneling. The said adhesives provide high levels of bond strength and can also resolve slight intaglios on the adhering surfaces. Many of the recent products are made water-resistant and can therefore be used both internally and externally, making them useful in many conditions.
- Water-Based Adhesives with High Tack
Special water-based formula adhesives are usually the number one go-to adhesives, especially for bead board applications, since they are specifically meant for paneling. These provide a high initial grab, which in turn makes the setting up of the panels less time-consuming and minimizes the use of other fixings, such as screwing. For indoor applications, especially with minimal aeration, the use of adhesives with low odor and VOC rank becomes pertinent.
- Silane-Modified Polymer Adhesives (SMP)
Silane-modified polymer-based glue is becoming known as the next big thing in adhesives thanks to the development of these glues. They adhere well when it comes to temperature changes and surfaces that are susceptible to movements, such as those used in beadboard in regions of varying temperatures. For instance, these adhesives do not expand whenever they cure, retaining the purity of the joint as created.
- Hot Melt Adhesives
Preparing for Beadboard Installation
- Gather Necessary Tools and Materials
All tools, lingerie, folds, saw, adhesive, nails, and air pistol have been made ready for use. Cut the beadboards as well as any trim or doll-up that will be needed.
- Measure and Plan
Look around you and measure the walls where the beadboard will face. Draw the desired length and beat up a waste-reducing configuration in order to damp it effectively all around.
- Prepare the Surface
The wall must be cleaned and the roughness removed to make the glue bind better. Use a compound to fill in the openings and let the filler dry before starting the process.
- Cut Panels to Size
This requires cutting every piece to fit the pattern made for the very size of those pieces, and however important the fitting is, it must be known that there are no jagged lines left.
- Acclimate the Materials
Allow the use of beadboard panels in the room where they will be built for approximately 24 hours so that they adjust to the room’s humidity and temperature changes. This is to prevent any warping or shrinking when the wall is put up.
Surface Preparation Techniques
Moreover, in improving beadboard panel installation, correct surface preparation is also very important. Begin this by examining the styles for different features, especially the differences, cracks, or even the thickness. Adjust such unevenness by use of a level or any other adequate standard. Apply this technique because deviating even by a slight degree might be the difference between good and comprehensive fitting. Sandbags to make them level more often than not. This is the best way to deal with such problems. Sanding down or filling up of any uneven surfaces is the solution. Irregular surface structures, however, can take up quite some time. One proven means of fastening the process includes using an air dry, some sandable filler, and a good primer to make the surfaces smooth in no time.
First and foremost, ensure that the surface is clean and free from dirt and other contaminants. The flat surface can be wiped with a water-soaked, clean, white, finalised cloth to remove leftover dust, dirt, or oil. Where dirt remains ingrained, one can use a mild detergent cleaning water, such as dishwashing detergent, although this has to be applied lightly to avoid any problems arising from bonding. If high temperatures are in the area undergoing construction, ensure that the moisture content of the floor is acceptable and falls within specified levels to avoid any future destruction. An indicator of the level of water in the floor, which is highly recommended as a norm, is to have a moisture meter that is moisture sensitive. It is worth mentioning since this ensures proper surface preparation and elevates the fulfillment of aesthetically pleasing, durable beadboard walls.
Tools and Materials Needed
- Measuring Tools: To make sure straight dimensions are attained and the beadboard is set up with the exact positioning, two important tools that are indispensable are a good tape measure that measures the length and width and a straight edge. At the same time, it is necessary to have a level as it helps in ensuring the placement is as straight as possible during the assembly.
- Cutting Tools: To cut the panels to size, use a circular saw or a table saw. Although a blade of a jigsaw may be brought into good use for fine cuts or adjustments around such openings and corners. However, make sure that the saw blades are sharp enough to keep the knife edges free from fuzz.
- Fasteners: When putting the panels on the wall, use nails or nail gun—pneumatic; the latter is preferable and has to be loaded with brad nails. In case wood glue has to be used, the adhesive has to be well-suited to the project. Make sure it is an interior/exterior wood adhesive with very high bond strength and waterproof properties whenever such adhesives are recommended.
- Primer and Paint: Begin by using a good primer for bare wood MDF surfaces and utilize latex or oil-based paint if necessary. Those ensuring all other factors are controlled, the use of paint which is anti-mold and can withstand very humid conditions is quite appropriate.
- Caulk and Sealant: Filling any dust and sealing any form of joint or gap to allow exhalation of your sealant is possible using caulk. Make sure the beadboards or the color are compatible, and chemically, the ribbing is suitable for both.
- Moisture Meter: Using a professional-grade moisture meter on the flats and panels before you get it in place further reduces the chances of encountering any risks, such as dimension distortion or adhesive underperformance.
- Protective Equipment: Wearing safety eyewear, ear protection, and a dust mask while cutting and sanding is good practice to reduce exposure of the ears and lungs to noise and sawdust.
Measuring and Cutting Beadboard Panels
Precise measurement, correct cutting techniques, and systems, among others, are several of the key methods that assist in ensuring proper installation of beadboard and that there is a neat finish. Measure the length and height of the wall partition where the beadboard will be used, taking into account any dimensions affected by elements such as sockets and/or molding. Such measurements need to be taken at more than one point, as any variations in the walls can affect the fitting. It’s advisable to hash or use wallboard tape for the measurements in order to be done within some minimum limits, and for the part of the beadboard panel, use a pencil.
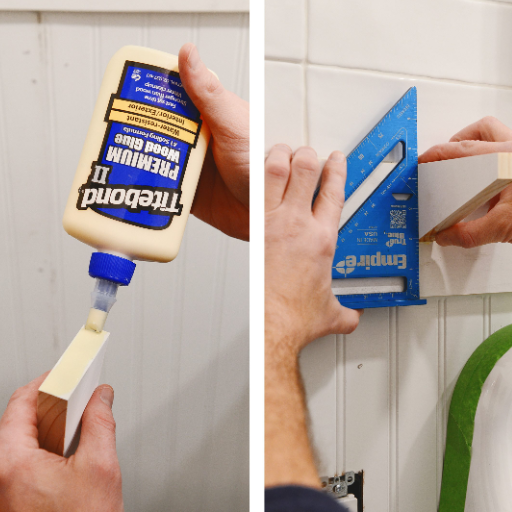
Application Techniques for Beadboard Glue
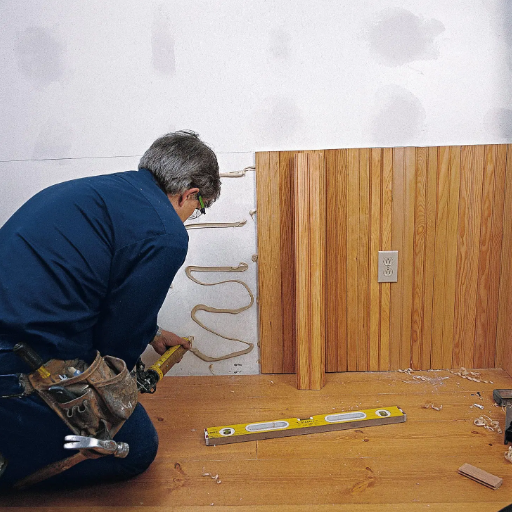
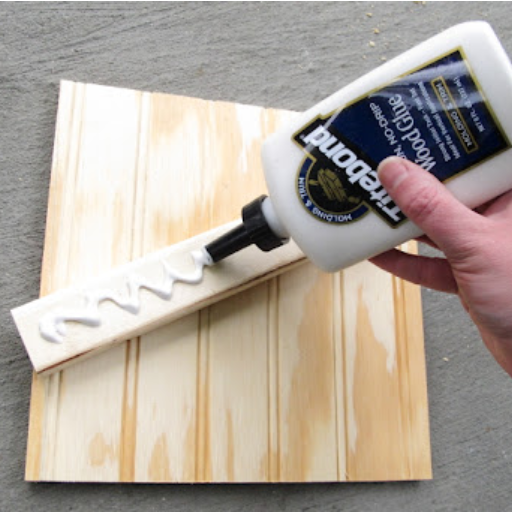
The most appropriate way to apply bead board is to ensure that all surfaces are dry and clean and that no unwanted materials are on it. Apply the glue by pressing more emphasis on the back side of each bead board panel, doing it completely as well as adding lines at angles. After placing and bonding the beadboard on the surface, do not remove your hand from there immediately. In order to minimize any reworking, adhere to the manufacturer’s recommended cure drying method and opt to use complementary materials such as finishing nails or brace nails, depending on the bond between the panels. These additional fasteners contribute greatly to the stability of the joint and prevent any unwarranted displacements while the materials are drying.
Proper Adhesive Spreading Techniques
The skill of applying adhesive also plays a key role in developing a strong bond between two surfaces, especially in applications involving heavy or textured materials. Each application may let you prefer one-component adhesive over others based on several parameters like adhesive materials, bond strength, the rate of unit bonding, etc. For even adhesive coverage, apply the adhesive directly using a notched trowel or applicator that suits the viscosity of the adhesive. Apply the adhesive uniformly, in patterns or consistent rows, there may not be any gaps or air pockets that will compromise the bonding. When large surfaces are treated, painting in fragments is safer as the adhesive may cure before the material is set correctly. Some regions may require a test page prior to loading adhesive to discover the right technique and issues of the standards.
Alignment Tips for Seamless Installation
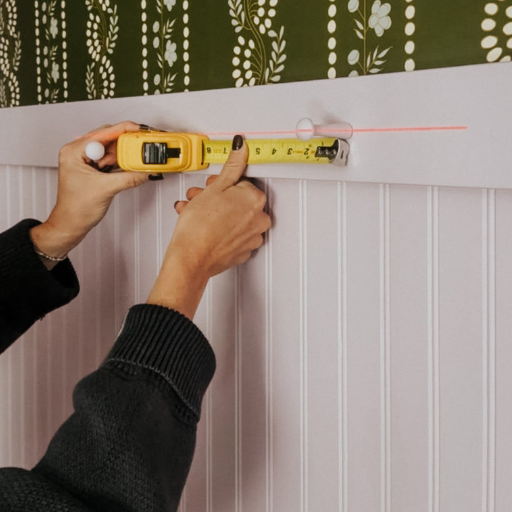
- Measure and Mark Reference Lines
- For the obtained orderliness or surface levels, a laser level or chalk line can be sought, ensuring that the lengths are consistent.
- Data: Tolerances for alignment typically should not exceed ±1/32 inch (0.8mm) per linear foot in standard applications.
- Assess Surface Flatness
- Check and confirm the flatness of the surface with a straight edge and its allowable deviations. Uplifts on surfaces can distort alignment during the alignment process, leading to interfitting materials having gaps.
- Data: Industry guidelines suggest a maximum deviation of 1/8 inch (3.2mm) over a 10-foot span for most substrates.
- Dry-Fit Materials Before Application
- Place the pieces in the proposed positions without securing them and observe the fit, the orientation, and alignment. To avoid errors or misalignment during installation, make any necessary adjustments.
- Tip: Pay more attention to the previous floors that have customized walls.
- Ensure Proper Spacing
- Ensure that there are the required gaps, as specified by the manufacturers, between the building materials. This stops the materials from bending or warping and allows for their expansion without interference.
- Data Example: Wood flooring typically requires 1/4 inch (6.35mm) spacing along room perimeters for expansion.
- Clamp or Use Alignment Tools
- It is also advisable to use other devices such as clamps, spacers, or support devices while installing structures to ensure that they are well-positioned.
- Note: For larger projects, particular alignment aids such as track or template systems may enhance the accuracy of the work.
- Double-Check Angles and Intersections
- When verifying the corners of the building, the square or the angle locator will help to ensure that the corners and junctions of the wall and the other parts have been pitched at the correct angle e.g. 90 degrees.
- Data Reference: In more visible constructions, the corners not matching at angles above or below ±0.5 degrees become noticeable.
- Continual Adjustments During Application
- It is required from time to time, rather than continuing work, to trace back so that work in the working area may be viewed from a different angle, and to detect deviations of Fomas from Brumal criteria early on the basis of some changes, and then work again.
Product Recommendations and Comparisons
When selecting products for precise installations requiring angular accuracy and strong adhesion, the following options are highly recommended based on performance and user feedback:
- PrecisionPro Adhesive Tape
- Key Features: High grab adhesion, 0.2 degrees of angular precision, great durability under extreme conditions of visibility.
- Best Use Case: Appropriate for usage where exact geometrical accuracy and no visible seams are important, for instance, placing decorations and signs.
- ExactAlign Adhesive Gel
- Key Features: It can be used within 30 minutes, has adhesion in place after curing, and may be applied to metal, glass, or wood.
- Best Use Case: Applicable in creating assemblies made of a range of materials, which can be adjusted prior to hardening of the adhesive.
- AlignLock Corner Clips
- Key Features: It is able to firmly anchor the devices to make them stay in place while the 90-degree joint is constructed, hence it can be used repeatedly, and it works well with adhesives too.
- Best Use Case: Constructing a changeless or semipermanently pinned structure and wanting to make sure the corners of the structure are strong enough before finally anchoring it.
Top Adhesive Brands for Beadboard Installation
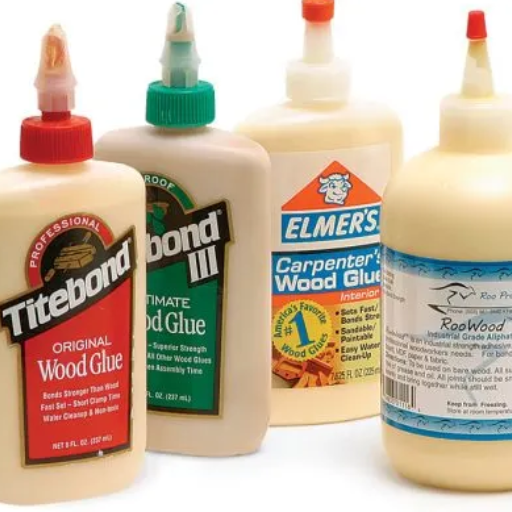
Ensuring that the paint is adequately affixed to the surface that has been chosen for its application calls for the application of the correct adhesive. So, below are some examples of the brands of the adhesives whose effectiveness in fixing the beadboard is undisputed:
- Liquid Nails® Heavy Duty Construction Adhesive: This is the brand of a very strong adhesive, and it works with many kinds of materials, for example, on wood, on sheetrock and on panels. Additionally, the surprising fact about Liquid Nails is that even when in a high-stress situation, the adhesive does not shrink and consequently it does not adhere, unlike in many instances, and this effective application ease makes it a favorite to many professionals.
- Loctite® Power Grab Express Construction Adhesive: This adhesive can easily be applied without using nailing or clamping during installation as it has zero-second instant grab technology. It is more common for use in the walls, ensuring the beadboard materials are installed horizontally without moving towards the end of drying.
- Gorilla Heavy Duty Construction Adhesive: This is implemented with an all-weather adhesive activated component that is waterproof in all directions, which makes it an excellent ally in all construction undertakings of beadboard, be it on the inside or the outside of the structure. And that is one of the things that is so good about it, being that it can function even in environments with high humidity.
- DAP® Dynagrip Heavy Duty Max: Specifically meant for tough construction tasks, this paste dries quickly and is the shortest product of the other adhesive brands. It works on any kind of surface because of its quick bonding properties and is also applied in fixing beadboard on porous or curved surfaces in a cost-efficient and effective manner.
Side-by-Side Comparisons of Popular Products
|
Product |
Adhesive Strength |
Ease of Application |
Drying Time |
Compatibility |
Price Range |
Unique Features |
|---|---|---|---|---|---|---|
|
Liquid Nails Fuze*It |
Strong, fast bond |
Easy to apply |
24 hours |
Works on various materials |
$$ – Moderate |
Waterproof and versatile |
|
Gorilla Heavy Duty |
High durability bond |
Simple tube application |
30 minutes |
Works on wood, tile, and metal |
$$$ – Higher range |
Bonds porous and non-porous surfaces |
|
Loctite Power Grab |
Instant, strong initial hold |
Precise nozzle |
Instant grab |
Beadboards and moldings |
$$ – Moderate |
Reduces need for bracing |
|
Titebond Ultimate |
Moderate bonding power |
User-friendly splash-free |
2 hours |
Wood, plastic, and beadboards |
$ – Budget-friendly |
Non-toxic and cleans up with water |
|
DAP Dynagrip Max |
Premium adhesive strength |
Easy dispensing tube |
24 hours |
Wide material compatibility |
$$ – Moderate |
Designed for high-stress applications |
Reference Sources
-
How to Install a Beadboard: A Vintage Feel You Can Be Proud Of
- Summary: This guide provides a step-by-step process for installing beadboard. It emphasizes cleaning and drying the walls and beadboard before applying adhesive in a zigzag pattern. The beadboard is then pressed firmly into place. The article highlights the importance of proper preparation and adhesive application for a secure and lasting installation.
-
Installing Beadboard: A Step-by-Step Guide
- Summary: This guide discusses using wood glue or construction adhesive for beadboard installation. It suggests applying glue to lap-joint seams and the back of the beadboard panel. The article also advises against overusing glue and provides tips for achieving a clean and professional finish.
-
Beadboard: Instant Character on a Budget
- Summary: This tutorial focuses on preparing walls for beadboard installation, including removing baseboards, switch plates, and outlet covers. It also discusses the importance of wall preparation, such as removing textures, to ensure the beadboard adheres properly.
Frequently Asked Questions (FAQs)
Q: How to install beadboard paneling effectively?
A: To install beadboard paneling effectively, start by selecting the right adhesive for the job. Construction adhesive is often recommended for secure attachment, especially on ceilings and walls. Before you begin, ensure the surface is clean and dry, and consider using a level to make sure your installation is plumb. Apply the glue uniformly on the back of the beadboard panels, and press them firmly against the wall. For added stability, you may want to nail the panels into place, especially around the edges. After installation, consider painting the beadboard for a finished look, as many adhesives are paintable.
Q: What type of glue is best for wainscoting installation?
A: The best type of glue for wainscoting installation is typically a strong construction adhesive that can handle various conditions. When applying glue wainscoting, ensure that the adhesive is compatible with the materials you are using, such as MDF or solid wood. It’s crucial to use a glue that provides a strong bond but also allows for some flexibility to accommodate any movement in the wood. Apply the adhesive generously on the back of each panel and press it against the wall for a few seconds to ensure a good grip. For a more secure installation, consider also using nails to attach the wainscoting to the studs behind the drywall. This combination of glue and nails will provide a long-lasting and durable finish to your DIY projects.
Q: Can I use beadboard glue for DIY projects in the bathroom?
A: Yes, you can use beadboard glue for DIY projects in the bathroom, but it’s essential to choose a moisture-resistant adhesive. Bathrooms can be humid environments, so using a waterproof construction adhesive will ensure that your beadboard panels remain securely attached over time. When installing beadboard in a bathroom, consider using faux beadboard or paintable options that can withstand moisture. It’s also wise to install a chair rail or baseboard to protect the lower sections of beadboard from splashes. Make sure to follow a step-by-step installation guide to achieve the best results, and always allow sufficient drying time for the adhesive before exposing it to moisture.
Q: How do I know how much beadboard I need for my project?
A: To determine how much beadboard you need for your project, start by measuring the area where you plan to install the panels. Calculate the total square footage by multiplying the width by the height of the walls or ceilings you intend to cover. Be sure to account for any electrical outlets or windows that will not be covered by beadboard. Once you have the total square footage, you can divide it by the square footage of a single beadboard panel to find out how many panels you will need. It’s always a good idea to buy a little extra to account for mistakes or future repairs, so consider ordering an additional panel or two. Remember to check the product specifications for each panel to ensure accurate measurements.
Q: What is the step-by-step installation process for beadboard?
A: The step-by-step installation process for beadboard involves several key stages. First, gather your materials, including beadboard panels, adhesive, nails, and any necessary tools. Begin by preparing the surface where you will install the beadboard, ensuring it is clean and plumb. Next, cut your beadboard panels to the desired size if necessary. Apply the beadboard glue to the back of each panel, then press it firmly against the wall. Secure it further with nails, especially at the edges and seams. Finally, finish your installation with any trim work, such as baseboards or chair rails, to give a polished look. Allow the adhesive to cure according to the manufacturer’s instructions before painting or adding décor.


