


Your choice of adhesive has a greater impact on your project’s durability than you might think. It does not matter if you are going for a DIY fix or a large construction project, you always need to choose the glue best suited for the task. This article will provide you with all the required information that guarantees a professional concrete block finishing by tackling bond strength, glue application, environmental conditions, and much more. You will make an informed decision by mastering all concepts so expect reliable results.
What Is the Best Adhesive for Concrete Blocks?
All-purpose adhesives exist, but their efficiency varies from task to task. For concrete block projects, polyurethane based adhesives are of far greater value in comparison to others. These all purpose adhesives bond strongly and are durable. They hold concrete blocks well for both indoors and outdoor projects. Construction grade adhesives from the brands we previously mentioned work well for all projects and allow moisture, heavy loads, heat, and temperature fluctuations. Always remember to guarantee a cleaner and dry surface for stronger adhesion and never skip on manufacturer advice to ensure the strongest effect.
Comparing Premium Block Adhesive Options
|
Adhesive Type |
Key Features |
Ideal Applications |
Limitations |
|---|---|---|---|
|
Polyurethane Adhesive |
Strong, flexible bond |
Structural and load-bearing |
Not UV-resistant |
|
Epoxy Adhesive |
High durability, chemical-resistant |
Construction, marine use |
Long curing time |
|
Construction Adhesive |
Multipurpose, high strength |
Wood, drywalls, concrete |
Not for high-temperature areas |
|
Acrylic-Based Adhesive |
UV stable, weather-resistant |
Outdoor projects, signage |
Limited flexibility |
|
Cementitious Adhesive |
Water-based, rigid bond |
Masonry, ceramic tiling |
Cracks under extreme stress |
|
Modified Polymer Adhesive |
Fast curing, versatile |
Heavy-duty applications |
Higher cost |
|
Silicone Adhesive |
Waterproof, heat-resistant |
Glass, sealing joints |
Lacks structural strength |
|
Hybrid Polyurethane Adhesive |
Combines strength, durability |
Advanced construction tasks |
Limited availability |
|
Hot Melt Adhesive |
Heat-activated, quick setting |
Packaging, furniture |
Weak under high temperatures |
|
Elastomeric Adhesive |
High flexibility, vibration damping |
Roofing, expansion joints |
Requires specific primers |
Why Choose Masonry Adhesive Over Regular Glue?
When it comes to bonding bricks, stones, or concrete, masonry adhesive works far better than regular glue. Regular glue won’t cut it in the adhesion department since it does not have the strength structural integrity to hold up heavy materials. On the other hand, masonry glue can take the harshest of conditions including extreme thermal expansion, varying moisture, or even weather.
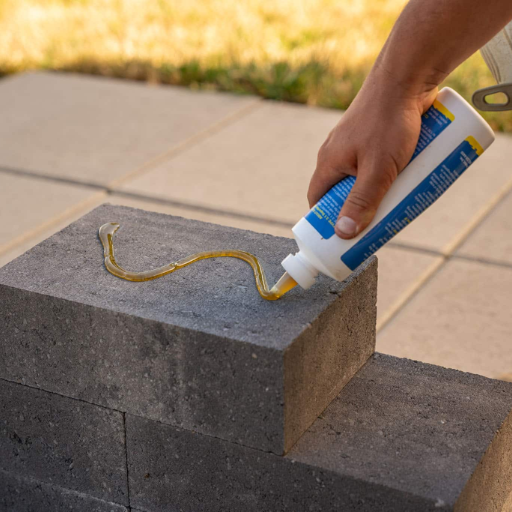
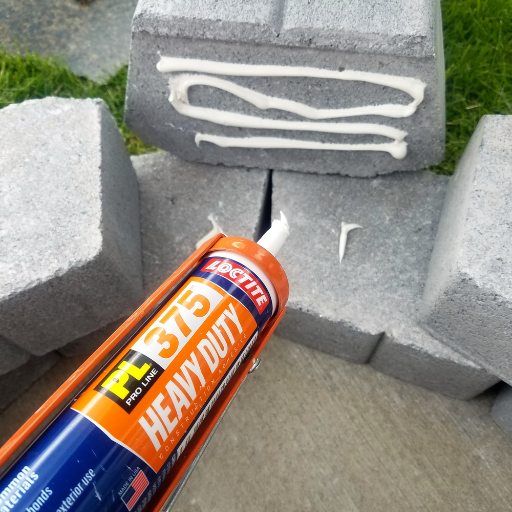
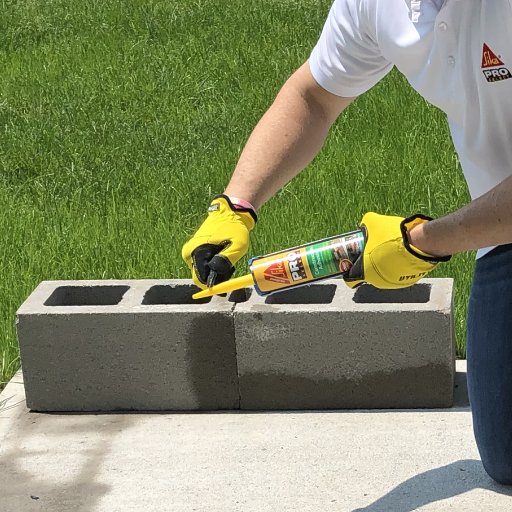
How to Apply Construction Adhesive to Concrete Blocks?

- Prepare the Surface
Make sure the concrete blocks are clean and dry, free of dust or loose materials. Surfaces should be wiped with cloth and brushes.
- Apply the Adhesive
Apply construction adhesive using a caulking gun. Adhesive should be applied in a continuous bead either along the perimeter or in the center where the blocks are going to touch.
- Join the Blocks
Make sure to hold the concrete blocks firmly together. They must be positioned correctly prior to the adhesive setting in order to achieve a steadfast connection.
- Allow Time to Cure
Stick to the recommended curing time given by the manufacturer for the adhesive. For best results, do not put any stress on the joint until the adhesive has set completely.
Completing these steps will allow you to bond your concrete blocks professionally, and make it durable at the same time.
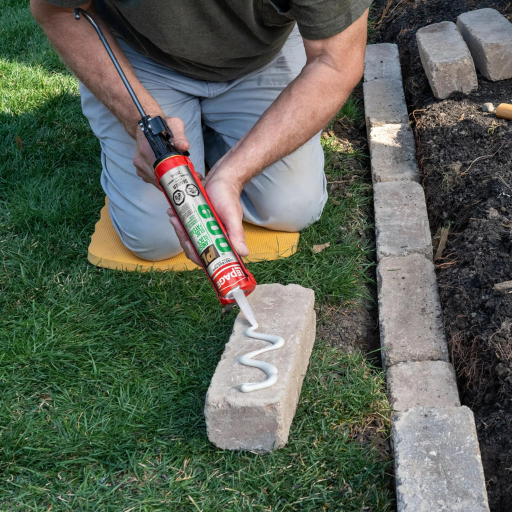
Tips for Using a Caulk Gun Efficiently
- Choose the Right Type of Caulk
Choosing the right silicone for your project is very crucial. For areas that experience moisture, a silicone based caulk would work best, whereas, an indoor, dry area would require affixed with acrylic caulk. Be sure that both surfaces are compatible.
- Prepare the Surface Properly
Wash the surface systematically to eliminate dust, oil, litter, etc. Adhering to a clean surface eliminates bond contamination. Use alcohol or other suitable cleaners for optimal results.
- Cut the Nozzle at an Angle
Adjust the opening of the nozzle with a utility knife to a 45-degree angle. Make the width of the opening less than the width of the bead you intend to apply. This angle will ensure precise application of caulk.
- Puncture the Inner Foil Seal
Once the nozzle is cut, use the puncture tool on most caulk guns or a sturdy nail to pierce the inner foil seal of the caulk tube to enable smooth flow during application.
- Load the Caulk Tube Properly
Lock the caulk tube firmly in the gun. Make sure the plunger is engaged. Always follow the caulk gun’s specific loading guidelines to avoid misalignment or damage to the device or caulk .
If these tips are followed, using the caulk gun would be very easy, while also guaranteeing accurate and professional results.
Common Mistakes to Avoid During Application
- Applying Too Much Caulk
Oversimplification is a common mistake that often leads to unnecessary scrubbing, abandoning work, and biased finishes. To achieve the right finish for the joint or seam, apply even pressure throughout when using the caulk gun and the trigger.
- Skipping Surface Preparation
Cancelling the cleaning and drying the surface to be worked on leads to poor adhesion and premature failure. Always scrub and get rid of dirt, dust, grease or old caulk prior to starting to ensure the best possible bonding.
- Ignoring Temperature and Humidity Conditions
The different types of caulk have different curing requirements. Extreme hot and humid temperatures will inhibit flexibility and curing enzymes, leading to cracks and defective seals being formed.
- Cutting the Nozzle Incorrectly
Cutting the nozzle opening too large will result in unmanageable bead widths. Starting with small cuts and tuning the sizing increases precision and control.
Paying attention to detail not only improves the reliability and functionality of your caulking applications but focusing on proper technique also ensures perfection in both professional and diy projects. Following the right procedures and best practices will definitely enhance the work.
What Are the Benefits of Using Landscape Block Adhesive?
Adhesive landscape blocks provide numerous benefits landscape and construction works, like:
- Exceptional Adhesion: It Provides a lasting bond between blocks, offering bond durability, reliability, as well as resistance against movement shifts throughout the years.
- Simple Application: Adhesive offers a quick application that is not as laborious as mortar, hence saves time on overall installation.
- Temperature Resilient: Unlike cement based adhesives, landscape adhesives dry during heat, withstands rain, and also freezing weather conditions, making them effective without losing any efficiency.
- Flexibility of Use: It can be used together with concrete, stone, and brick, making them flexible around numerous landscaping jobs.
- Reduced Cleanup: Compared to traditional methods, less adhesive cleanup leads to less clutter thus lowering workload for laborers.
With all the above salient features, professional finishes with durability alongside neat results makes these adhesives exemplary.
Enhancing Durability in Outdoor Projects
Durability is a key consideration for outdoor projects that encounter weather changes, rain and even physical impact. To withstand maximum impacts, project construction requires high-grade materials and sophisticated technology. As an example, recent innovations with polymer-based adhesives have considerably strengthened the connections used for landscaping. Such adhesives provide a protective coating against water, ultraviolet radiation, and even heat expansion. Thus, ensuring that outdoor structures remain stable and appealing even after many years.
In addition, proper surface preparation from the user’s end is essential concerning readiness of the surface. Ensuring surfaces are clean, dry, and without any form of obstruction before application leads to better bonding and elimination of weak spots. Studies further confirm that incorporating moisture barriers and sealants as part of the design enhances protection from environmental degradation while further reducing the need for maintenance. By combining new specially designed materials and perfectionist manual installation techniques, outdoor features can withstand the harshest conditions while ensuring peak performance each season for years to come.
Comparative Analysis with Traditional Mortar
The historical use of mortar in construction is common due to its relative availability and affordability. However, it often lags when compared to modern alternatives. For instance, traditional mortar is susceptible to cracking because of thermal expansion and contraction. This is especially true in regions with significant temperature fluctuations. Structures composed solely of mortar are considerably weaker when exposed to environmental stressors in comparison to those relying on poly-adhesive or modern sealant technology.
Additionally, the compressive strength of traditional mortar between 2,500 to 5,000 psi is relatively weak in comparison to modern alternatives which have over 10,000 psi. Coupled with this, traditional mortar weakens with time due to microfractures caused by repeated mechanical and environmental pressures. This is however not the case for polymer-modified alternatives which have an increased durability, compressive strength, and flexibility to absorb stress.
Just like other traditional methods, it cannot efficiently manage moisture ingress. A permeable pore structure tends to allow for easy access for water, which can cause issues such as efflorescence, mold, and freeze-thaw damage in colder climates. Hydrophobic admixture and barrier technologies present in modern materials defend from water, usable barriers that can automatically shut off after construction.
How Long Does Concrete Adhesive Take to Dry?
Drying time for adhesive applications like concrete sets between 24 and 48 hours, though fast-setting options are available that work for light-duty applications in 1 to 2 hours. Full curing, especially for heavy-duty use, takes longer as it ensures the strongest bond. Always check the manufacturer’s instructions because not all products are made the same.
Factors Affecting Drying Time
- Type of Adhesive Used
Adhesives’ chemical composition cores will determine their drying time. For example, polyurethane usually cures faster than epoxy adhesive, but epoxy holds up better in terms of strength and durability. They aim to create a balance between drying speed and performance for adhesives suited for different applications.
- Ambient Temperature
Low temperatures can prove problematic for drying times, often doubling what is typically expected to be over severely slowing the process. Conversely, higher temperatures tend to improve dry times due to an increase in chemical reaction rate within the adhesive components. Optimal temperature conditions are usually set by manufacturers between 50°F to 90°F.
- Humidity Levels
Evaporation of solvents or water from the adhesive is directly linked to humidity. Low-humidity levels mean faster drying whereas high humidity slows the process down. Foam and water-based adhesives suffer the most from high humidity. Some moisture bond curable adhesives like certain polyurethanes perform best during moderate humidity regions.
- Surface Porosity
Some surfaces such as untreated porous concrete absorb part of the adhesive, outfitting less moisture and increasing drying. Non porous clad concrete or polished metal surfaces do not absorb adhesives which may extend curing times as the adhesive must rely on evaporation or chemical bonding entirely.
Best Practices for Ensuring Proper Curing
- Control of Environmental Conditions
Optimal temperature and humidity shall be maintained for effective curing. Adhesive bond strength often improves (within limits) at temperatures between 60°F and 80°F, and with 40-60% RH. These parameters are usually dictated by the manufacturers. Exceeding or going below these values may increase or reduce the curing time which may affect the final bond strength.
- Preparation of Substrates
Not maintaining the surfaces to be clean, dry, and clear of dust, grease, or oil is damaging. Surface preparation includes these systematically depending on the substrate and the type of adhesive being used. Proper preparation increases adhesion and reduces failure risks during and post-cure.
- Regulation of Adhesive Application
Even and uniform application of the adhesive is critical to achieving uniform curing. Apply the adhesive within the optimal minimum and maximum thinness range to avoid incomplete curing or excessive drying time. Overapplication may entrap moisture while underapplication may lead to weak surface adhesion.
- Use of Curing Accelerators or Primers
To solve these problems, manufacturers often recommend primers or curing accelerators. These products enhance the bonding processes by improving surface compatibility and reducing the time required for curing while maintaining effectiveness.
The steps above best adhere to improve the reliability and efficiency of the adhesive system and the outcomes structurally or functionally. Perfecting the details that affect curing and taking action on them will improve the effectiveness of the system greatly.
Can You Use Liquid Nails for Concrete Blocks?
Yes, Liquid Nails can be used on concrete blocks, considering the type of product used and the certain requirements of the project at hand. Many products are tailored for Liquid Nails for effective adhesion to concrete or porous material. When considering Liquid Nails for concrete blocks, it is imperative to use construction grade adhesives meant for tough construction or heavy dry work. Moreover, all surfaces to be bonded must be clean, dry, and free of dust to ensure maximum effectiveness which yields the best results thus adherence. The best results are also always obtained when following the instructions of the manufacturer.
Understanding the Bond Strength of Liquid Nails
As noted with Liquid Nails and other products, there are critical bond factors such as the material to be adhered to the surface, the surrounding environment, and the makeup of the adhesive used which affect the bond strength. For instance, construction formulated strong adhesive for heavy-duty construction or masonry work give increased bond tensile strength and durability. This type of Liquid Nails is appropriate for wood, treated metal, and even concrete.
Another example of factors affecting performance and curing time is temperature and humidity. Liquid Nails recommend an application range of 40°F to 100°F, meaning both these factors will drastically affect the appointment of bond strength. For best results, surfaces must be dry and primer free as well as clear of grease or any other dirt as these greatly reduce adhesion.
Some industrial-grade variants of Liquid Nails, according to the manufacturer, has a shear strength of over 400 psi. This means that it can support substantial loads over time. When applied properly, Liquid Nails adhesives can endure environmental conditions for decades while maintaining bond strength.
Application Techniques for Liquid Nails on Concrete
To achieve optimal performance and warranty Liquid Nails on concrete for a long time, proper steps for application need to be followed. The first step is cleaning off the concrete surface thoroughly. Removing dust, grease, and loose particles goes a long way. This is critical because contaminants can create weak points in the adhesive bond. Textured and porous surfaces can be prepped with a wire brush or pressure washer for better adhesion.
After surface preparation, use a caulking gun for application. Ensure that surface is fully dried and correct Liquid Nails product is chosen. Recommended application is uniform, continuous beads every 6 inches or in “S” for wider areas. Avoid excessive application as it would slow down curing time and lead to uneven bonding.
Ensure that surfaces are joined within the recommended working time of 10 to 20 minutes for a complete bond and contact. For vertical or heavier applications, temporary supports may be need to hold the joint until the adhesive sets. Liquid nails industrial grades achieve full cure within 24 to 48 hours with variation depending on humidity and temperature.
For best results, industrial guidelines for any specific product should always be followed. Outdoor factors like temperature (best between 40°F and 90°F) and moisture greatly influence curing time and strength of the bond. Following these application methods, anchors can be designed to provide a permanent bond, which is very strong and can stand up to a wide range of demanding uses including heavy structural and decorative concrete elements.
Reference Sources
-
Autoclaved Aerated Concrete (AAC) Shear and Tensile Bond Strengths: This study evaluated the bond strength of AAC blocks using polymer-modified mortar (PMM) and cement-sand mortar. PMM showed the highest tensile bond strength (0.22 MPa), while a 1:5 cement-sand mortar with 17mm thickness had the best shear bond strength (0.15 MPa).
-
Air Entraining/Plasticizing Admixtures in Cement-Lime Masonry Mortars: The study explored the effects of air-entraining/plasticizing admixtures on cement-lime mortars. Liquid admixtures were found to be more effective than powdered ones in improving air content and workability.
Frequently Asked Questions (FAQs)
Q: What is the best adhesive for concrete blocks when building a wall?
A: The best adhesive for concrete blocks when building a wall is often Loctite PL 500. This construction glue is specifically designed for retaining walls and provides strong adhesion for cinderblocks and other masonry materials.
Q: Can I use regular construction glue for paver blocks?
A: While regular construction glue can be used, it is recommended to use a specialized adhesive like Loctite PL 500 landscape block adhesive for paver blocks. This ensures better adhesion and durability for outdoor landscaping projects.
Q: How do I apply adhesive to cement blocks?
A: To apply adhesive to cement blocks, you can use a cartridge for a caulking gun. Squeeze the glue out to create a desired bead size along the surface of the block where you want to adhere. For more precision, a trowel can be used to spread the adhesive evenly.
Q: Is Loctite PL 500 resistant to outdoor conditions?
A: Yes, Loctite PL 500 is designed to be resistant to outdoor conditions, making it suitable for retaining walls and other outdoor landscaping applications. It helps the blocks retain their position against various weather elements.
Q: Can I use foam filler as an adhesive for concrete blocks?
A: Foam filler is not recommended as a primary adhesive for concrete blocks. It may not provide the necessary adhesion required for structural integrity, especially in retaining walls. It’s best to use specific construction adhesives like Loctite for this purpose.
Q: What should I do if there are cracks in the concrete blocks before applying adhesive?
A: If there are cracks in the concrete blocks, it is advisable to use an acrylic filler to seal these gaps before applying adhesive. This will ensure a smoother surface for better adhesion and longevity of the bond.
Q: Where can I find Loctite PL 500 landscape block adhesive?
A: Loctite PL 500 landscape block adhesive is readily available at home improvement stores like Home Depot, as well as online retailers. It is a popular choice for DIY landscaping projects.
Q: How do I ensure that the adhesive retains its strength over time?
A: To ensure that the adhesive retains its strength over time, it is essential to prepare the surface properly by cleaning it of dust and debris. Follow the manufacturer’s instructions for application and curing time to achieve optimal adhesion.
Q: Can Loctite PL be used for cinderblock projects?
A: Yes, Loctite PL is suitable for cinderblock projects. It provides excellent adhesion and is ideal for both block walls and other masonry applications requiring a strong bond.
Q: What factors should I consider when choosing a construction glue for my project?
A: When choosing construction glue, consider factors such as the type of materials you are bonding, whether the project is indoors or outdoors, the temperature conditions, and the specific adhesion requirements for the materials involved in your project.


