


The right adhesive, glue, or cement can make all the difference with a woodworking project-therein making it even more choice when working with two unique materials like felt and wood. Combining the two surfaces may seem difficult due to their contradictory texture and density, yet with just the right tools and techniques, you can achieve a very strong and reliable bond. Amongst some decorative contraptions, practically useful items, and a serious appliance for an impressive DIY project, this guide will show you the best glue and adhesive to bond felt onto wood. Read on to learn all the expert advice, product reviews, and step-by-step explanations that will guarantee your project success from start to finish.
Understanding Glue Options for Felt and Wood
1Types of Glue for Felt on Wood Surface
For bonding felt to wood, certain glues do well owing to their properties. A very common such option is of course hot glue; fast and easy to use. It works well on small felt and wood projects, adding little drying time to the overall project. Though, it just might not be good for heavy-duty applications.
Another beautiful option would be craft glue that is made especially for fabric and porous substances such as felt. This glue forms a strong yet flexible adhesive bond, best used when felt has to bend or move without threatening to crack the glue. It may need a longer period to dry than does a hot glue, but it is one hundred percent worth the effort and more reliable over the longer term for decorative or lightweight functional purposes.
For slightly more permanent and heavier projects, contact adhesives and epoxy glues can do the magic. These make strong bonds that hold together felt and wood even when under stress or heavier use. A little extra care has to go into the application and curing stage to have a durable, strong, and resilient bond for more demanding projects. Ensure to have proper ventilation and follow the safety guidelines while working with stronger glue.
2Characteristics of the Best Glue for Felt
Glue for felt should provide a very strong bond that can stand various levels of stresses applied to it, whether for art projects or for more demanding uses. Among the qualities it should possess are versatility, ease of use, and the ability to work with felt as well as with the material it is bonded to. To get rid of any delays and for the glue to be applied neatly, it should also dry quickly.
Additionally, the glue should be flexible so as to maintain the softness felt boasts of. A flexible glue would keep the surface of the bond from stiffening or cracking with time-especially with works that tend to be handled regularly. Water resistance can also apply where an item is likely to be subjected to moisture or humidity.
Lastly, safety and ease of cleanup are important factors when buying glue. Always select adhesives that are low in or non-toxic, and work in a well-ventilated area. In case of a spill or maybe a little too much glue application on a project, easy cleaning lets one continue the work without much interruption, making the whole project of crafting so much enjoyable. Felt crafting becomes so easy and fun with the right glue.
3Non-Toxic Adhesives for Felt Work
Non-toxic adhesives present an ideal way to keep felt projects safe for all members of a family, school, or anyone concerned with health and environmental implications. These glues contain no harmful chemicals and thus may be used by children or adults, while still providing strong bond systems for felt materials.
In selecting a non-toxic adhesive for felt materials, be sure to seek those marked as “non-toxic” and which have been certified by a reputable safety agency. They come in various types depending upon your project-they could be liquid glues, glue sticks, or spray adhesives. For precise application, liquid glues work best, while glue sticks are great for fast bonding without the mess.
With non-toxic glue, safety retires strongly for a crafty conscience. Water is usually good enough for a cleanup against glue, lessening possibilities for an extended mess or unintended damage to a delicate surface. From the intricate design to the simplest felt craft, these kinds of glues provide alternatives for any project in a very effective and dependable way, and nurture safety along the path for a great crafting experience.
Application Techniques for Gluing Felt to Wood

Best Way to Glue Felt on Wood
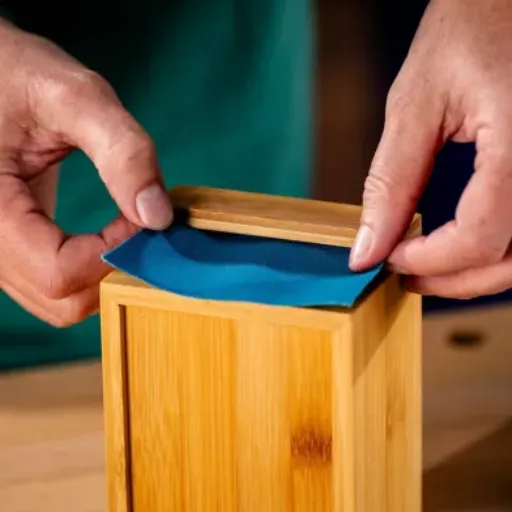
The glue method that is chosen must allow for a strong, lasting bond, while preserving the smoothness of the felt and keeping it undamaged. Before applying glue, prepare the wood surface; it should be clean, dry, and devoid of any dust or debris. Optionally, sand it slightly to allow better binding of the glue. Just ensure that all sanding dust is wiped away before glue application.
The next step is selecting a glue that bonds well with felt and wood. For most applications, a general craft glue or a strong adhesive that dries clear will do. Apply a thin, even layer of glue to the wood, but do not overdo it, as glue can soak through and possibly discolor the felt. Place felt on the gluing surface carefully. Press gently to smooth out any wrinkles or air bubbles.
The glue should be given some time to set, as per the instructions on the adhesive. Sometimes a flat, heavy object would be placed on top of the felt to ensure even adherence during the drying time. The glue has to dry fully beforehand, plus any overhanging felt can be trimmed off if needed. The finishing of these steps gives a neat bond between the felt and wood and strong enough for most felt and wood crafting or DIY projects.
Making Felt Crafts with a Glue Gun
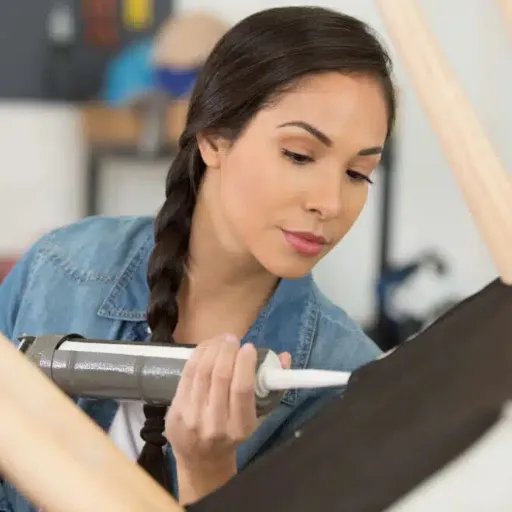
A glue gun or any other glue device quickly and easily bonds felt to materials such as wooden pieces, cloth, or plastic. To prepare your glue gun, go ahead plug it in to preheat. Make sure to pick glue sticks compatible with your glue gun, preferably those suitable for crafting or for general use. When your glue gun is ready, apply a thin and even layer of hot glue over an area of the material that you want to bond. Then, immediately place felt on the glue on the material surface and hold down for a few seconds to allow the glue to develop a strong bond.
The fast drying time of glue is one of the advantages of using a hot glue gun. Usually, the glue sets in seconds; hence it makes for a really quick crafting process. This also means one must be quick and accurate as messing around after application gets difficult. Therefore, think ahead about placement before applying glue to prevent any mishaps. Also, use protective measures, because glue and the tip of the gun can get really hot, which causes disbursal with burns. The area of work should be well-ventilated and covered to protect against accidental drips.
For most successful bonding, ensure that both surfaces to be bonded are clean and dry prior to glue application. Trimming any excess felt once the glue sets will lend that polished look. For more detailed or intricate pieces, it is advisable to glue in smaller sections or use a narrow tip from the glue gun for more control. With a bit of care and attention, this tool can be one of the most versatile felt craft tools, producing strong and durable results.
Tips for Sticking Felt to Wood Effectively
Some tips on successfully sticking felt to wood involve some preparation. The wooden surface must have been dirt-free and smooth. Rough areas can be sanded with fine-grit sandpaper, followed by a wipe with a damp cloth to get rid of any dust. This helps to build a surface that will adequately unite the adhesive with the object.
Choose the appropriate glue for the particular job. Hot glue is probably most widely used and probably best in adhering felt to wood as it firmly bonds and dries very fast. Other options are craft glue or spray adhesive, especially when large areas require even coverage. Try your choice of glue on some scrap material to make sure it is compatible and achieves the desired finish.
Applying the felt should be done in sections in order to maintain control. Press the felt onto the wood firmly to bond it, smoothing out bubbles or creases as you go. Afterward, the project should be left to dry for a sufficient amount of time, allowing the adhesive to set firmly. This enhances durability and produces a better finish.
Popular Products for Felt Adhesion
⭐ Top Recommended Glues for Felt Projects
When gluing felt, it is essential to choose adhesives that will bond strongly to stay in place and that will dry clearly without staining the fabric. These glues are often meant for porous surfaces such as felt. If the felt is to be moved or handled often, then flexible adhesives are recommended to prevent brittleness from developing later on.
Hot glue remains a favorite for felt projects due to its quick drying and holding capacity. It works great to glue felt to different surfaces, including wood, plastic, and fabric. When using the glue, however, be careful not to burn yourself, and try to be even with application. It is generally better to use a high-temperature glue gun to ensure a strong and durable bond.
For a more precision-based approach, fabric adhesives come in handy when working on detailed felt projects. These adhesives are easy to use, can be washed away, and settle down very neatly. They work great when bonding felt to other fabrics and are usually formulated a bit flexible after drying, which makes it convenient for wearables or decorating projects. Ensure the glue dries and cures properly to achieve maximum strength.
⏱️ Comparison of Drying Times: Which Certain Glues Would Dry Clear?
Most glues that dry clear include the different craft glues, fabric glues, and some of the all-purpose adhesives. Gluing substances here are made so that once dried, they remain transparent; hence, one would want to use them for projects that are supposed to have a clean, flawless-looking finish. Usually, most of these glues dry within 30 minutes to an hour to the touch, although curing may take up to 24 hours, largely depending on application thickness and the atmospheric conditions.
For rapid results, certain clear glues dry within a few minutes; keep in consideration that a quick drying time also diminishes the working time one has to adjust the materials if required. So, do have patience and take special care in application if clarity and strength are equally important to you. Always read the instructions of each product to get some clue with respect to drying and curing times, as these can differ greatly.
Environmental factors such as temperature, humidity, or surface compatibility may influence the amount of drying time. A drying process occurs faster when environmental conditions are warm and dry, and slower in cool or humid settings. To guarantee your glue does not dry cloudy but instead binds properly, do exactly as the manufacturers suggest for application and drying conditions, and the best choice for clear drying will be any adhesive deemed right for the task at hand.
🎨 Best Adhesives for DIY Felt Crafts
Choosing an adhesive for felt crafts is indeed very important to ensure strong, durable, and clean results. In other words, the glue depends on the project, whether it entails felt to felt or bonding to other surfaces like wood, plastic, or fabric.
Adhesives that work great for felt to felt bonding include a good fabric glue. This glue would hold well, dries clear so it looks neat on the project, and remains flexible, so the projects can have some movement or texture. These adhesives are made in such a way that they would easily bind a fabric without affecting the actual fibers of the felt.
Hot glue proves to be a very good choice when attaching felt to harder surfaces like wood or metal. It sticks very quickly and forms a relatively strong adhesive in the case of working with porous surfaces. One does have to keep in mind, though, that for non-porous surfaces, other alternatives such as double-sided adhesive sheets and crafting tapes may offer cleaner and temporary solutions, depending on specific project needs. Always test a small area beforehand to check if it really adheres and is compatible.
⚠️ Common Issues and Troubleshooting

🔧 What If the Glue Is Not Holding?
Failure in holding usually occurs once the surfaces are either not compatible or are not properly prepared or the glue is not properly applied to them. Initially, the surfaces must be cleaned, dried, and free from dust, grease, or any other contaminant. Cleaning will ensure that glue sticks to the object and improves bonding-all strength of the unit. For cleaning procedure, one must follow the methods dictated by the type of materials involved: a wipe with alcohol-based products is usual in most cases, while it is acceptable to sand the surface lightly for added texture and better grip.
Until the appropriateness of the glue for the materials it has to work on is ascertained, some more thought must be given in this regard. Some constraints direct adhesives to one or another surface. Others may put families into porous and nonporous. Follow the instructions on the package or those given by manufacturers to make sure the glue is not unsuitable. Otherwise, one should use a different glue, which should preferably be designed for the job, such as wood glue in cases involving timber and epoxy-based glue in cases of metal.
Hovering on your application technique, you should apply the glue with an even hand and maintain sufficient pressure throughout the setting or curing period. Drying or curing time must be adhered to, as rushing this phase will jeopardize bonding. If the problem repeats, think also about extreme temperatures or humidity, as these environmental factors can be contrary to your adhesion. Now, adapt to this approach for a better bond that’s consistent.
🔄 Fixing Mistakes: Removing Felt from Wood
Felt can be stripped away from wood, but care must be taken to avoid any damage to the wood surface. First try to peel as much felt off as possible using one’s fingers or a plastic scraper to avoid scratching the wood. If the felt does not come off easily, please do not try to force it, as that may damage the wood beneath it.
Apply rubbing alcohol or vinegar on a soft cloth to dissolve glue residues. The chemicals soften the glue, so one can simply wipe it off. The solution is kept there for about a couple of minutes, and then it is rubbed with circular motions until the glue loosens completely and is disposed of. Consumption of strong solvents could be dangerous should it strip the wood finish away or discolor anything.
Once there is no trace of the felt and adhesive, clean the wood with a cloth and soapy warm water. Use a clean cloth to dry the wood surface properly to avoid moisture damage. If needed, use a wood polish or wax to gently buff the cleaned surface to renew the natural finish and allow it to blend smoothly with the surrounding surface. Always perform a test on a hidden spot with the cleaning agent to prevent ill effects.
💪 Ensuring Strong Adhesion for Long-lasting Projects
To guarantee strong adhesion for your applications, the surfaces must be clean and properly prepared. Dust, grease, or moisture can hamper the proper bonding of the adhesive, so clean the surfaces thoroughly with the appropriate cleaner and let them dry completely. When applicable, you may sand the surface lightly to provide some texture for better grip. Always check the adhesive product instructions for detailed preparation requirements.
The choice of the appropriate adhesive should take into account obstacles related to the project. Different materials require different adhesives, such as wood glue for wood, epoxy for metals, or some adhesives specific to plastic and ceramics. Carefully consider the materials you are working on and select a product that promises endurance and compatibility for forming a bond that will indeed last through time. Look out for drying and curing times because doing the opposite will only get you a diminished adhesion.
Lastly, application and curing are key. If applied before curing, the glue should be spread evenly, in just the right amount, without being over-applied, because excess glue can result in mess or improper bonding. Usually, the bonded pieces are clamped, weighted, or otherwise supported to maintain even pressure until the adhesive has fully cured. Do note that the supports should be removed only after the curing time is fully observed as instructed because if taken off too early, it will adversely affect the bond formation. If all these steps are well and truly observed, you will be able to count on a strong and durable bond against time.
✨ Creative Uses for Glued Felt
🪵 Incorporating Felt in Woodworking Projects
Woodworking projects can allow felt to be a versatile material that can be used for both practical and decorative purposes. One of the main applications serves as a protective layer to avoid scratches or dents on any surface. For instance, pieces of felt might be put on the bottoms of furniture legs to avoid damage to hardwood floors or used to line drawers so that fine items are kept from being harmed. It is a bit too soft, cushioning against friction, and is apt for this incorporation into several design approaches.
The felt-to-wood combinations include soundproofing purposes. Though it looks like falling, felts offer great soundproofing potential due to their densely packed fibers. Any exposed surface of cabinet interiors or any wooden paneling could be treated with felts to minimize sound from vibration or impact. This application is especially useful if silence is required in a home office, library, or bedroom.
Making felt a decorative overlay for wooden furniture and accents would provide an interesting combination of surfaces. Various shades, textures, or even contrasts can be imposed on plainer wooden surfaces. Felt-based decor may be laid on display shelves, inlaid in tabletops, or mounted onto walls. This felt application allows for aesthetic and tactile contrasts. When working with felt, it is crucial to apply the type of glue or adhesive that will yield the smoothest possible finish while maintaining durability.
📋 Making Felt Boards: Tips and Tricks
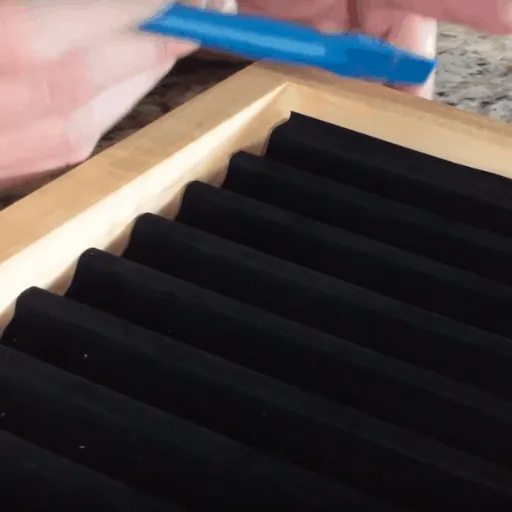
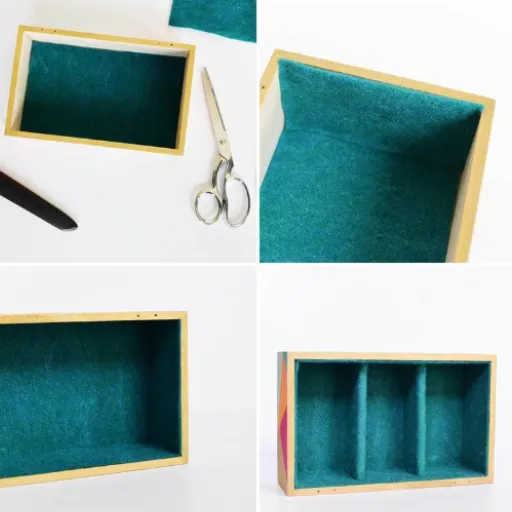
Felt boards are multifaceted and can be utilized for creative instructional activities, storytelling, or as unique decoration. To create one, start by selecting a sturdy base made from wood, cardboard, or foam board. The base should be cut to the size and shape desired for the project or use of the felt board. A strong and durable base will ensure the board stands the test of repeated use.
It is important to select good-quality felt to cover the board surface. Cut the felt, allowing it to be a bit larger than the surface so it may be wrapped around the board edges at the back for a clean finish. Use an adhesive that is strong and suited for fabric to glue down the felt. As you press the felt onto the surface, eliminate any wrinkles or air bubbles. Once the glue has dried completely, trim off all of the excess felt.
To further increase functionality, one might consider adding Velcro-compatible felt pieces to allow for the interaction, or else creating custom felt shapes that adapt to particular themes or activities. Correct care along with proper storage of the felt board will make it last a long time, ready for some creative help or for day-to-day use.
🏠 Innovative Felt Crafts for Home Decor
🖼️ Felt Wall Decorations
Felt wall hangings are the best option if you wish to add a little warmth and texture to your home. Felt pieces are layered to create striking wall decorations using various geometric patterns, floral designs, or abstract art. Such crafts are versatile and customizable to coordinate with both color and style with your existing décor. The quality of the felt has to be good so that it can give a professional finish to your work. Using craft glue to place the pieces firmly or stitching them will be ideal.
🍵 Felt Coasters and Table Mats
Felt coasters and table mats are an ideal gift or addition to any home felt projects. Being naturally resistant to heat, felt cushions a surface and protects it, in turn adding a little glamour. Simple round or square coasters may be easily made by cutting the felt into shapes, whereas more intricate designs such as layered patterns or embroidered details can add some flair.
🧺 Decorative Felt Storage
Highly functional and visually alluring, felt storage baskets or bins do the job of de-cluttering spaces while adding some style to a room. They are made by folding and stitching thick felt sheets into sturdy shapes capable of holding toys, craft materials, or other items. When decorated, such as with felt flowers or opposite stitchings, they look so charming that they could be considered beautiful art pieces in their own right.
❓ Frequently Asked Questions (FAQ)
QWhich is the perfect glue for felt on wood?
A: The ideal glue for felt on wood usually includes adhesives like Aleene’s Tacky Glue, 3M Spray Adhesive, and super glue. These types of glues form a good bond yet are quite easy to apply, thereby ensuring that the felt fabric is sufficiently glued to the wood surface.
QCan I use tacky glue for sticking felt to wood?
A: Yes, tacky glue is an excellent choice for sticking felt to wood. It provides a strong bond and remains flexible after drying, making it ideal for craft projects involving felt fabric.
QIs super glue considered a good fit for felt and wood?
A: You could use super glue for felt and wood, but it dries in a flash and would not let you to reposition anything. Using tacky glue or spray adhesive for felt would be more forgiving should any adjustments be necessary.
QHow do you apply spray adhesive to felt?
A: In order to spray glue on felt, the wooden surface has to be clean and dry. Shake the can spray, spray a thin, light coat of adhesive on felt or wood, and then firmly adhere the felt onto the wood according to the drying time provided by the manufacturer.
QHow does craft glue differ from school glue in felt projects?
A: Generally, craft glue is a more versatile adhesive and stronger than school glue; hence, the glue is meant for felt projects and applications requiring a stronger hold-the school glue would not be strong enough. While craft glue gives a more permanent bond, school glue might not hold well when results are stressed.
QCan 3M spray adhesive be used to stick felt to wood?
A: It certainly can, as 3M spray adhesive serves as an excellent option for sticking felt to wood. It provides a strong hold and easy application, making it ideal for multiple craft projects using felt fabric.
QNice-washable glue could work for sticking felt to wood, huh?
A: Glue for washing with water might not make the best hold when felt is glued to wood for projects that require durability in their operations. It is much better to have tacky glue or contact cement applied even for the life of the works.
QCan you offer some alternatives to commonly used glues to attach felt with?
A: Other than glue, felt may be attached through adhesive backing or self-adhesive felt sheets. These are practical methods to avoid having to apply glue on top of the felt.
📚 References
- Best Glue For Felt (5 of them!) And The Worst Ones I Don’t … – This article discusses various types of glue suitable for felt, including spray glue for large crafts.
- Gluing Felt To Wood : r/woodworking – A Reddit thread where woodworking enthusiasts share their experiences and recommendations for gluing felt to wood.
- Gluing felt to wood – A discussion on LumberJocks about using 3M spray adhesive and other options for gluing felt to wood.
- Glue felt to wood – A forum thread on Sawmill Creek discussing the use of Weldwood Contact Cement and other adhesives for attaching felt to wood.


