


A ceiling picture rail is kind of like a frame to the top of a room, and as such, this adds to the overall design of the place. This comprehensive guide will help you examine in detail how to attach decorative crown molding with all the necessary tools, materials, and step-by-step processes for success.
Introduction to Crown Molding
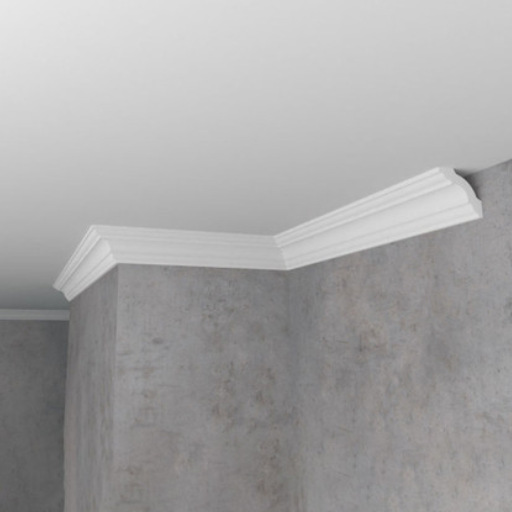
In the settings of a room, the way to join the ceiling with the walls is not the only concern because its connections from the wall to the ceiling confront as positive issues. The cornice is a decoration which is applied to the point between the ceiling and the wall in order to enhance the general appeal of the room. The materials used are more common in wood although with time there is more use of other materials like polyurethane and MDF crown molding.
What is Crown Molding?
The cornice is believed to be one of the oldest designs of moldings associated with the architecture of ancient Greece and Rome as far as any examples of crafts and arts are concerned. It provides for the change of direction in the line with the change of vertical directions of the two planes: the wall and the ceiling, smoothes out the sharpness of angles and admits the development of tonal superimposition. The new varieties are created with such a way that they do not wrap, do not pick up moisture, do not develop strains and are therefore designed also for the areas characterized by high humidity.
Benefits of Crown Molding in Home Design
Enhanced Aesthetic Appeal
Adding crown molding to a room is another option that allows the embellishment of the building. In doing so, the homes can attract a higher clientele than they usually would.。
Property Value Appreciation
Market assessments show that homes with quality finishes and crown installations can see a return on investment of up to 70%. This is particularly true in exclusive markets where beauty enhances buyer interest.
Room Proportion and Visual Balance
Material Durability and Sustainability
Modern materials have higher resistance to moisture and are likely to last longer. The new lightweight composites are extremely durable and can be used in both humid and arid conditions.
Customization for Design Flexibility
Crown molding can be used in almost any home due to its ability to range from simple flat strips to intricate elaborate motifs that are classical in nature. Kits are available that are much easier to use than making molding from scratch.
The Best Types of Glue for Crown Molding
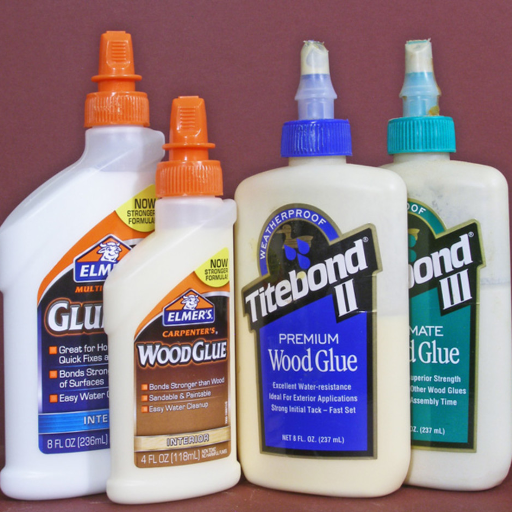
The best adhesive for crown molding would be one that has a high bonding strength and a good resistance against solvents:
- Construction Adhesive – Recommended for fixing crown molding to walls or ceilings, especially for thicker or larger sections
- Wood Glue – Perfect for wooden crown molding installations where pieces need to be well-integrated
- Hot Glue – Apart from its main adhesive, also useful in adhering components together for a brief moment before stability is reached
Construction Adhesive
Wood Glue
Wood glue is engineered specifically for binding wooden surfaces together in a sturdy manner that is tear and weather-resistant. Modern wood glues contain polyvinyl acetate cross-links and aliphatic resins loaded with bonding power that can surpass the strength of the glued wood pieces themselves.
Compare Common Types of Crown Molding Glue
| Glue Type | Strength | Drying Time | Best For | Water Resistance | Applications |
|---|---|---|---|---|---|
| Wood Glue | High | 20-30 minutes | Wood crown molding | Moderate | Interior projects |
| Construction Adhesive | Very High | 24 hours | Heavy-duty, large surfaces | High | All-purpose indoor/outdoor use |
| Hot Glue | Moderate | Seconds to 1 minute | Temporary or lightweight molding | Low | Quick fixes, crafting |
| Super Glue | Very High | 10-20 seconds | Small, precise applications | Low | Plastic, lightweight trims |
| Epoxy | Extreme | 5-20 minutes (sets) | Permanent, high-stress areas | Very High | Metal, plaster, challenging materials |
Step-by-Step Instructions for Gluing Crown Molding
1Prepare the Surface
Condition the walls and ceiling for molding so they are clean, dry and free from dust and greasy substances. Use a dampened rag to wipe down surfaces and allow plenty of time to dry.
2Measure and Cut the Crown Molding
Use a tape measure to determine the dimensions of each wall section. Use a miter saw, especially for corners, to make clean cuts at the precise angles needed.
3Choose the Appropriate Adhesive
Select high-quality adhesive based on your crown molding material. For most activities, heavy-duty adhesive or bonding material with high tensile strength is recommended.
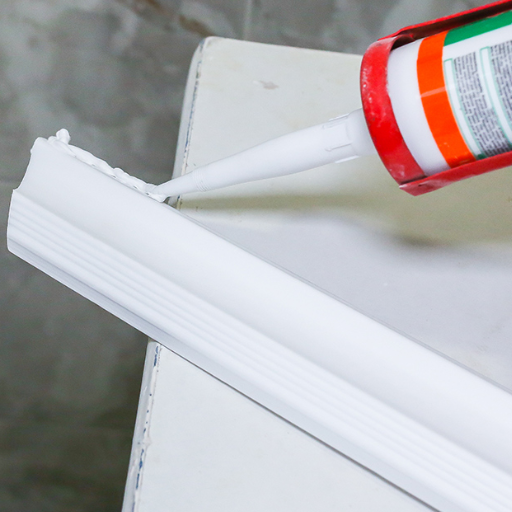
4Apply the Adhesive
Apply a bead of adhesive along the back of the crown molding that will intersect with the walls and ceiling. Avoid running excessive adhesive to prevent spillover effects.
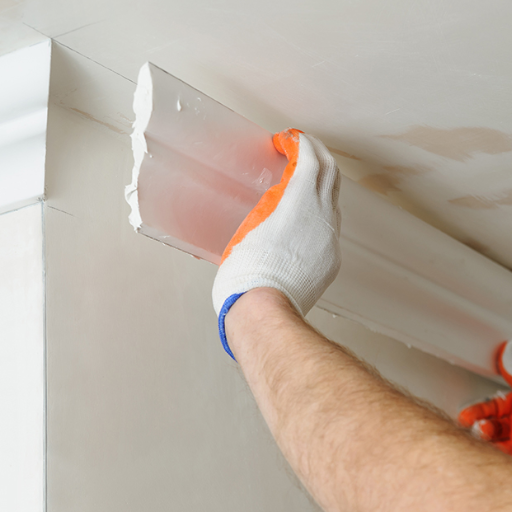
5Position and Press
Carefully align the crown molding along the installation area. Press firmly into place, ensuring proper alignment. Use a level if needed for accuracy.
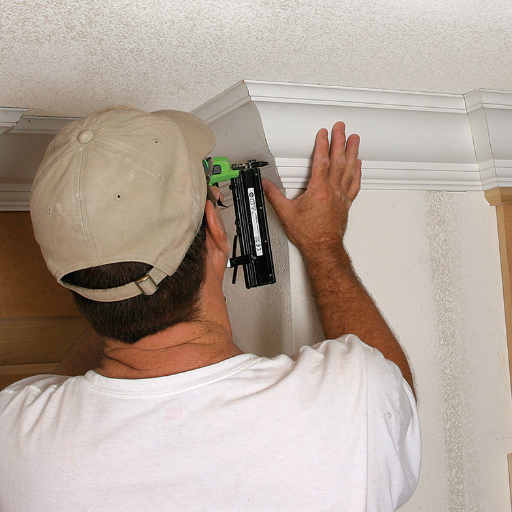
6Secure the Molding
For additional support, use finishing nails or a nail gun to temporarily hold the crown molding while the adhesive cures. Space finishing nails evenly at 1-foot intervals.
7Clean Excess Adhesive
Use a damp cloth to remove any adhesive seeping through gaps before it dries.
8Allow Adhesive to Cure
Check manufacturer guidelines for curing time. Most adhesives require a minimum of 24 hours for the bond to fully set.
9Finishing Touches
Fill any gaps or nail holes with caulk or wood filler. When dry, paint or stain the crown molding as required to match your desired style.
Tips for Achieving a Professional Finish
Prepare the Surface
Ensure the substrate is clean, well-prepared, and free of foreign material. Even fractional surfaces and voids must be addressed using appropriate compound and finish application.
Use High-Quality Tools and Materials
Invest in quality brushes, rollers, and adhesives that ensure consistency and durability. High-quality materials decrease unsightliness and enhance the general outlook of the installation.
Apply Primer and Paint Evenly
For painted crown moldings, use primer first to enhance intercoat and topcoat adhesion. Apply thin paint layers and allow each to dry before applying the subsequent layer.
Seal Gaps with Caulk
Seal gaps and joints between walls and moldings with paintable caulk. This step enhances beauty and prevents cracking over time.
Cut and Install Precisely
Calculate the length of each ornamental strip piece carefully. Use a miter saw for angled cuts and check measurements before final assembly.
Filling Gaps and Sanding
Filling holes and sealing the profile are foundational steps for successful crown molding installation. Use painter’s caulk for minor problems and wood mastic or sealing compound for larger gaps.
Using Caulk and Paint
Caulking is indispensable for sealing gaps and joints, particularly around trim and molding at ceiling connection points. For successful caulking:
- Ensure the area is clean, dry and free from dirt and oil
- Use quality interior paintable caulk with latex base for flexibility
- Apply even strips using a caulking gun with consistent pressure
- Smooth excess caulk with water and finger or finishing tool
Priming is essential to guarantee paint adhesion and longevity. Apply primer before the main paint coat to ensure coating integrity and best adhesion.
Common Mistakes to Avoid When Using Glue
Critical Mistakes That Can Ruin Your Installation:
Choosing the Wrong Adhesive
Applying the wrong adhesive can cause mechanical and visual malfunctions. Different adhesives are made for specific surfaces, temperature zones, and contexts. Research manufacturer requirements and test compatibility with substrates.
Incorrect Glue Application
Poor application techniques damage bond quality. Avoid:
- Applying adhesive to dirty or unprepared surfaces
- Ignoring proper curing environments (humidity and temperature)
- Using inadequate spreading strategies
- Not following curing instructions
Poor Surface Preparation
Adhesive or paint failure frequently occurs due to improper surface treatment. Remove all impurities including:
- Dirt, oil, and grease
- Rust and corrosion
- Old paint or finishes
- Dust and debris
Other Critical Mistakes
- Overlooking Material Compatibility – Can cause warping, cracking, and loosening
- Neglecting Tolerances – Leads to poor contacts and mechanical reliability issues
- Using Substandard Fasteners – Compromises structural integrity
- Skipping Regular Inspection – Hidden deterioration can occur without periodic checks
Reference Sources
-
Crown molding glue or no glue – Woodweb
This forum discussion explores the use of glue in crown molding installations. Professionals share their preferences, with some using glue alongside pins for added security, while others avoid glue to prevent mess and staining on pre-finished materials. -
How to Install Interior Trim Molding Using Construction Adhesive – PPG Paints
This guide emphasizes the benefits of using construction adhesives like Liquid Nails for crown molding. It reduces the need for fasteners, minimizes touch-ups, and speeds up installation.
Frequently Asked Questions (FAQs)
Q: How do I install crown molding using glue?
A: Begin with taking corner measurements and mitering moldings to facilitate perfect fit. Apply a small amount of construction adhesive to the backside of the moldings and fix it onto the ceiling and walls in a straight line. Apply masking tape again and again in order to prevent the molding from moving while the adhesive is being given some time to stick. Use brad nails in places where the adhesive alone seems insufficient. In bonding polystyrene moldings to the ceiling, the mounting of the moldings is generally completed with paste or hot-melt adhesive.
Q: What materials are best for DIY crown molding projects?
A: Polystyrene being a lightweight material, is a preferred choice for many. When it comes to finishes – one can get classic look with all its traditional benefits from solid wood or use any other material such as composites to save. When more than one piece is being worked on, connect them in a way that the junction is not outwardly visible. For learners’ purposes use smaller pieces to practice cutting and installation.
Q: Can I use glue for crown molding in the bathroom?
A: It is well acknowledged that the construction adhesive is very efficient if it is applied within the wet surroundings. Nevertheless, it is recommended to use moisture-resistant adhesives for cladding. Care should be taken to ensure that the corner miters are thin and even when they are glued and clamped. For the extra caution, it is also recommended to use antifungal types of paint.
Q: What tools do I need to install crown molding with glue?
A: Essential tools include:
- Miter saw for accurate angle cuts
- Brad nailer (optional if using only glue)
- Clamps to hold pieces while setting
- Level for straight, even installation
- Caulking gun for construction adhesive application
- Painters tape to secure during installation


