


Gluing felt to wood sounds easy in theory; however, it is a daunting task involving lots of complexities if one is aiming at a durable and strong bond. Whether you are about to do some crafts, improve a piece of furniture, or produce anything unique, picking up the appropriate glue. Hope this guide helps. You will find all the information you need about glues, how to use them one by one and so forth. So, the tips I’ll be providing you will have you ready for this entire process so that when you create these ‘felt’ on ‘wood’ projects, you make them last and look good.
Choosing the Right Glue for Felt to Wood
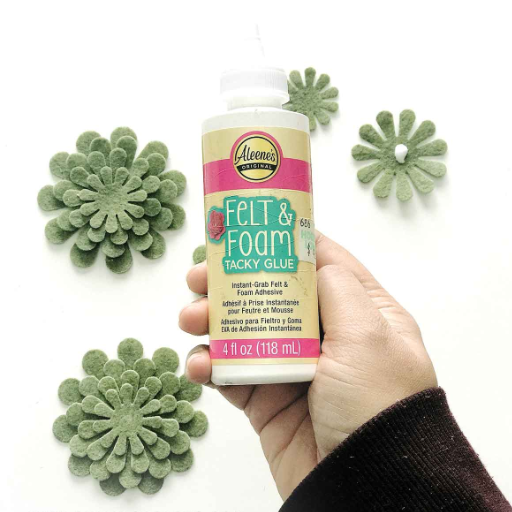
Ultimately, what glue should be used to attach felt to wood is dependent upon the needs of a particular task. In many cases a tacky glue is good since it offers strong adhesion and is easy to use in almost such tasks. Where there is a need for greater strength, hot glue offers a strong grip but needs to be applied carefully to avoid developing adhesion spots or tear areas on the felt. In cases where a heavy plastic is needed, or parts which are subject to wear and tear are considered, application of a fabric and wood spray adhesive is very useful for it provides an even coat and dries quickly. Always clean and dry the surfaces that you intend to adhere to so that you can achieve optimum results.
Comparing 3M Products: 77 Spray vs. Contact Cement
|
Key Points |
3M 77 Spray Adhesive |
3M Contact Cement |
|---|---|---|
|
Primary Use |
Lightweight bonding |
Heavy-duty permanent bonding |
|
Surface Compatibility |
Paper, fabric, foam |
Wood, metal, plastics |
|
Application Method |
Aerosol spray |
Brush or spread by hand |
|
Drying Time |
15 seconds to 1 minute |
15 to 20 minutes |
|
Bond Strength |
Medium |
High |
|
Flexibility After Drying |
Semi-flexible |
Rigid |
|
Resistance to Heat |
Limited |
High |
|
Ease of Use |
Easy to apply |
Requires precision handling |
|
Cleanup Requirements |
Minimal, solvent cleaning |
Requires specific solvents |
|
Longevity of Bond |
Moderate |
Long-lasting |
|
Cost Efficiency |
Budget-friendly for light use |
Costlier but for durable use |
Factors to Consider When Selecting Glue
When choosing the right glue for joining felt it is important to consider a number of variables that will determine the short and long-term success of the bond. It is essential to know the nature of the surface on which the felt shall be placed. Particularly, suppose surfaces with open structures such as wood are used. In that case, there is no question about using fabric glues for bonding, or highly tacky adhesive since both the surfaces will accept and hold their respective adhesive penetrates well. Conversely, when dealing with plastics or glass which are essentially smooth and resistant, more specific types of glue are required such as cyanoacrylate (super glue), or a silicone glue.
There is also the case of thermal resistance for those projects where the environmental conditions will change severely. Whereas some adhesives, such as hot melt adhesives, may become inefficient in higher temperatures, most epoxy and polyurethane-based adhesives are thermally resistant. However, the type of adhesive that is used on a project will determine the drying period as well as the opaqueness of the materials at the end of the work. And finally, most of the adhesives that dry clear come into play where no adhesives are needed on the final surface dressing.
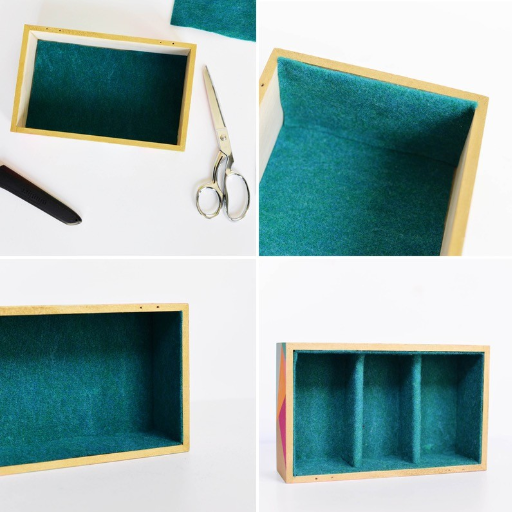
Step-by-Step Guide to Glue Felt to Wood
- Prepare the Surfaces
The area involving both materials must be free of filth and moisture. Wipe away any particles, gunk or grease on the wood with a dry rag. As a last resort, you might want to sand down the wood lightly to enhance its adhesion especially of the manufactured product.
- Choose the Right Adhesive
Choose an adhesive that dries clear and is internal, porous, recommended best primer, such as spray adhesive, fabric glue, PVA, or any glue designed to seal materials internally. Stick substances that dry hard and excessively avoid as this will affect the felt texture.
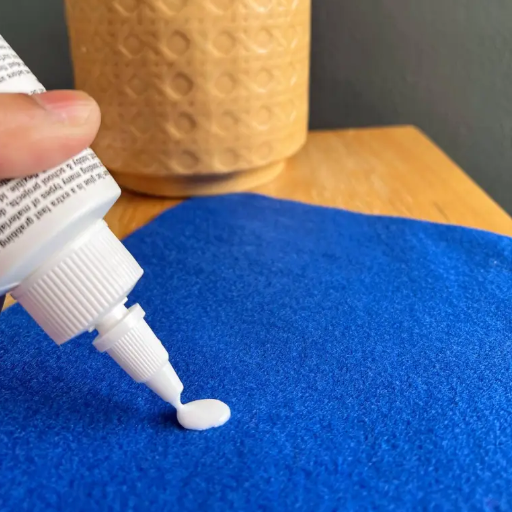
- Apply the Glue
Apply an even layer of adhesive on the wood surface. For spray adhesives, ensure a set distance between the spray and the wood, in order to have a proper and clear usage. Don’t load the surface with a lot of adhesive so that it soaks through the felt.
- Position the Felt
Instead, remove the felt carefully, starting from one of the corners, and lay it over the glued surface without stretching, thereby folding the rosy back. Use hands or any other clean, smooth instruments and smooth the felt layer.
- Secure and Dry
Apply a downward force and compress the felt down to the surface. Take advantage of the fabric’s weight and clamps if the need arises. Wait for the adhesive to dry as directed by its manufacturer to ensure a complete bond.
- Trim Excess Felt
After the glue has been set, remove the overextending felt by using either a pair of scissors or a craft cutter so as to give the article a shine and a neat finish.
Preparing the Wood Surface
The proper preparation of the wood before applying the felt is imperative to achieving a solid bond adherence. This includes roughening the substrate, removing splinters and any dirt on the wood. The sandpaper is used to smooth the surface prior to bonding, and the type varies according to the wood, but more often than not, 120 or 150 grit will do just fine. With this process, not only can imperfections be removed but the surface can also be made rough to allow the adhesive to stick well.
After sanding, clean the area to remove all the dust and rubbish. A microfiber towel or a tack rag will be more suitable for this work because it can be used to wipe away all the tiny bits without dirtying the cloth or the surface. For potentially greasy surfaces, use a suitable cleanser or isopropyl alcohol to remove these contaminants completely. Wherever there is moisture on the surface, allow that part to dry first before moving on to prevent mishaps. In this case, the preparation of the wood surface is very important to provide the basis for making sure the process of application yields maximum results.
Pressing and Drying Time
The need for a process of compression and curing involves high emotion in such types of activities where there is an adhesive need for a bond. In such cases, a uniform force within the specified time from the manufacturer for that adhesive should be maintained. For most types of wood glues, manufacturers advice for a 100 – 150 psi pressure to be exerted when the parts are being pressed against each other. However, for some specific advanced adhesives like, but not limited to those based on polyurethane or epoxy, requirements may vary slightly and one should always refer to technical data sheets for such adhesives.
The time to dry may differ in most cases depending on environmental factors such as humidity, temperature or air flow. Optimally and within basic conditions, most adhesives gain their primary curing after 24 hours but reach their full curing within the span of a week. For adhesives that are pressure sensitive, the bond strength typically builds up over time, and the highest figures in most cases can be reached within 72 hours. It is acceptable to bear in mind these factors and to keep their instructed procedures in attending to them so as to enhance the stability and the effective life of the engineered joint.
Best Practices for DIY Felt Projects
- Choosing the Felt Wisely: Choose a felt that is made of the material–craft felt for fun, out of decorative purposes, and wool felt for a better finish.
- Keep cutting tools sharp: Cut accurately with sharp and correctly positioned scissors, rotary cutters with a blade for making neat edges, or a craft knife.
- Preparing the Table: Use a clean, level space to work in strict accuracy and to avoid sagging or crescent-shaped fabric.
- Pick Specific Glue: While joining felt, pick a thin glue, especially meant for fabric bonding, or even hot glue to a lesser extent, is more likely to work. Before assuming that the product can be used, try it on a single piece.
- Layout and Mark When Required: Assemble the design beforehand, take all dimensions accurately, and cut or stick the pieces down, diminishing casual flaws.
- Environmental Reinforcement: In the case of motions, interfacing or sewing can be used to reinforce felt panels.
- Follow All Rules: Deliberate and avoid painted canvas when more than one felt sheet will be used. Attention is to be given to the overall shade of the plastics and its uniformity that is to be achieved as well.
Fun DIY Felt Crafts
- Felt Flower Bouquets: Make felt flowers of different designs and colors and combine them into vases to keep them lasting longer. Ideal arrangements can be created for home interiors, wedding decoration, or certain personal needs. This involves using special heat-conserving glue and floral wires to connect the flower components and petals.
- Personalized Felt Keychains: Color in felt inappropriate rings to becomeing keynd accessories for one bag or high end gifts. Depending on the customer’s preference add a light stitch or a few felt letters or shapes upon the felt externally.
- Felt Animal Plushies: Use felt to make cute little soft toys and pretty funny creatures. Cut out the felt carefully and assemble it, stuffing it with polyester. This activity is appropriate and fruitful for making children’s objects and interior decorations.
- Seasonal Felt Ornaments: Make felt decoration for every season and every festival. Make use of templates to make patterns such as snowflakes, pumpkins, hearts, and more, and embellish these with beads, sequins, and embroidery, and such.
- Felt Organizer Panels: Set up a felt vertical organizer to save people from misplacing small objects such as keys, papers for instance, and also tools. Piles of thick felt with pockets are layered to create this elegant design and attached to a support board for practicality’s sake.
Such projects demonstrate how felt has great potential when used for crafting purposes; it can meet both decorative and practical requirements. These concepts expand the possibilities regardless of one’s initial level of expertise in a flexible way, enhancing and facilitating one’s work.
How to Ensure the Glue Dries Clear
Eliminating cloudiness or achieving clear transparency on the surfaces being bonded requires relevant preparation and more adherence to the methodologies for adhesive selection and application. As a first step, use good quality milky water glue such as those labeled “clear when dry.” Most of such glues have either been formulated to lessen or to avoid any formation of clouds right in the process of setting. The next step is to prepare the surfaces by removing all dust, oil, and water from them because they affect the bonding process and cause coloring of the seam. When spreading the adhesive, make sure to apply a thin, even layer to avoid thick spots of glue, which will cause visible marks.
Temperature as well as humidity are fundamental factors in the drying of adhesives. Extremely careful should be taken in producing at the advised temperature stated by the company, otherwise undesirable curing effects could be experienced. Also, consider the curing period of the glue because quick curing may result in incomplete transparency of the adhesive on cured edges. Some manufacturers can suggest clamping or placing added weight on the surfaces in order to increase adherence and improve the clarity, too. Such actions are thus more likely to result in the glue drying completely transparently creating as stated before a much neater and clean working area.
Tips for Successful Glue Application
- Surface Preparation
All surfaces to be glued together should be dry and cleanfrom dust, oil, greaseor any other foreign bodies. Research reveals that surface preparation has the potential to increase the strength of the joint by 30%. Appropriate solvents such as isopropanol, acetone or a degreaser may be used in case unwanted residues are present.
- Choose the Right Adhesive
Choose an adhesive that suits the materials as well as the conditions of use. In the case of epoxy resins, they offer excellent thermal conductance and high-strength adhesive joints, while cyanoacrylates or super glue stick easily to materials that are not porous, like metals and ceramics. Consult the specification data for any necessary guidance.
- Control Application Amount
Use the appropriate quantities of adhesive according to the instructions given by the manufacturer. Excessive use of any glue results in spilling, whereas too little of it results in weak positions. Literature shows that the bond strength is significantly affected by the uniform application of an adhesive and that there can be up to a 25% drop in the bond strength if an uneven coating is applied.
- Temperature and Humidity Conditions
Within the ranges of allowable temperature and humidity application of adhesive is determined to enhance curing. The optimum temperature for applications of most adhesives is between 65°F–75°F, while the relative humidity should be in the range of 40–60%. Going beyond these limits, the properties of the bond and curing rate may be affected negatively.
- Follow Cure Times Precisely
Curing times are often required for adhesives to reach maximum strength. For instance, epoxy takes around 12 to 24 hours to achieve 90% strength and approximately one week to cure completely. Do not try to test the joint at this stage; otherwise, it will be compromised and lose all of its holding power.
How to Ensure a Strong Bond
Appropriate preparation of the surfaces is VERY important if one wants to obtain strong bonding. First, all the surfaces that will be adhered to must be cleaned so that no dust, oil, or other substances that might come in contact with the adhesive are left. This is done using isopropyl alcohol or any other recommended solvent that can be used; the materials shall determine this. Secondly, smooth surfaces should be slightly abraded with very fine smooth sanding paper in the process of bonding non-porous surfaces like plastics or metals.
The choice of a suitable adhesive for the given materials and conditions is equally important. Each type of adhesive has a set of compatibility information which is often provided by the company. This informs the consumer on which products are to be used or which objects or environments can damage the product. Moreover, the adhesive should be spread all over the whole contact area evenly so that every part would be making good adhesion to each other and no voids would be formed inside the adhesive over time. When the surfaces are pressed together, enough pressure of the surfaces should be used, and the pressure can be sustained for a long time if required, using a clamp. Manufacturers also specify curing times that are recommended for use; these periods ensure that the material attains the highest strength possible, after which it remains stable for long periods.
Maintaining Your Felted Wood Projects
Felt wood projects require careful attention with regard to cleaning and maintenance, so as to preserve their quality and aesthetic look. Carrying away dust and particulates is easy and should only involve a microfiber wipe or delicate shedding bristles without risking the felt or timber surfaces. In the event of any serious and deep stains, it is possible to use a damp cloth or a cloth moistened with a pH-neutral cleaner; however, caution should be exercised, given that wood can warp and felt disintegrate at high moisture levels. Make sure to dry the surface as soon as possible to prevent further moistening. try to avoid using chemicals and strong solvents as they may damage the lacquer and also risk ruining the co-efficient of adherence between the glue and wood.
In addition to cleaning, maintaining felt wood items also requires moderating the surrounding environment. Rapid temperature changes, high levels of moisture, or sunshine can cause the items to bend or distort or the adhesive to become weak. For this reason, one should keep FELT projects in a place where these factors are relatively mild. In addition, dehumidifiers or air-conditioners may be used for control of climate, more, during humid weather.
Common Mistakes to Avoid When Gluing Felt
- Using the Wrong Adhesive
Adhesives that are not meant to be used with fabric or felt can lead to poor adhesion or disintegration of the felt. Use the fabric-specific or mitigation-grade hot glue for better results.
- Applying Too Much Glue
Adhesive should be used sparingly as it may result in soaking of the felt, leading to the setting out of the glue or the formation of dirty stains. The adhesive should be thin and evenly layered to achieve tidy and even results.
- Skipping Surface Preparation
Dirty bonds are inevitable when bonding is done on unclean surfaces. Both the felt and the contact sides should be well prepared, i.e., cleaned and dried or free from any contaminating elements or particles such as dust or lint.
- Ignoring Drying Times
In situations where adhesive glue is used such glued materials should not be lifted too early because their premature handling will make the bond weaker. Bonding will only last if the adhesive is fully hardened according to the technique outlined by the manufacturer.
- Not Using Proper Pressure
Low pressure while trying to glue felt to wood, for other surfaces, poor handling of tissues. Light but adequate pressure should be applied in order to hold the surfaces together in comparable forces into the materials.
Overusing Glue
Applying more pressure to the beads of glue applied in a manner to stick two surfaces together may lead to a host of problems that hinder the efficient facilitation of the process. Excessive application often leads to dripping at the borders, which is quite difficult to wash off without causing any damage at the same time, especially in the case of felt, which is ready to absorb such an excess of glue, causing discoloration or hard spots on the surface. Moreover, excessive use of glue causes longer drying and curing times, which may postpone the finishing of the work and negatively affect the bonding ability due to the adhesive layer becoming uneven or hard. It’s crucial to follow all the manufacturer’s guidelines to apply the product correctly, in order to obtain professional and durable results.
Not Allowing Enough Drying Time
Another common mistake associated with the use of adhesives is the lack of allowing an appropriate time for drying or curing the adhesive. Inadequate time will eventually destroy the strength of the bond since various types of adhesives have appreciable timelines that have to be adhered to in relation to the conditions within which the bonded adhesive is applied and the materials that have been used. Where adhesives perform weakly, if any drying time is limited, parts may break apart or budge in an indented case. Cyanoacrylate adhesives, for example, set in a matter of seconds but given a full cure, can take up to 24 hours, while epoxies tend to take more time to cure before they give the desired results. Weather conditions specifically temperature as well as humidity do matter, as well; while higher humidity is preferred for some adhesives to set, low temperatures is something that could, in fact, delay the process for long. Hence, one should always consider the recommended curing time for a particular bonding product and how weather conditions should be considered so as not to have weakened bonds and thus postpone work.
Reference Sources
-
“Traditional Glue, Adhesive and Poison Used for Composite Weapons”: This study explored traditional adhesives made from plant extracts and their applications in composite weapons.
-
“Corrugated Veneer Joinery and Construction Material”: This research focused on the sound insulation properties of corrugated veneer panels, which were tested with PVA glue and felt. It found that while the material was effective at high frequencies, it required additional layers for low and medium frequencies.
Frequently Asked Questions (FAQs)
Q: What’s the best glue to adhere felt to wood?
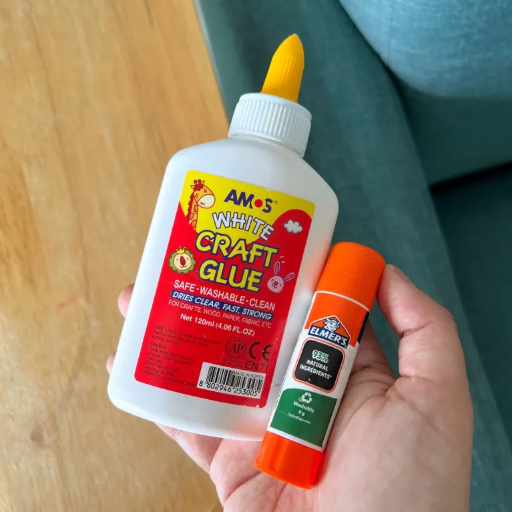
A: The best glue to adhere felt to wood is typically a strong craft glue or a spray adhesive like 3M 77. These adhesives provide a strong bond and are easy to use. For projects requiring a non-toxic option, Elmer’s school glue or Titebond can also be effective, although they may require a longer drying time.
Q: What’s the best way to lay the felt onto the wood?
A: The best way to lay the felt onto the wood is to first clean the surface of the wood to ensure proper adhesion. Apply a thin coat of your chosen glue, such as 3M spray adhesive or a hot glue gun, and then carefully place the felt onto the wood. Ensure there are no air bubbles by smoothing out the felt as you press it down.
Q: What glue types work well on felt?
A: Different glue types can work well on felt, including fabric glue, craft glue, and hot glue. For a strong permanent bond, consider using 3M spray adhesive or Super 77. If you are looking for a washable option, white glue or Elmer’s can be used for temporary projects.
Q: Can you use a hot glue gun to glue felt to wood?
A: Yes, a hot glue gun is a popular choice for gluing felt to wood. It works quickly and forms a strong bond, especially if applied correctly. However, be mindful that the glue can soak into the felt, which may affect the appearance if the felt is thin.
Q: How do you apply 3M spray adhesive to felt and wood?
A: To apply 3M spray adhesive to felt and wood, first ensure both surfaces are clean and dry. Shake the can well and hold it about 6-8 inches away from the surface. Spray a thin, even coat onto the wood and the back of the felt, then allow it to sit for a few moments before pressing the felt onto the wood. For the best results, work in a well-ventilated area.
Q: Is there a better bond when using Titebond for felt projects?
A: Titebond can provide a better bond for felt projects, especially when dealing with woodworking. It dries clear and is non-toxic, making it suitable for a variety of crafts. However, it is essential to apply a thin coat and allow sufficient drying time for optimal results.
Q: What is the best glue to use for a felt board project?
A: For a felt board project, the best glue to use is usually a strong craft glue or fabric adhesive. These types of glue create a lasting bond and allow the felt to stay securely attached to the board. Hot glue can also be an option for quick projects, but it may not be as durable for long-term use.
Q: How can I ensure my felt adheres well to wood?
A: To ensure your felt adheres well to wood, choose the right glue for the materials you are using, such as 3M spray adhesive or a strong craft glue. Clean the wood surface thoroughly before applying a thin coat of glue, then press the felt firmly onto the wood, smoothing out any wrinkles or bubbles. Allow it to dry completely for the best results.


