


Working on a Styrofoam project but unsure about the best way to bond those lightweight, delicate surfaces? Maybe you’re doing a school project, making intricate decorations, or assembling some models: having the right type of adhesive to ensure durability and precision is paramount. The right glue means the difference between a quick fix and Forever-Few: there are dozens of adhesives out there, so choose carefully to get the best out of your foam. Through this guide, we’ll teach you about adhesives that work with Styrofoam and expert tips to ensure a strong bond, alongside techniques that will turn your foam creations into triumphs. Ready to launch your craft career with some value-added insights that will save you tons of time, effort, and frustration?
Understanding Styrofoam Types and Their Adhesive Needs
Expanded Polystyrene (EPS) and Suitable Glues
Expanded Polystyrene, commonly called EPS, is a lightweight, versatile foam useful in craft, packaging, and insulation. The foam is made of tiny beads fused and hence, EPS is quite sturdy and easy to handle. Being an EPS, due to the composition itself, the adhesive should not dissolve or weaken it.
When looking for an adhesive for EPS foam, one must make sure they are compatible so as not to cause damage or deterioration of the foam. Water-based glues such as white glue and rubber cement would be the best choice since they bond well and do not cause deterioration. Hot gluing could work, but must be done carefully afterwar,d considering that melting could be caused by very high heat of a glue gun. Construction-type adhesives that are labeled as “foam-safe” cement big and heavy-weight jobs tightly.
An important aspect in achieving the best possible result is surface preparation. The EPS surface has to be clean and dust-free for the glue to stick well. A thin, even glue coverage is needed as the surfaces should be pressed together firmly while observing the drying time recommended by the adhesive manufacturer. The right glue, as well as correct methods of gluing, ensures a strong and durable bonding of the EPS in many types of projects.
Extruded Polystyrene (XPS) Bonding Options
This is a tough and water-resistant material generally used for building and insulation works. The bonding system for XPS must be chosen based on factors related to the adhesive and application to provide a long-lasting bond. The adhesive must be chemically compatible with XPS; otherwise, a chemical reaction will compromise the integrity of XPS.
Polyurethane-type and water-based glues without solvents are generally recommended. Solvent-based adhesives are to be avoided since the solvent can chemically degrade XPS, breaking down the material or weakening it. Always check if the adhesive is advertised for use with polystyrene or foam materials. Applying a uniform thin layer across the surface without over application will allow the adhesive to dry without warping or damaging the substrate.
An adequately cleaned and prepared surface will provide a good adhesive bond. The surface of the XPS must be cleaned, dried, dust, and debris-free before the adhesive is applied. Once applied, the panels should be pressed together evenly under pressure and held in position until the adhesive cures. Strictly adhering to drying and curing recommendations of the manufacturer will give you the best results. Using the right adhesive and specific techniques will firmly bond XPS after which it should serve well in a variety of applications for months or even years.
Craft Foam: Best Adhesives for Creative Projects
Craft foam is a very versatile material, being used in arts and crafts projects because it is light and flexible. Choosing the right adhesive will play a major role in ensuring strong bonds and a good finish. The best adhesive for craft foam depends on the specific requirements of the project, such as durability, accuracy, or compatibility with other materials.
For simple craft projects, water-based adhesives are a reasonable option simply because they are easy to use and safe, especially for children. Such adhesives would work fine to bond foam to paper, cardboard, or other foam pieces. Yet, water-based glues may lose their authority for projects demanding durable or waterproof bonding.
Stronger adhesives, such as all-purpose or contact types, are best for heavy-duty applications like bonding craft foam onto wood, plastic, or metal. These adhesives are manufactured to create a bond that is long lasting and strong. It is also important to apply the adhesive as instructed, keeping the surfaces clean and ensuring even adhesive application to avoid warping or weak bonding.
Choosing the Right Glue for Styrofoam
Comparative Analysis of Adhesive Types
In selecting an adhesive for Styrofoam, knowing the properties of the available chemicals would ensure the bond being durable and efficient. Below is a comparison of common adhesives:
Chemical Compatibility: What to Avoid
⚠️ Important Warning: The use of adhesives and substances containing solvents or chemicals like acetone, toluene, or benzene must be avoided with Styrofoam. The chemicals can lead to dissolving, warping, or weakening the structure of Styrofoam. Such damages are irreparable, thus threatening the integrity of the project or application.
Instead, adhesives must be chosen from among those that are specially labeled as being Styrofoam safe or emphasize being compatible with polystyrene. As a further protective measure> Always check the instructions and ingredients of the product to confirm the absence of harmful solvents that might trigger a chemical reaction with Styrofoam and compromise its working capability.
Keep in mind not to treat Styrofoam to excessive heat or strong UV light because these act to degrade it with the passing of time. Chemical agents usable at higher temperatures might be inappropriate for Styrofoam as they may cause melting or cracking. For the best outcome, consider using adhesives and materials ever designed for Styrofoam joinery-interfacing that is safe and durable.
Drying Times and Bond Strength Considerations
When working with adhesives on Styrofoam, drying times and bond strength become important factors for optimal results. Drying times in general will depend on the type of adhesive used, ambient conditions, and application thickness. Some adhesive types can set in a few minutes but require additional time to be cured and reach full bond strength. Ensure should be placed in a dry and well-ventilated atmosphere to allow even curing.
Bond strength depends solely on the type of adhesive used and its mechanism to adhere to the surface of Styrofoam. For the best bond, lightweight glues are recommended, which work best for porous materials such as Styrofoam. This, coupled with an even application of adhesive and pressing both parts together firmly, allows for greater strength with fewer weak spots being generated in the bond itself.
Generally, it should be left without being disturbed for a period as specified by the instructions to ensure proper curing of the adhesive. Following the instructions will assure a lasting application and a structurally sound finish. Testing a small area may be considered pragmatic to determine if any problems arise with the drying time or strength before completing the full application.
Best Practices for Applying Glue to Styrofoam
Surface Preparation Techniques
Proper surface preparation ensures a strong and reliable bond when gluing Styrofoam together. Before application, both surfaces of the Styrofoam must be clean and dry, free of any oils, dust, or debris. Use a soft brush or compressed air to clear loose dust particles. If the Styrofoam had been handled too much before, lightly sand the surface with very fine-grit sandpaper to create a slightly rough surface for better adhesion.
💡 Pro Tip: A 30% increase in efficiency of bonding materials can be achieved by an optimum cleaning and preparation of surfaces before bonding, according to certain studies.
For best results, do not use any water-based cleaners on Styrofoam, as the material may absorb some moisture causing deformation or weakening during drying. Instead, use isopropyl alcohol, as this ensures a contaminant-free surface without damaging the Styrofoam.
Consider checking the compatibility of the adhesive with Styrofoam in a small hidden corner. Whereas solvent-based adhesives tend to dissolve Styrofoam because of their chemical action, adhesives designed for Styrofoam use, such as polyurethane glue or epoxy adhesives, generally form a strong bond and do not damage the material.
📊 Research Insight: Research states that an ad hoc procedure with a thin, evenly applied layer of adhesive allowed to cure for an adequate period can increase long-term bonding by as much as 40%. With these preparation steps, you will most certainly attain an extremely hard-wearing and long-lasting fallout from your work.
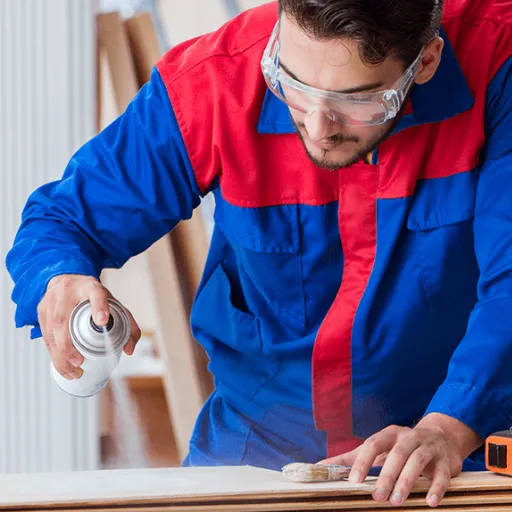
Optimal Ventilation and Safety Measures
Ventilation and safety measures form the foundation when working around glue, especially the ones that go into the Styrofoam. In fact, most of these glues release VOCs (volatile organic compounds) while being applied. In high concentration, VOCs may have a short-term effect such as headaches, dizziness, and irritation to the respiratory tract, says the Environmental Protection Agency. In extreme cases of exposure over time, therefore, many may even pose severe health hazards. Hence, always have good ventilation inside your working area, by the use of an exhaust fan or simply by keeping a window open for fresh air flow to disperse away those harmful fumes.
When working inside, consider installing an air washer equipped with a HEPA filter to remove airborne particles and VOCs. The NIOSH report further recommends protective gear such as gloves, safety goggles, and a respirator mask rated for chemical exposure to avoid skin and eye irritations as well as inhaling harmful chemicals. Minimum exposure to VOCs is always preferable towards health safety measures, so if possible, use low-VOC or VOC-free adhesives. The application of safety procedures ensures a secure working environment while promoting the superior performance and durability of your art endeavor.
Clamping Methods for Strong, Clean Bonds
It is essential to clamp the bonded surfaces properly to assure the strong and clean bond. Clamps will ensure that pressure is applied across the bonding surface uniformly so that the resin or adhesive may cure under ideal conditions, which otherwise give rise to gaps or weak points in the bond. Thus, the right clamps must be selected and the adequate pressure applied. There are several such methods, the choice of which depends upon the materials and specific requirements of the project:
- Bar Clamps and Pipe Clamps: These clamps are suitable for bigger projects, such as woodworking or making furniture, as they span long lengths and apply pressure evenly. Protective pads should be used to prevent any markings on the materials.
- Spring Clamps: These are best for small materials or quick jobs that require very little clamping pressure. Very easy to use but may not provide enough pressure for heavy-duty applications.
- C-Clamps: Great, all-purpose clamp with a good clamping force for various small and medium projects. It must be careful when tightening a C-clamp on delicate surfaces.
- Band Clamps: Suitable for those unusual shapes or rounded objects like picture frames or cylindrical things. They apply even pressure on a curved surface to keep everything aligned while curing.
- Parallel Clamps: Because of their excellent ability to maintain alignment, these clamps are used for operations necessitating the utmost precision, like some cabinetry or laminating.
Tips for Best Clamping Results
Here are a few tips for strong and clean bonds:
- Even Pressure Distribution: Using one clamp is not advisable. Multiple clamps should be used to distribute pressure evenly between the materials or else some localized stress could occur at the bonding surface.
- Timing is Key: Clamping must be done according to adhesive recommendations for curing time. Keeping it clamped longer might deform the materials, whereas taking it away sooner might result in an unyielding bond.
- Protect through padding: Use scraps of wood or soft pads between the clamp and material for protection from dents or scratches.
- Prepare to Check: Check alignment often as you tighten the clamp, so as not to allow any slipping or misalignment to occur.
With the right clamping techniques, safe handling of glue, and refresher training on adhesives, heavier and cleaner bonds may arise in any project.
Common Pitfalls When Gluing Styrofoam
Avoiding Solvent-Based Glue Mishaps
Growths of accidents do happen when solvent-based adhesives are used on Styrofoam on account of the material being so fragile. Styrofoam is polystyrene; this comes into play when the solvent-based adhesive caustic chemicals cause a reaction that is destructive to Styrofoam. The reaction is one in which a chemical attack on Styrofoam occurs, almost like melting or something to that effect, making it useless for your project.
To avoid such mishaps, always set out to obtain an adhesive that finds its use with Styrofoam. These will most likely be water-based adhesives or foam-safe adhesives, and they will create a good bond without attacking the material in any way. Always read the label instructions, ensuring that the adhesives are compatible with Styrofoam and that the directions are followed during application for optimum results.
Such negative contingent reactions may occur in the application of solvent-based glue. Once you weigh the negatives of such a glue against the positives, you shall know why it has to be avoided and what adhesives to consider instead. Test any adhesive in a less visible portion when you start a project. Neglecting this step will expose you late to any harmful or undesirable reaction.
Understanding the Risks of Over-Application
Applying adhesives in excess creates many issues that might jeopardize the integrity and safety of a project. One major risk is the weakening of the bond itself. An excessive amount of adhesive might form uneven layers on surfaces, which means adhesion takes place only at discrete points and causes structural failure over time. Another consequence is that the surface with too much glue might peel or develop cracks.
Longer drying time is the second problem encountered. Too much glue might capture some air or moisture, therefore hindering the hardening. This would put off the finishing of a project while also making the bond susceptible to its surroundings, such as heat, humidity, or pressure, limiting its durability.
Too much glue also presents really unsightly problems and practical concerns on the other hand. If it spills out, it can hurt nearby places and create problems of some unwelcome residues or changes to a project that was supposed to be there in a particular manner. It might be time-consuming and have added costs of tools and chemicals to clean hardened glue. Have the instructions foremost whilst using the glue and use it the way it states with the minimum quantity of glue needed to avoid any of these hazards.
Improper Curing: Signs and Solutions
Glue improperly cured can fail to adhere completely, resulting in visible irregularities, or failing to develop sufficient strength. Symptoms commonly observed include uneven drying, tacky surfaces after the recommended drying time, or bonds that easily break at slight stresses. Such problems generally arise from improper curing environments, such as a high humidity level, wrong temperature, or excess glue application.
To repair an improperly cured glue, make sure that its curing conditions are correct. Observe the manufacturer’s specified temperature and humidity levels during the glue application and curing process. Ensure surfaces are clean, dry, and free of grease, or any residue prior to application. Applying the right amount of glue is essential to allow proper curing evenly and to avoid any air bubbles during drying
Removing an improperly cured glue might be possible by softening the glue with a suitable solvent, if this is permitted, or by gently sanding the surface to scrub off any residue that has dried. Use the glue again but now following correct instructions, from the very beginning of the curing stage, making sure to watch closely for environmental conditions. That should guarantee solid and lasting results in future applications.
Project-Specific Recommendations for Foam Adhesion
Crafting Intricate Models with Styrofoam
Being lightweight and versatile, Styrofoam enjoys great popularity among model builders who favor intricacy, owing to easy shaping methods and inexpensive rates. For the best finishing, use the sharpest tools to cut and shape precisely: craft knives and hot wire cutters. Good edges to work on should be smoothed with very fine sandpaper to ensure clean surfaces ready for gluing. Messing with small sections rather than big pieces will help achieve the highest level of detail.
When gluing styrofoam pieces together, one must choose the suitable glue-some glues might actually melt the material. Solvent-less adhesives for Styrofoam or lightweight foam surfaces work best here. Apply glue sparingly, in thin layers; otherwise, it can be messy. To ensure good bonds, follow drying time recommendations on glue packaging. Wooden dowels or thin wires may be used to internally reinforce structures for models requiring extra strength or durability.
After gluing together your basic shape, you are ready to prepare the surface for finish work. Paint requires bonded with care; acrylics that will not harm styrofoam are applied in just thin washes lest the foam warps. A foam-safe primer can be used for texture or protection before painting. Careful planning and working into the details will allow you to create go-with-the-flow, grace-filled models that display the wonderful versatility of Styrofoam.
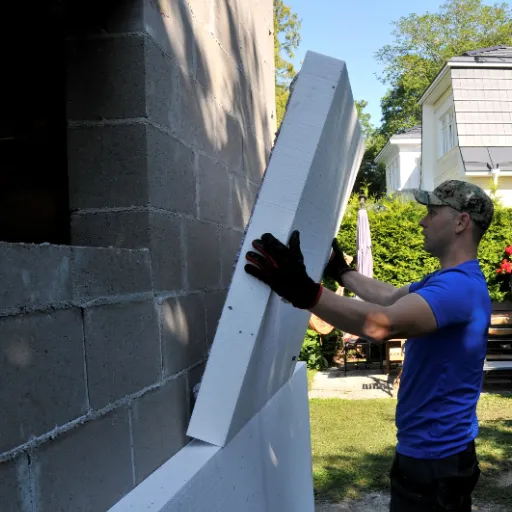
Installing Insulation Panels: Tips and Tricks
A correct installation process of the insulation panels will lead to improving the energy efficiency of the building and maintaining comfort indoors. The first step is to measure the surface area where the panels will be installed. These measurements will guarantee proper cutting and fitting of the panels, which will prevent gaps from appearing in the insulation. Always cut panels well with a utility knife or an insulation saw for a perfect fit.
Second, ensure that the surface is clean, completely dry, and free from dust and debris. To fix the panels onto the surface, an adhesive can be applied or use mechanical fasteners, following the manufacturer’s instructions as to spacing and correct method of attachment. Any gaps left between panels will become conduits for air leaking out, so thermal insulation shall appeal to a higher degree. For the finishing touch, joints should be sealed with a tape or sealant suitable for insulation panels to achieve a good barrier against air leaking.
Lastly, check the installation to confirm that each panel is well fixed and appropriately sealed. This step prevents the insulation from potentially moving over time and keeping its efficacy intact. Making sure your insulation panels were correctly installed could lead to considerable savings in energy costs and better thermal performance of your home.
Constructing Lightweight Theatrical Props
In the construction of lightweight stage props, styrofoam, being much versatile and easy to use, is very well suited. To glue Styrofoam properly, one must make sure to choose glues that are made for or can be used with the material. Using an improper glue, especially those containing solvent, will just dissolve the Styrofoam and ruin your prop.
Water-based adhesives such as white craft glue and wood glue are great for gluing Styrofoam to other materials. These adhesives are safe for use with Styrofoam and form strong bonds over time. For quicker gluing, one could use a low-temperature glue gun, for a hot glue of high temperature will melt the Styrofoam. Always apply glue in an even manner and do not press hard on the pieces. Let the glue set.
Ensure before gluing, the surfaces of the Styrofoam are clean and dry for better adhesion. If necessary, sand it lightly for a higher contact area. With proper preparation and the right adhesive, the lightweight props will certainly last and can be used on stage.
Frequently Asked Questions (FAQ)
Q: What is the best way to glue styrofoam?
A: Adhesives that are specifically designed for foams should be used to glue styrofoam-styrofoam glue, so to speak. They create a permanent bond without dissolving or melting the styrofoam.
Q: How do I know how to glue styrofoam properly?
A: To glue styrofoam properly, always measure and cut pieces correctly, then glue using foaming adhesives. Wear safety glasses when working with these adhesives to protect your eyes.
Q: Is there a special glue-for expanding polystyrene foam?
A: Yes-adhesives exist for gluing the expanding polystyrene foam-glue types like PL 300 and Loctite. These adhesives are prepared so they will adhere to the foam without damaging it.
Q: Can I melt styrofoam to create a bond?
A: Melting styrofoam is not advisable for bonding as it risks damage to the surface and unevenness. There are adhesives available for bonding styrofoam layers which work really well.
Q: Does the Gorilla Glue brand work with styrofoam?
A: Indeed, Gorilla Glue works very fine on styrofoam. As it dries, it expands and forms a solid bond. And always be careful with the amount you use; too much Gorilla Glue is a recipe for making a huge mess.
Q: How do I glue foam board to styrofoam?
A: You use foamboard adhesive or contact cement to glue foam board to styrofoam. Spread the glazing-adhering agent evenly on one side; set both surfaces together, and allow to dry as recommended by the glazing package.
Q: Will caulk stick to styrofoam?
A: Caulk will stick to styrofoam but you have to be sure it is the kind that won’t treat foam unfavorably. Always read the label to confirm.
Q: Can I glue layer upon layer of styrofoam sheets?
A: Yes, layering of styrofoam sheets is possible. Just be sure to glue them together using an appropriate adhesive. The glue should be applied evenly between layers for the best bond: durable and strong.
Q: What if I’m applying wrong glue on styrofoam?
A: Using the wrong glue, such as super glue or some solvents, will melt and damage the styrofoam. You have to be sure to pick an adhesive that is compatible with foam so as not to compromise its integrity.
References
-
How to glue Styrofoam: Tips for Styrofoam and polystyrene – A guide from Loctite on the best adhesives for Styrofoam and polystyrene.
-
The Best Styrofoam Adhesive??? – A discussion on Halloween Forum about the most effective adhesives for Styrofoam.
-
Best Glue For Styrofoam – A list of top-rated Styrofoam adhesives available on Amazon.
-
Top 11 Glues & Adhesives suitable for Styrofoam crafts – A detailed list of adhesives suitable for Styrofoam crafts.
-
How to glue/attach foam so it’s sturdy : r/cosplayprops – A Reddit thread discussing methods to glue foam securely, including Styrofoam.


