


3D printing is a process that makes production, prototyping, as well as home projects much easier since it allows the making of sophisticated parts with maximum accuracy. In most cases, it is necessary to attach smaller parts, which have been printed, so that they can play a much larger, useful and detailed function. This is where knowing and effectively using the skills of attaching 3D printed parts with glue comes. Regardless of whether one is restoring a damaged print, combining multiple printable models into one, or modifying the models, how well the tricks and materials used will make the attachment last remains pivotal. This write-up takes you on a course concerning the principles, tools and procedures when bonding 3D-printed parts. Be it from the need to choose a glue for different active materials such as PLA or ABS, or the task of finishing and reinforcing prints, we will detail all the steps to help you grow out of the reticence and adopt full range of 3D printed models. By the end of this lesson, you will be well equipped to deal with any assembly problem even if it involves prints.
Understanding the Basics of Glue for 3D Printed Parts
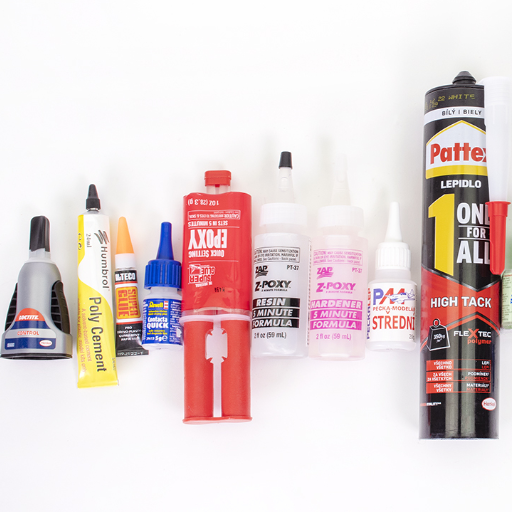
By the purpose of fixing the 3D printed objects, one must not forget that the choice of adhesive is paramount to the durability of the joint. Each adhesive group is designed for certain materials.
- Cyanoacrylate (Super Glue) – This is typically the one that is built in general for PLA since it has a quick curing time and presents an effective bond in gluing of tiny parts.
- Epoxy Resin – The most preferred adhesive for the fixing of large sized components and structural joints that may need high strength and long lasting bond qualities due to longer curing time.
- ABS-Specific Solvents – For parts that are made of ABS the pieces can be chemically welded using acetone-based solvents as the bonding agent so that there is no single blemish left in the assembly.
- Polyurethane Adhesives – Whenever holding paint is required for the improvement of incompatibles and binding different types of bonds the admixable polyurethane adhesives boast flexibility and water-resistance.
Always clean and apply loose abrasive to the surface before the adhesive is used to make it adhesive. Also, it is highly recommended to make sure that the adhesive is compatible with the materials used so as to achieve the best results.
Choosing the Right Glue: Super Glue, Gorilla Glue, and Epoxy
|
Glue Type |
Best For |
Cure Time |
Strength |
Water Resistance |
Special Notes |
|---|---|---|---|---|---|
|
Super Glue |
Small repairs, non-porous surfaces |
10-30 seconds |
High (small areas) |
Limited |
Not ideal for flexible materials |
|
Gorilla Glue |
Wood, foam, metal, ceramics |
1-2 hours |
Very strong |
Excellent |
Expands as it cures |
|
Epoxy |
Heavy-duty repairs, mixed materials |
5-60 minutes |
Superior durability |
Excellent |
Requires precise mixing |
Factors to Consider When Selecting Adhesives for Different Filaments
- Material Compatibility
Different adhesives possess different temperature requirements, which makes close alteration of certain polymers. For instance;
- PLA (Polylactic Acid): Bonds well and allows the use of polysporin for glue sn “tiles” or epoxy bonding on “non-porous” slabs.
- ABS (Acrylonitrile Butadiene Styrene): Chemical bonding of ABS requires an acetone solution or specific plastic welding adhesives. In general, wood industries do not favour adsorption bonds for PET since this will also be bonded with adhesives, as there is hope for under-pin.
- PETG (Polyethylene Terephthalate Glycol): Use of common adhesives, e.g., Super glue, on areas attached with NANO particles will not be impressive; this adhesive glues best PETG joints.
- Nylon and TPU (Thermoplastic Polyurethane): These materials require adhesives that bond with them while retaining the flexibility that the material already possesses, and the adhesive is either a contact cement or a structural adhesive.
- Curing Time
Manipulative procedures and object dimensions, contain variations which in turn dictate cure time. Such as:
- Fast Curing: Super glue sets within 10-30 seconds, ideal for small repairs.
- Moderate Curing: Gorilla Glue requires 1-2 hours, suited for larger applications.
- Extended Curing: Epoxies may take up to 24 hours for maximum strength, essential for heavy-duty or complex assemblies.
- Bond Strength
The bond strength is the amount of physical tensile load applied to a material needed to separate a layer or structure of a polymer. When repairs involve connections that are subjected to high loads, epoxies are normally used, which are known to be used for joints that bear heavy loads; on the contrary, super glues are used for light-duty joints.
- Flexibility
Although some types of tapes or glues and other forms of adhesives tend to produce a very rigid bond, such bonds may not be suitable for most filaments that require flexibility. So, while using labels to glue, in contrast to the filaments that can be curved, there is a need to is adhesives that will allow that curved return after they have hardened .
- Environmental Conditions
Certain conditions, notably temperature, humidity, and time in use of a bonded product, such as an installation, also need to be taken into account.
- Moisture GU single coatings (like Gorilla Glue or epoxy) are appropriate for high-humidity areas because they are moisture-resistant.
- Silicone adhesives do well in high temperature applications are an absolute way to go, particularly when bonding nylon or PET/G is required.
Preparing Your 3D Prints for Gluing
- Surface Cleaning
Taint all the surfaces to be glued so that they are clean, i.e., no greasy, dusty, or any other soils. Use isopropyl alcohol (IPA) for the removal of these contaminants as it is effective in such instances.
- Sanding
Scuff the adherence areas with fine-grained sandpaper, such as 200-400-grit sandpaper, to help the glue adhere better by creating more roughness on the surface for better stickiness.
- Dry Fit
Insert the parts before using the adhesive in order to check that the right connection has been achieved. This is one of the methods to prevent mistakes while gluing.
- Adhesive Choice
Analyze the label on the glue container and look up the other material in the compound to determine if they will work well together. Every other bonding surface needs to be properly aligned with one another and glued before they can be allowed to cure.
- Clamp or Secure
Comprehend the presence of the bond during the curing period and ensure positioning or clamping of the parts to be bonded so that it does not move and cure effectively.
Cleaning the Surface of Your 3D Printed Parts
Cleaning 3D Printed surfaces correctly is very important in order to achieve a smooth finish and a proper condition for further modeling or assembly. Start by checking the sample for any support structures that might be stuck on it. Many such support structures may require forceps or pliers to remove it by hand because they do not come off easily. Working in fine detail, continue to use small files or abrasive paper for smoothing edges and removing irregularities.
After printing, one can work on post-processing, specifically surface finishing, such as scrubbing with a fine-grade abrasive, which improves the look of the object under target. The usual technique would be roughing with grade 120 sandpaper as the lowest grade to remove coarse imperfections followed by stepwise progression to finer grades up to 600 for smoothing. To remove dust trapped in a dust-prone material, such as PLA used in 3D extrusion, always use isopropyl alcohol, agitated gently. This allows the cleaning of the dirty print, while still protecting the print in its original fine-mesh form.
Moreover, choose the right tools and solvents that do not react with or reduce the beauty of the materials as they are used. Performing the procedures outlined herein will increase the effectiveness of post-treatment on 3D models, making them more attractive and functional.
Sandpaper Techniques for Better Adhesion
Step-by-Step Instructions to Glue 3D Prints Together
- Prepare the Surfaces
Ensure the surfaces of the 3D prints are free of dirt, fat and other detriments. You can also use isopropyl alcohol or an analogous solution for the streak-free bonding of parts.
- Sand the Contact Areas
Grind the areas first before gluing by passing a fine-grit sandpaper (for example, 120-220) on the surfaces. Doing that adds some roughness to the surface and provides a better bonding surface. Remove any dust that remains after sanding before applying the adhesive.
- Select the Appropriate Adhesive
Choose a bonding agent that will work with the materials of your prints. Cyanoacrylate, also known as superglue, works best with PLA and/or ABS. Two-part epoxy works in a similar fashion, but provides a better hold between the surfaces as it cures at a lower bonding temperature in most cases. It is suitable for most materials, too.
- Apply the Adhesive
Apply a small and unvarying coat of adhesive to one of the surfaces. Never overuse the adhesive because it runs in the joint, filling any extra spaces that are mostly around.
- Align and Join the Parts
Clip the parts together and apply pressure to bond them together. The precision in bonding should be observed to avoid spaces or misaligned sections while assembling.
- Clamp the Parts (if necessary)
Where curing time is required to bond the components, clamps or weights will be used to hold them together. The manufacturer’s manual should be referred to for specific time limits for curing and to align the parts properly.
- Allow the Bond to Cure
Definitely let the bonding time expire following the instructions that come with the adhesive. Besides, during this time, do not attempt to relocate or apply pressure to the new bond.
- Inspect the Bond
After the bond has dried enough, test it to check strength and uniformity. Do not forget to clean out any excess adhesive without resorting to any sharp objects, but sandpaper can also be used if the need arises.
Using Cyanoacrylate for Fast Bonding
Instant adhesives, also known as super glues, work quickly and have very high bonding abilities between different materials. This is because they polymerise within minutes when triggered by moisture, which makes it possible to use them in both porous and non-porous pieces. Sticking agents such as Cyanoacrylate have been improved in recent years in that they have better resistance to heat and impact force so that they cannot be easily used in heat-treated parts in electronics, automotive, and medical devices, among others. It will also be noted that since they adhere to the surfaces of objects and harden quickly, care must be taken not to use them on dirty or greasy surfaces because such surfaces will reduce the adhesion effect. Special applicators with tips and accelerators may be used for spot working, mostly in industries performing quick work. In this regard, be cautious during use of these adhesives since they have a tendency to bond quickly hence there are health hazards or risk.
Applying Gorilla Glue for Stronger Joints
For the more significant and permanent adhesive bonding such as using Gorilla Glue, the state of the surface for adhesion is most critical. The base materials should begin with a quick treatment in the form of cleaning, making sure that no dirt, dust, and oils are on the surfaces, and the surfaces are wet only and not too much, since the most active chemical in Gorilla Glue is water. Wood, a porous material, would require light moistening of its surface in order to enhance the penetration and the cure of the adhesive. Sanding of these surfaces, whether it is metal or plastic, improves the bond through the mechanical roughness.
Common Mistakes and Troubleshooting Tips
- Using Too Much Glue
If the adhesive is applied too much, it can swell and deform adhesively, which may reduce the effectiveness of the bonding. Refrain from applying a thick-walled adhesive and apply them uniformly for even application.
- Skipping Surface Preparation
Failure may occur in adhesion if the surfaces are not properly prepared, that is, cleaned or slightly wet (if the glue calls for it). Clean surfaces, which are not wet, and those which are damp protects adhesive performance.
- Insufficient Clamping Pressure
Insufficient pressure during application may lead to dead joining. During the setting up and curing process, it is always beneficial to use appropriate levels of weight or clamping to prevent the materials from movement.
- Rushing the Curing Process
Failing to opt for the same effect, the strength of the bond may also come off after a limited period of time, curing. Adequate curing time for the glue is not less than 24 hours which allows acquiring the highest strength.
- Improper Storage
Improper storage of the glue results in decreased functionality. Ensure that you seal the container properly and keep it in cool and dry conditions s that it will last longer and be more effective.
Fixing Mistakes: How to Reapply Glue
Using an adhesive again after an issue is a highly essential process that necessitates cautious handling for the attainment of the objective. Use a scrim, sandpaper, or even some chemical adhesive remover for the elimination of the used coarse powder, taking care of the respective type of glue. Ensure that the materials being glued are clean and free of impurities and dirt since they can weaken the bonding. If possible, bond preparations ahead of surface bonding may also entail slight abrasion of the surfaces and re-cleaning with a dry cloth to make sure that there is no more dust or some other solid composing particles present.
It is recommended to use adhesive of a given quality as pieced needs would be most warranted and re-cured every such area even if after pressing certain components with it, there are gaps or it has been overly built; because the bond may possibly be affected or the components will not be in correct positions. When the glue is to be applied of a given type, a range of applications is always spelled out with the manufacturer, including the required degree of pressure, required time lag before the tight and so forth. And this must be done using regulated temperature and humidity controlled conditions and usually takes up to 24 hours curing. This approach should help to guarantee that the attempted bond on this second occasion is at least as strong as if not stronger than the original bond.
Understanding the Limitations of Different Adhesives
The drawbacks of every type of adhesives are distinct and are based on their chemical structures, time taken to cure as well as the methods of application. Such as, cyanoacrylate–based adhesives, also known as superglue, are quick to use but have a tendency to break easily under dynamic stress and exposure to moisture, making them very suitable for short-term applications and not as much for external flexible joints. In contrast, epoxy glues are very robust and can resist high and low temperatures and chemicals with some good effect. On the other hand, these kinds of adhesives have and curing tempretures over long periods may not complete bonding under peel loads, due to the fact that the components have very high – bounded together resins-cte rigid.
Polyurethane adhesives present another principal limitation as they are very good at filling gaps and general adhesion. However, they are also very poor in UV stabilization in that their bond breaks down if they are left out in direct sunlight for long periods. Pressure-sensitive adhesives, normally associated with adhesive tapes, are vulnerable to high temperatures and to contaminating canes such as grease, which affects their viscous elasticity properties.
It is vital to know all such restrictions when applying these products so that the best is done and no adverse effects ensue. Fabricators and suppliers have to bear in mind these conditions while choosing materials, how the products are dimensioned, and their ability to last in order to avoid untimely collapse or even worse, in-service of the structure. Some of these constraints are completely alleviated by appropriate surfacing and confining to well-defined cure cycles, making possible the development of more dependable bonding technologies across the industrial spectrum.
Expert Tips for Professional Results

- Thorough Surface Preparation
Make sure the surfaces are all clean and dry, free from oil, dirt, and traces of moisture. Employ suitable manners of cleaning such as solvent wiping or abrasive methods, which the materials will determine.
- Select the Right Adhesive
Orient the kind of adhesive used to the final fabricated part and the environmental conditions. Epoxies are likely to be the best choice for structural or rigid bonding, while silicones or polyurethanes are suited for flexible bonds.
- Monitor Environmental Conditions
Carry on with bonding in environments where temperatures and relative humidities are constant. Severe environments can harm adhesives or their curing processes.
- Apply Uniform Pressure
Through the curing period, it is necessary to effectively use the pressure to make sure that there is no void spaces between each layer of the adhesive which is solidified in the bond.
- Follow Manufacturer Guidelines
Using a Hot Glue Gun for Quick Fixes
A hot melt glue is an amazing and easy-to-use appliance that is applied to glue quickly many different kinds of materials such as timber, fabric, metal, and plastic, and beyond. The working principle of said equipment lies in heating glue sticks in it until they reach their melting temperature, which then makes it easy to control the flow of the adhesive, and it bonds quickly when it is cold. The heat applied through its nozzle should reach the correct temperature so as to link the materials appropriately using the glue gun. Those that emanate less heat are best used for soft material types such as foam or thin plastic, while higher temperatures can take care of stronger materials such as wood or metals.
To acquire the most unfailing results, the principles of best practice necessitate an untainted work plane bereft of foreign elements such as dust, oil, or any other form of dirt, as they weaken the bond. Furthermore, any present adhesive should be used within a suitable time frame, as the strength of the bond is directly tied to the speed at which it cools. Circumstances will also require you to take care of yourself by putting on handwear, keeping glue away from the skin and face, and spraying your project with hot glue. Used properly, a hot-glue gun is a very strong tool that allows for long-lasting repairs. These facets work readily in other circumstances as well, where one is lo legislation claims that this is not appropriate, but there are facts showing that this is not so.
Leveraging a 3D Pen for Seamless Connections
Reference Sources
1. 3D Printing on Textiles – Overview of Research on Adhesion to Woven Fabrics (2023)
- Adhesion between 3D-printed polymers and textiles depends on textile properties, printing parameters, and polymer types.
- Double-weave fabrics show better adhesion due to deeper polymer penetration and higher thread density.
- Pre-treatment methods like roughening or chemical treatments improve adhesion.
2. The New Industrial Revolution: Manufacturing with 3D Printers and Polymer Materials (2024)
- 3D printing enables decentralized production, reducing shipping costs and empowering local manufacturing.
- The technology shifts focus from traditional manufacturing to design-based economies.
- Challenges include intellectual property concerns, potential monopolies, and risks like weapon manufacturing.
3. The Application of 3D Printing Formwork Technology in Concrete Building Materials (2024)
- Concrete 3D printing reduces waste and enhances automation in construction.
- Rheological properties, extrudability, and buildability are critical for successful 3D printing with concrete.
- Innovations include fiber-reinforced and large-aggregate concrete for improved performance.
Frequently Asked Questions (FAQs)
Q: What is the right glue for 3D printed materials?
A: The right glue for bonding 3D printed materials largely depends on the type of filament used. For PLA parts, you can use cyanoacrylate glues, commonly known as superglue, which creates a strong bond quickly. If you’re working with ABS parts, acetone can be used as a solvent to weld the pieces together, making it a popular choice for joining parts. For larger or more complex assemblies, epoxy offers a durable solution. Always ensure that the surfaces are clean for optimal adhesion.
Q: How do I apply glue to hold the parts together?
A: To apply glue effectively, start by cleaning the surface of the 3D printed parts to remove any dust or grease. Use a fine applicator or brush to apply an even layer of glue, ensuring you cover the areas that will contact each other. Press the parts together firmly and hold them in place for a few seconds to allow the initial bond to form. If necessary, you can use clamps to secure the parts while the glue cures fully. Be cautious to avoid excess glue, as it can create a messy finish.
Q: Can I use a hot glue gun for 3D printed parts?
A: Using a hot glue gun can be an effective method for gluing 3D prints together, especially for temporary holds or lightweight assemblies. Hot glue works well on materials like PLA, but it may not provide the strongest bond compared to cyanoacrylate or epoxy. When using hot glue, ensure the surfaces are clean and the glue is hot enough to flow well. However, keep in mind that it may not work as effectively for high-stress applications or with ABS parts, which require stronger adhesives.
Q: Is 3D gloop a good option for gluing 3D prints together?
A: 3D gloop is specifically designed for bonding 3D printed parts and works particularly well with materials like PLA and ABS. It creates a strong bond by melting the plastic slightly, allowing the parts to fuse together. To use 3D gloop, apply a thin layer on the joining surfaces and press them together. This method is often easier than traditional gluing methods because it provides a strong bond without the mess of excess glue. It’s essential to follow the manufacturer’s instructions for the best results.
Q: How can I secure the parts while the glue dries?
A: To secure the parts while the glue dries, you can use clamps or rubber bands to hold them in place. This helps to maintain pressure on the glued surfaces and ensures a stronger bond. If clamps are not available, pressing the parts together manually for a few minutes can also work, although it’s less effective. For larger assemblies, consider using a jig or fixture to keep everything aligned. Always check the glue’s curing time to ensure parts remain undisturbed for the required duration.


