


The most common issue when working with PLA filament is assembling parts in a way that enhances strength, precision, and a smooth finish. Whether you are involved in designing complex 3D projects, repairing a broken piece, or assembling a multipart model, knowing how to glue PLA effectively could be the difference. This guide will provide you with the best techniques for applying glue to create durable and well-finished PLA parts. From basic gluing checks to expert methods, this article equips you with the know-how to bring 3D projects to life with excellence and permanence.
Choosing the Right Adhesive for PLA
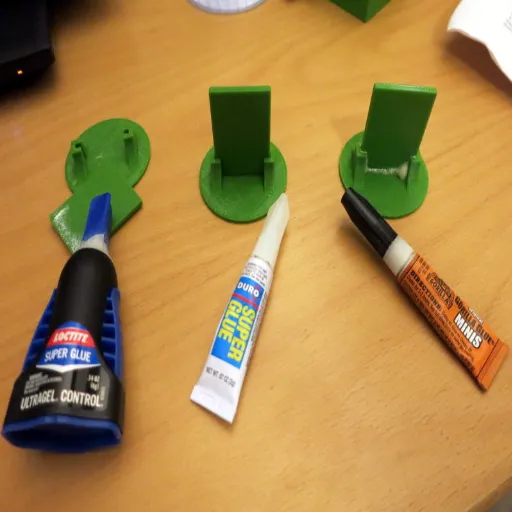
When choosing the right adhesive for PLA, it is essential to consider the strength and purpose of the bond. Cyanoacrylate glue, also known as super glue, is one of the options due to its fast curing and strong bonding properties; therefore, it can be used for most PLA products. For enhanced strength, especially in structural or load-bearing models, a two-part epoxy can provide greater resistance. For smoother seams, one can also use PLA solvent adhesives, such as Weld-On 16, which chemically bond parts and offer a seamless finish. Any adhesive will adhere better if you keep clean surfaces and lightly sand them before application.
Adhesive Options for PLA
The best adhesive for PLA models depends on the application. In the most commonly found scenario, cyanoacrylate adhesive is applied by the user, and with its speedy curing time, it is the most popular. For relatively large and heavier models, a two-part epoxy is an ideal choice due to its strength and durability. For situations where a seamless finish is of utmost importance, solvent adhesives for PLA, such as Weld-On 16, are ideal since they’re designed to join parts, thereby creating smooth joints chemically. Users should always consider the adhesive in relation to the specific model’s use and the surrounding environment, such as the possibility that it may be exposed to heat or moisture.
Factors to Consider When Selecting Glue for PLA
Choosing the right glue for PLA must take into consideration:
- Type of Connection Needed: Determine if a permanent or temporary bonding is required. Super glue is very well suited for permanent fixes; however, some glues, like hot glue, may make adjustments a bit easier.
- Model Size and Load: For larger models or those intended to bear a heavy load, consider using a two-part epoxy for a more durable and stronger bond than standard glues.
- Heat and Environmental Resistance: If the PLA part will be exposed to high temperatures or moisture, then opt for a glue that will withstand those conditions, such as heat-resistant epoxy or construction adhesive.
- Finish and Aesthetics: For an artistically finished, seamless bond, consider solvent adhesives such as Weld-On 16, which chemically bonds the PLA, leaving no trace of glue.
- Curing Time: Immediate bonding Super Glue is suitable for fast-paced projects; once needed for rigorous assembly, a gradually curing epoxy will do much better.
- Surface Preparation: This detail appears to be overlooked. Surface preparation makes an enormous difference in adhesion on PLA, so always sand and clean the surface before gluing it down; it is necessary to ensure that it is free of dust or oily impurities.
Step-by-Step Guide to Gluing PLA Parts Together
Follow These Steps for Perfect Results
-
1
Prepare the Surfaces
Clean the PLA surfaces thoroughly with a solvent to remove dust, grease, or any residue. Then lightly sand the blotting-paper areas with a fine grit to make them adhere better.
-
2
Choose the Right Adhesive
Use a strong adhesive, such as cyanoacrylate (super glue), for a faster bond, or an epoxy for sturdier results. Follow the manufacturer’s directions carefully.
-
3
Apply the Adhesive
Carefully apply one thin, even layer of adhesive on one of the surfaces, ensuring no excess that could ooze out during assembly.
-
4
Align the Parts
Align the two PLA parts to ensure they are correctly aligned. You can make slight adjustments before setting.
-
5
Hold or Clamp
Keep the pieces pressed together using your hands or clamps while the glue cures. The duration of curing should be found in the adhesive’s instructions.
-
6
Clean Excess Adhesive
Before the adhesive hardens, use a cloth or paper towel to clean away any excess, taking care not to mar the surface.
-
7
Allow Full Curing
Once initially bonded, allow sufficient time for the adhesive to cure fully, ensuring the bond holds strong and lasts for a long time. This typically takes several hours, depending on the type of adhesive used.
Gathering Materials for the Bonding Process
To successfully glue PLA filament, glue must be made using bonding materials and tools that are suited for the job. Here is a list of items to be gathered for the bonding process:
PLA-Compatible Adhesive
Look for glues designed explicitly for plastics or those that are safe for use with plastics, such as cyanoacrylate glue (also known as super glue), epoxies, and specialized PLA glues. The standard glue is cyanoacrylate due to its high-speed bonding capability and relatively strong hold.
Sandpaper or File
To ensure better adherence, lightly sand the surfaces to be bonded to create a semi-rough texture that facilitates the glue’s adhesion. Use either fine-grit sandpaper or a file.
Clamps or Weights
The application of constant pressure on glued surfaces as they dry will help hold them together against mechanical interference from the steel clamps or small weights.
Cleaning Supplies
Rubbing alcohol, microfiber cloths, or paper towels may be brought to clean the PLA surfaces. Removing dust, oils, or debris will ensure a good bond.
Protective Gloves
Wear protective gloves to keep the adhesive off your skin and prevent oils and fingerprints from getting onto the PLA surfaces.
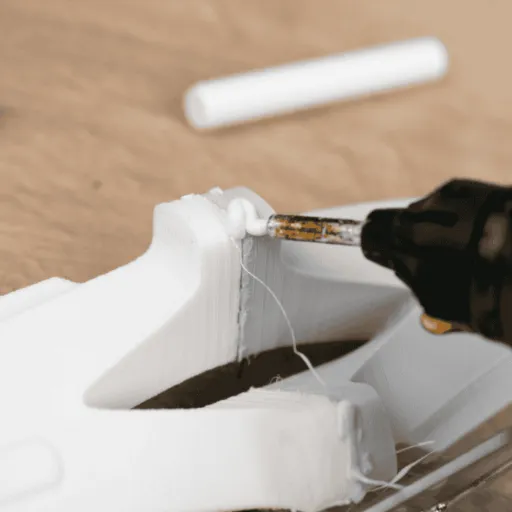
Applying the Adhesive Correctly
To establish a strong and lasting bond, using adhesives with PLA correctly is essential. Here is how to do it correctly.
Clean the Surfaces
You must ensure that both PLA surfaces are clean and free from dust, oil, or other contaminants before applying glue. Use isopropyl alcohol with a lint-free cloth to remove any impurities.
Apply the Adhesive Sparingly
Apply an even, thin layer of adhesive to one of the surfaces. As the glue begins to squeeze out of the surface with excessive amounts, it could diminish the bond and create a mess.
Join the Parts Carefully
The pieces must be aligned before they are held together. Ensure the edges match perfectly, as some PLA glues will set fairly quickly.
Secure the Bond
Hold these two surfaces together firmly while the glue sets for the stipulated period required by the adhesive manufacturer. If there is capacity, clamp the two sides with constant pressure throughout the curing time.
Allow Proper Curing Time
Once clamped, the bond must cure according to the product instructions to yield a strong, durable bond. This is especially true when the parts are subjected to stress.
Common Mistakes to Avoid When Gluing PLA
✕
Using the Wrong Adhesive
Not all glue will stick well to PLA. General-purpose glues might cause unequal glue bonds. Always use glue made for plastic or specifically PLA.
✕
Skipping Surface Preparation
Poor adhesion occurs when the gluing surfaces are not adequately prepared, either by cleaning or smoothing them. Dirt, grease, finish, or rough edges should be removed so gluing can proceed properly.
✕
Applying Excessive or Insufficient Glue
Less glue means there is no chance for the bond to be too strong, as too much glue can cause a messy bond. On the surfaces, put a thin, even layer of glue.
✕
Not Allowing Adequate Curing Time
Compromised bond strengths come with rushing the curing process. An adhesive should always be cured for the complete time as suggested by the manufacturer.
✕
Ignoring Temperature Sensitivity
PLA has a high sensitivity toward temperature. While gluing and after gluing, avoid heating the bonded parts, for this will weaken bonds or induce warpage in the material.
Neglecting Surface Preparation
Among the most common causes of poor bonding results in PLA projects comes neglect of surface preparation. A proper preparation method ensures that the adhesive adheres effectively to the material, resulting in a strong and durable bond. Surface preparation requires cleaning to remove any dust, oil, or debris that may hinder bonding. This step holds special importance because contaminants may just create a barrier between PLA and glue, significantly decreasing bond strength. Lightly sanding the surface increases grip, especially when dealing with smooth PLA parts. Taking the effort to prepare the surface will ensure the project’s success and save you from a lot of trouble later.
Ignoring Curing Times
Taking the ultimate cure out of the bonding equation means looking at the strength and durability of the bonding itself. Curing time provides the necessary period in which the bonding agents, e.g., glue for PLA, can harness the full potential of adhesion. Not only does skipping curing weaken the bond, but it also increases the likelihood of outright failure when subjected to stress. Examining recent data reveals that many users query “fast-setting” adhesives to reduce curing time; however, even fast-setting adhesives still require curing to perform effectively. If we are dealing with a significant project, however, it is always best to adhere to the curing times given by the manufacturer, thereby attaining long-lasting durability and reliability.
Tips for Achieving Strong PLA Bonds
- ✓
Clean the Surfaces: All bonding surfaces should be free from dust, grease, or any other type of debris. For higher-quality bonding of PLA parts, cleaning should be performed using isopropyl alcohol and cross-checked.
- ✓
Use the Right Adhesive: Select an adhesive that is suitable for bonding PLA or high-strength plastics. Cyanoacrylate glue (also known as super glue) and epoxy adhesive often work well with PLA.
- ✓
Roughen the Bonding Area: The surfaces can be lightly sanded with fine-grit sandpaper to increase adhesion by providing texture for the glue to grip.
- ✓
Apply Even Pressure: After applying the adhesive, pressure should be applied evenly and firmly to the bonded parts. The weight of clamps and other holding methods can be used to improve adhesion.
- ✓
Allow Proper Curing Time: After bonding, adhering to the curing time indicated by the adhesive manufacturer ensures a long-lasting bond; handling the glued panels before this time is recommended to be avoided.
The Importance of Sanding
Sanding is crucial in many projects, particularly in woodworking and crafts, to ensure a strong and professional finish is achieved. Light sanding will smooth out rough surfaces, old paints, or uneven edges-any imperfections that would hinder an adhesive, paint, or finish from properly adhering to a smooth surface. According to research trends, many want to know if sanding is necessary before painting or gluing, with the consensus being that if you do not sand, there is weakened adhesion and poor-looking results. Well-sanded surfaces enhance both the adhesion strength and longevity of the artisan work, resulting in a superior finish that provides an excellent touch to other applications.
Utilizing Clamps for Better Bonding
When bonding, place a clamp with gentle to moderate pressure across the bonded surfaces to ensure the best possible adhesion, while displacing potential air pockets and ensuring an even curing process. Many users ask a web question: “Clamping: Does it improve bonding strength?” The answer is, “Yes, clamps used correctly improve the durability and the strength of a bond.” There is a need for such action when working with wood and metal, or any other material that might move while clamping. One ensures quality work finishes and retains better performance longevity by choosing the correct size with the least weight of clamps and applying pressure evenly across the bonded surfaces.
Applications of Gluing PLA in 3D Printing Projects
Gluing PLA is beneficial in 3D printing projects for assembling large and complex designs that cannot be output as a single item. It allows intricate designs to be manipulated and put together with precise joining of smaller sections. The technique also finds gluing use in fixes to restore functionality or aesthetics to broken or damaged prints. It is widely used in prototyping, model making, and custom product development to allow for modifications and improvements to a product design as may be required.
Repairing 3D Printed Parts
For effectively repairing 3D-printed parts, well-selected tools, materials, and techniques must be employed. Some unpleasant damage may require gluing, welding, or cutting out sections. The smallest cracks can be addressed using gluing methods that contain cyanoacrylate glue or a type of epoxy resin, providing a quick and lasting solution. Pieces will be welded together by applying either the tip of a 3D pen to matching filament or a soldering iron with compatible heat; this may cause them to decompose into thinness. The sanding around the area must also be done in conjunction with the finishing of the whole repair, so that the part is returned to its original coloration and functionality. The utilization of these techniques enables the repair of damaged 3D prints for reuse, thereby reducing material waste and promoting sustainability.
Assembling Multi-Part Projects
When assembling multi-part 3D printing projects, the alignment and fit between parts must be precise for the product to be functional and sturdy. Begin by printing all parts to size with clean walls and smooth edges, which may require sanding or trimming away rough areas. Depending upon the complexity of your project, other alignment tools, such as clamps or jigs, may be necessary to hold parts in position while you fasten them together. A glue finish, such as epoxy resin or cyanoacrylate glue, can provide a strong adhesive bond. On the other hand, depending on the design, the project can be assembled and disassembled mechanically by incorporating screws or bolts. A careful preparation and assembly phase will yield a professional-looking project that will withstand use.
Creative Applications in Prototyping
Prototyping is a method for exploring new ideas and bringing concepts to life through a combination of materials and techniques. I love experimenting with unusual materials, even combining 3D printing with traditional hand-finishing techniques to develop truly unique and functional prototypes.
Reference Sources
Here are three professional and authoritative reference sources that you can use to support or dispute and validate your article on “What is Fly Cutting in Fiber Laser Machines.” These sources enlighten the subject of laser cutting techniques and other process-related subjects:
Fiducial-Aided Calibration of a Displacement Laser Probing System for In-Situ Measurement of Optical Freeform Surfaces on an Ultra-Precision Fly-Cutting Machine
Discusses laser displacement probes installed on ultra-precision fly-cutting machines from a technical perspective.
Laser Cutting Technique: A Literature Review
This source provides a comprehensive review of the various laser cutting processes, including standards of parameters and applications, and should therefore be considered as complementary for insight into the workings of fly cutting by fiber lasers.
Laser Cutting
Describes the physical mechanisms of laser cutting and how the process can be modeled, which pertain to the fundamentals of fly cutting.
Frequently Asked Questions (FAQs)
What is the best way to glue PLA together?
The best method for gluing PLA together depends on the specific application and the required strength. Super glue, also known as cyanoacrylate glue (CA glue), is often recommended for its quick-drying properties. For larger pieces or those needing more flexibility, polyurethane glue can be effective, while epoxy offers strong bonding and filling properties.
Can I use acetone to glue PLA pieces?
Using acetone to glue PLA pieces is not ideal, as acetone does not dissolve PLA effectively like it does with ABS. Instead, consider using super glue or epoxy for a strong bond. However, acetone can be used to smooth the surface of PLA for better adhesion before applying a different adhesive.
How do I apply super glue to PLA parts?
To apply super glue to PLA parts, ensure that the surfaces are clean and dry first. Then, use a small amount of super glue gel to one of the surfaces. Press the two pieces together firmly for a few seconds to create a strong glue joint. For larger areas, consider using a super glue gel control for better precision.
What type of glue is best for 3D-printed PLA parts?
The best types of glue for 3D printed PLA parts include super glue for quick fixes, epoxy for added strength, and polyurethane glue for enhanced flexibility. Each type offers different benefits, so choose based on your specific needs and the environment in which the printed parts will be used.
Is using a hot glue gun suitable for PLA?
Using a hot glue gun can be suitable for PLA, especially for temporary fixes or when working with larger pieces that require holding in place. However, hot glue may not provide the same level of strength as epoxy or super glue, so consider the intended use before opting for this method.
Can I use Gorilla Glue on PLA?
Yes, Gorilla Glue can be used on PLA, but it’s essential to apply it in a well-ventilated area and to follow the instructions carefully. Gorilla Glue expands as it cures, so use it sparingly to avoid excess foam that may affect the appearance of your project.
How can I weld PLA pieces together?
Welding PLA pieces together can be achieved through friction welding, which involves heating the surfaces until they melt slightly and then pressing them together. This creates a strong bond, but it requires specialized equipment and should be done carefully to avoid damaging the material.
What is the best adhesive for filling gaps in PLA?
The best adhesive for filling gaps in PLA is epoxy, as it has excellent filling properties and sets to a sturdy finish. For smaller gaps, super glue gel can also work well, as it can fill minor imperfections while providing a strong bond.
Can I use Loctite on PLA?
Loctite is a brand that offers various adhesives, and certain types can be effective on PLA. Look for Loctite products formulated explicitly for plastics, as they can provide a strong bond suitable for use with PLA materials.


