


Breathing new life into furniture not only saves costs but also is an innovative and eco-friendly approach to making spaces more personalized. Upcycling enables one to take the old or the damaged and turn it into an appealing and practical piece of art while reducing waste. We have come up with this blog where we will share with you 15 simple but brilliant furniture upcycled designs that even a beginner can copy or even the better end of the scale – a bona fide master of crafty construction. From designing one-of-a-kind decor items to redesigning even the most basic of fixtures, these intersperse the re-envisioning of decorating homes with one’s personal touch. Let’s discover how, with creativity, resourcefulness, and craft, you can enhance your home!
What are the best pieces of furniture to upcycle?
The upcycling process become a great practice in communities that use wooden chairs, tables, dressers, and cabinets. The basic criteria for such furniture items are they will not lack structural support and can be sturdy and versatile. Such items are excellently ideal since they can be reinforced by a transformation as they have a classic design or a durable constructed from solid wood. Furthermore, such items are easy to change, if the original set has a classic design and remains simple, one can easily sand them or paint, or numerous artistic designs can be added. So, even old and broken furniture can easily be turned into something functional and valuable if one has the right equipment and can effectively use their imagination!
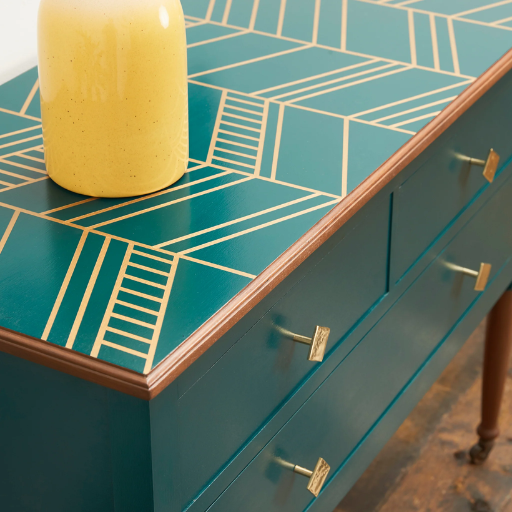
Transforming old dressers into statement pieces
turning an old dresser into an eye-catching centerpiece all begins with how the end goal is to look. So the first thing to do is look at the condition of the dresser—is the frame firm, and is there no major damage present on it? After that, I like to remove the old finishes as they help to prepare the surface for the sanding and priming processes. The transformation of the piece is when it becomes customized; selecting bolder and louder paint, changing handles with unique ones, if they are still timid then some stenciling and decoupage helps as well. Use different textures or even mix different design ideas if you are up to it. The dresser can be a centerpiece of a room with just a little effort and imagination to direct the dresser’s look.
Giving new life to outdated coffee tables
Usually, coffee tables that are old and outdated are pulled out by people and cannot be used. Use furniture refinishing, among other techniques, before plunging into rebuilding the coffee table. “Does this table have structural integrity?” is the first question I ask myself. A table exists only to be used, however if it shows a lot of structural damage like wobbling around, missing screws and loose parts, then the best course of action is to fix its defects. Let’s take a closer look at how I go about this process, step by step:
- Inspect the surface and structure: Are there scratches, dents, and uneven surfaces? For minor surface damage, wood filler is an excellent choice for leveling up the edges, and for deep scratches, sanding is enough.
- Check for stability: Usually, one of the legs is slightly longer, which makes the table creaky, or putting a little pressure on one side makes it creaky; usually, adding more screws or placing brackets works. Sometimes, one leg would be damaged, and replacing it makes the table look cool.
- Strip away old finishes: If the furniture is chipped off paint or the paint is old, I get rid of it with a chemical stripper or sandpaper. This gets rid of the old paint or any coat and makes it easier to work wit.
- Customize the design: Now comes the best part. I love painting and staining pieces of furniture to fit the room. For instance, if a person wants to emphasize the elegance of the room, a simple coat of black paint does the job, or for a more rustic effect, a natural stain would look great.
- Add functional and decorative elements: Adding a laminated or glass top might throw off the entire look, but placing glass or tile sheets on top of the table might work instead. Otherwise, putting chalk paint on top allows for notes or even drawings of family rooms.
- Preserve and protect with a durable finish: Thereafter, I spray lacquer or apply a clear finish to maintain the life of the table and prevent it from stains and other abrasions.
Revamping a coffee table that’s out of style entails being creative and also having a structured methodology. Concentrating on each of such components allows you to transform a worn-out piece into a stunning and functional piece of art!
Repurposing dining tables for modern interiors
A haulage challenge when transforming tables and applying it in modern interior design finishing is quite captivating. I looked into the table’s design and material first—hardwood should be a good option because it is strong and functional. Not only that, but I also examine the setting and the function: will the table be used as a stylish workstation, a simple side table, or a more enhanced piece? I then visualized the final product, which is when I would want to properly take care of the list of methods that would be used to ensure that the table is in a style that I would want it to be, to put it simply, in a co style that is either, industrial, Scandinavian, or mid-century. The objective is to ensure that the item is restyled but will still fit into the scope of the overall interior design. With good thinking, such a dining room table can perfectly fit into a modern-day house.
How can I upcycle furniture without spending a fortune?
The first step towards going about upcycling furniture with a budget is finding budget-friendly furniture- thrift stores, garage sales, and even your own belongings would work all right. Secondly, concentrate on some basic renovation ideas that can help you achieve a lot, for example, simply changing the paint, doing some hardware updates, or even replacing the fabric with something cheaper. Instead, use paints or scraps of wood which you already have at home, to cut the total cost. Innovation and imagination are essential when it comes to remodeling contemporary items or pieces so that they can be creative in the most cost-efficient manner.
Budget-friendly DIY upcycling techniques
the need for creativity and utilizing the materials at hand is quite essential when upcycling while sticking to a budget. One of my go-to strategies is to get the old items to serve a purpose they weren’t intended for—like a ladder becoming a shelf or mason jars serving as organizers. For old furniture that is sitting idle, I recommend starting off by changing its faces – a little sanding, staining, or repainting is usually a good idea. Other affordable ways to customize a piece of furniture include changing knobs or stenciling. The mantra is to keep trying and personalizing every piece economically!
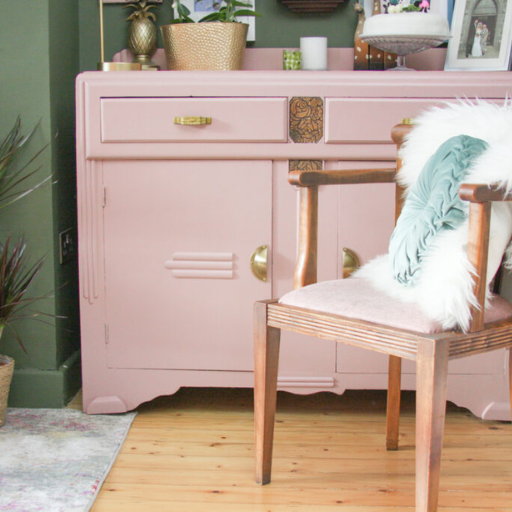
Using chalk paint for quick and easy makeovers
Chalk paint can be the best alternative for first-timers not only because of its affordable price but also due to its characteristics and application. The adhesive simply works on all types of furniture surfaces, thus decreasing the chances of sanding or priming. You only have to clean the surface and spray one or two coats, and in the end, add either a clear or dark coat, and that should do the trick. Chalk paints are rich in pigments and have a matte finish, which can instantly upgrade your ordinary furniture into antique shining pieces, which is why both professionals and DIYers love the product so much.
Thrift store finds: hidden gems for upcycling projects.
Thrift stores have always been appealing to me. Such stores are packed with things worth being creative with and making some amazing upcycling projects out of, such as sturdy dressers and vintage mirrors that can be turned to wooden and implement ornate detailing. What is necessary, however, is to understand that an item has so much scope beyond what meets the eye. For instance, chalk paints can cover the blemishes and markings and recoat a piece. Turning ita brand-new look. Thrift stores appear to be a fairytale when you dream of all the unique stuff that admirably substitutes expensive pieces and turns simple into wonderful masterpieces.
What are some creative upcycling ideas for old chairs?
Breathing new life into furniture by upcycling old chairs can be an enjoyable endeavor and a way to showcase one’s personality. Here are some inspired ideas to transform those old chairs into useful, eye-catching pieces:
- Turn It Into a Planter
Garden chairs for garden planters can be created by using wooden or metal pieces of old chairs. To do this, the seat can be removed, and a bucket, pot, or basket placed on it to plant flowers or small herbs or vegetables. This gives liveliness to any indoor and outdoor space.
- Create a Bench
A bench can be created by attaching one side of two or more chairs back together. Repainting or finding them in a uniform style enhances the motor for the sash of the chair to make it functional and beautify an entrance or a patio.
- Use It as a Shelf or Wall Display
In case of any chair with unusual shape, its back support can be cut, and then the chair can be placed on the wall as a shelf or any decorative unit. Moreover, hooks can be used on to hang scarves and bags or to organize keys or small items.
- Transform It Into a Pet Bed
Old chairs have their functional value as a pet bed to make their sleeping base comfortable. Instead of the seat, a foam base can be placed on it. To make it more appealing, some paintings and detailing can be applied so as to suit your home decoration.
- Make It a Stylish Side Table
One can put a little effort into beautifying an antique chair into a nice side table. Cut the legs to the height you want, sand it, and finish it off with a color of your preference. This creates a satisfying sense of purpose rather than belting furniture, which is creative and useful at the same time.
- Reimagine It as a Swing
As a fun element, consider using the seat of the chair as a swing that can be hung outdoors. Firmly secure the seat with strong ropes and then attach it to a tree limb or other support structure for a fun addition to your backyard.
Emphasizing factors like usefulness, beauty, and one’s style, these upcycling concepts not only save the chairs from disposal but also help in enhancing the space’s aesthetics. Feel free to utilize different materials, colors, and finishes to make every project yours!
Transforming chairs into unique side tables
Of all the ways I can think of reusing old chairs, the transformation of the chairs into attractive side tables strikes me as the most effective. For the conversion to be successful, it is necessary to note the fact that the chair seat serves as an ideal platform for making a tabletop and adhering to some elements of imagination, a competent and appealing structure can be created. First, take off the backrest and make sure the chair’s legs are intact. Clean and sand the chair, then paint or stain it, and it will suddenly become an impressive piece of furniture. It’s an easy task that serves its purpose and adds an artistic side to the room that has become more functional.
Creating a statement bench from mismatched chairs
Mix-and-match chairs can definitely be converted into magnificent benches, but it takes a couple of design principles and tactful crafted execution. To begin with, pick chairs that are of the same height and type so that your project doesn’t look unkempt. If required, detach the backrests and tie the chair bodies with wooden boards or a strong bench top using screws or brackets. As an additional step, sand and finish off all the parts of the assembly set in one color or suitable color sets to create a more cohesive effect in the design. Not only does this project revitalize and repurpose old furniture, but it also provides a creative and unconventional conveyance that people can sit on.
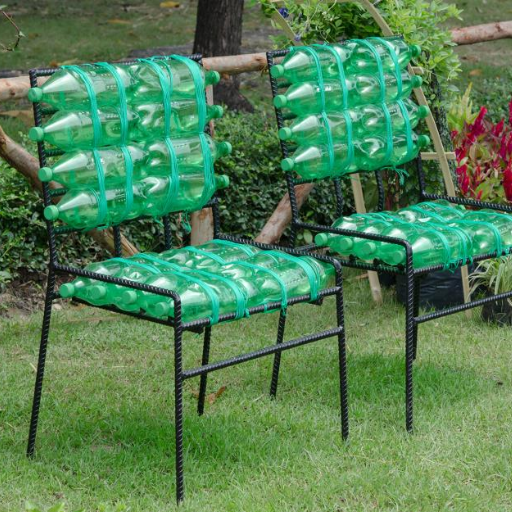
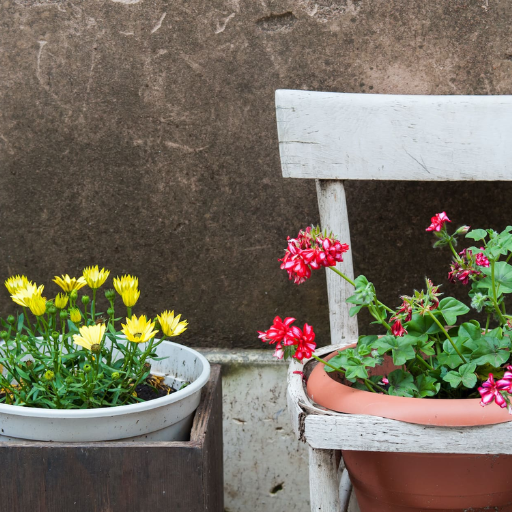
Upcycling wooden chairs into outdoor planters
Turning wooden chairs into outdoor planters is an interesting and creative project, as well as a great do-it-yourself (DIY) upcycling tip, which I provide to those who wish to improve the look of their gardens. I begin by unscrewing the seated part of the chair to form a hollow frame—it will act as the place for planting. I then place a porous fabric or coconut coir in the opening with an aim of preventing excessive moisture content, This allows adequate balance between the soil and moisture. Based on the desired target and design, I consider whether to purchase colorful flowers or strong herbs; these are the plants I prefer in most cases. In the end, plants seated on these repurposed chairs contribute an appealing rustic character to any outdoor place and demonstrate how combining sustainability and style can indeed be achieved.
How can I repurpose old doors in my furniture upcycling projects?
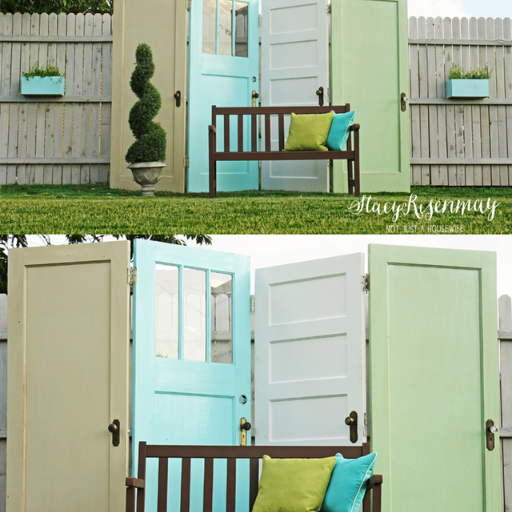
With a little creativity and skill, old doors can be made into gorgeous and useful pieces of furniture. They can serve as an excellent tabletop, headboard, or even bench seating when paired with strong supports. For a vintage allure, you can just leave the paint and hardware that is already there, or if you prefer a more polished appearance, just sand it down and apply a nice finish. Hinging or hooking an old door can be useful, as it can be mounted and used as a coat rack or wall storage. Both are quite useful and pleasant to look at. What’s essential is to think of the door’s material, dimensions, and general condition to plan the best course of action while preserving its robustness.
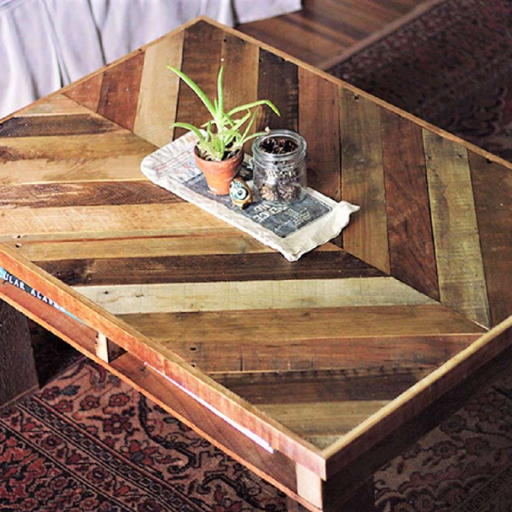
Converting old doors into rustic coffee tables
In today’s DIY guide, we will be going through the various steps of transforming an Old Door into a rustic coffee table. From my perspective and opinion, I would say this table solution is very easy and only requires a few tools to compose. First off, I would highly recommend choosing a door which is flat as this would serve as the core material for the table, when the weathered door is used I’d suggest to cut it down according to your requirements. From cutting, I would recommend one of two options: retain its texture or use sandpaper to make it smooth. Moving forward, I would advise using rigid wooden planks or metal brackets for legs; not only does it add to the rustic feel, but it also stabilizes the table. As an optional add-on, perhaps include a glass covering or compartments beneath the table for accessibility. Finish with a touch of stain or sealant so the wooden table looks more appealing. There you have it; you will have the coffee table, which is not only conceptually creative but also enables you to have a conversation about the table itself.
Creating a farmhouse-style headboard from reclaimed doors
Crafting a farmhouse-style headboard out of old doors is an exciting project that brings some comfort. Here’s what I’ve learned from doing it myself and advise the following steps:
- Selecting the Door: First, identify the door’s structural strength and its impression in line with the barn design you would like to achieve. Some features worth looking out for include raised panels, distressed paint, or natural wood grains, as these features enhance beauty and character. Also, confirm that the width of the door corresponds to the width of your bed (i.e., twin, full, queen, king).
- Preparation: Properly sand the door to get rid of splinters, dirt, or old paint. When working with doors coated with lead-based paint, ensure to take all the safety measures, i.e., use a lead paint test kit and ventilate the room as well as put on protective gear.
- Repairs and Modifications: Look out for cracks or loose panels because the tin may have been damaged; these two can be repaired using wood glue or filler instead. If the bed frame is too big for the door and needs to be trimmed or resized, use a saw to achieve perfect proportions.
- Finishing: This is applicable only depending on how you would like the door to look; stains and paint serve their purpose well. If you are looking for a more classic look, then whitewashing and a distressed finish would work quite well. Among the things to do before sealing the door is applying a protective top coat.
- Mounting: Fasten the headboard to the wall or to the frame of the bed to avoid movement and alterations of the right height. Additionally, heavy wood screws or brackets should suffice in order to ensure safety and stability.
By combining an old door with an exquisite ornamental element, you will be able to create a magnificent centerpiece for your bedroom as long as you pay attention to these details. This activity not only reconstructs the recovered materials, but also customizes the space which you inhabit.
What are some innovative ways to upcycle wooden pallets?
these wooden pallets are a goldmine for creative and functional projects. One idea I really like is to make outdoor furniture out of them, such as benches, coffee tables, or even lounge chairs, which would add a rustic touch to your patio. Another interesting idea is to make vertical garden planters out of pallets. Just lean them against a wall, fill them with pots, or directly plant herbs and flowers into fabric pockets sewn on them for a stunning and practical look. Pallets can also be cut into planks and glued together to make distinctive shelving units or storage space to fit your room. For someone who wants to engage in an unconventional project, how about making a headboard or decorative wall panels with natural pallet plank textures? These practical structures offer countless possibilities to enhance aesthetic designs while promoting green living.
DIY pallet coffee tables: a step-by-step guide
It is easy and fun to make a pallet coffee table. The first step is to get a good pallet that is both clean and not damaged. Remove any splinters and make the wood nice and smooth by sanding it down. Choose a wood stain or paint that matches the look you want to go for, and apply an even coat on top of the surface. For additional mobility, attach caster wheels, or for stability, attach wooden legs. Top it with glass for an elegant look, or leave it for a more natural sensation. It is a creative and practical project that can add style to your living room.
Creating vertical gardens from upcycled pallets
Vertical gardening using recycled pallets is a project that I have often endorsed due to its ease, sustainability, and decorativeness. With wooden pallets, you can create a very beautiful and practical garden system that is great for small spaces such as balconies or patios. Start off by choosing a strong pallet and sanding it to get rid of splinters. Afterward, fasten the landscaping fabric or plastic onto the back so that the soil will not flake off. Put enriched soil in the fragments and plant any combination of herbs, flowers, or succulents. The main challenge is the management of excess water in the system as well as maintaining proper watering schedules. This method not only minimizes waste but helps in creating vibrant and green spaces in busy cities thereby combining design and environmental concerns.
Transforming pallets into stylish outdoor furniture
It’s one of my favorite personal projects, as it combines practicality, creativity, and sustainability. As years went by, I have realized that this process can be made easy and greatly enjoyable provided a few important factors are taken into consideration.” Here’s how I do it:
- Selecting the Right Pallets
The first thing you have to do is look for pallets that are durable and safe. When doing so, have a look for heat-treated pallets HT instead of chemically impregnated ones as they are harmful when used in home improvement projects. Always remember to check for broken parts and even pests or rotting for signs of wearing out.
- Preparing the Pallets
Worry not as this entire process will not take much time, to get started begins with sanding your wood down properly, this will round off any rough edges or splinters making the furniture safer to use, but also more effective for absorbing paint and stain. What’s More: missing out on such a simple process will make it tough to get the desired result in the end.
- Design and Assembly
Pallets are versatile and, with a little imagination, can be molded into a number of different items, so before starting off any construction work, I plan the design in my head, whether it’s a bench, lounge chair, or even a coffee table. Even with the use of screws and weather-resistant glue, you can never be too sure, so I use it for securing the build and creating the furniture composite to withstand outdoor conditions.
- Adding Finishing Touches
In order to achieve the desired look, once the framework has been joined together, I interfere with the structure by painting or staining the furniture, which gives the final desired look and makes the furniture look more appealing. Depending on your budget, outdoor furniture should include weather-proofing since wood can be reactive to rain and UV light, I now put a membrane barrier to ensure waterproofing.
- Comfort and Accessories
At the end, I add cushions or covers in order to create a balance between comfort and style for the furniture. Certainly, these little things add character to the design and can be modified with ease to change the appearance.
To put it simply, it has become easier for me to transform used wooden pallets into lovely creations that can be placed outdoors. Thanks to this project, pallets that were otherwise wasted are given a new use, and more importantly, it offers opportunities to make bespoke furniture pieces with one’s own touch. This is a practical solution that anyone can undertake with a little effort and creativity. Best of all, it’s durable and doesn’t cost too much.
How can I give old furniture a fresh look with paint?

Revamping your space or room with old furniture can be a great choice. What’s more? All furniture can be customized quite easily to match one’s personal style by simply painting them over. The first step in this revamp takes you back to the fundamentals of prepping the furniture, which involves sanding the furniture down to a smooth surface, including any imperfections or remnants of a previous finish. It is most important to apply a suitable primer to the piece as it enables the paint to bond well to create an even finish. Next step involves choosing the right type of paint suitable for furniture finishes as it will be able to withstand wear and tear, use Enamel or Chalk paint and apply it evenly throughout with a brush or a roller ensuring that the finished layer is thin or light. First, oversee proper drying times before moving on to additional layers. The last layer should involve a protective coat, such as polyurethane, to ensure longevity. This new method of old furniture restoration not only saves time and enhances the look of a piece but also ensures the stylistic legacy of furniture is kept in mind.
Choosing the right paint for different furniture materials
My first step in deciding the type of paint appropriate for furniture is considering the material. For wooden surfaces, chalk paint or enamels can be applied for either a polished look or the durability of the furniture. Metal surfaces too require specific paint manufactured for metals, use spray paints or enamels that will provide protection against rust and evenly coat the piece. For the cases of laminate furniture, it is good practice to first use a good/suitable primer before painting, and in such cases, I prefer using Acrylic or latex as they are more flexible and abundant in colors. Most importantly however the preparation, paint, or even the tools change based on the material you would be painting, therefore knowing what to expect would contribute significantly in achieving a desired finish of the paint job.
Creating faux finishes to add character to upcycled pieces
If you want the furniture you’re going to upcycle to be decorative, then a faux finish is one ideal way to achieve it. First, choose a base color of your liking, then gradually apply a dry brush, sponge, or glaze to the specific area until you achieve the desired effect. Then, a light disturbing of the edges should yield a standard worn-down appearance, or a crackle medium could be better suited for you. An additional alternative is marble or wood grain finishing, which is sought after to emulate natural marble or wood using nothing but a few tools and a mere coat of paint. The pivotal point on this one is actually practicing on a different surface to concentrate and then applying a sealer to the outside of the layer to further improve its longevity.
Mastering distressing techniques for a vintage look
If you’re looking for ways to get that authentic vintage character in your interior design, then you should definitely consider distressing furniture as it’s one of my go-to’s. The first thing I do is take sandpaper and focus on the edges, corners, and places that receive the most touch because they will wear it over a period of time. I utilize tools like steel wool or a sanding block in order to get that realistic, worn-out look. I also use the technique of paint layering using two contrasting colors and then sanding one of the colors so you get shades or hues of the color that was below the surface. For some added entertainment, I also tend to use a rag to wipe parts of the paint off while it is still wet. The key point is that you cannot go overboard with it; maintaining a more sophisticated approach always produces better results for that true aged look. After I achieve the expected end result, I finish it off by applying a clear wax or matte top coat in order to protect it while keeping it looking vintage.
What are some unique upcycling ideas for small spaces?
One of the things to keep in mind when thinking of alternatives for small spaces is multi-functional designs that are efficient in saving space. For instance, an old ladder can be reused as a wall-mounted rack for storage. Old suitcases can either be used as ottomans that have hidden storage or as storage items themselves by stacking them on each other. Hanging mason jars or tin cans can also serve as great wall art, holding things like utensils or stationery. Furthermore, wooden boxes can be modified by adding wheels at the bottom to make movable storage that can be placed under furniture. Such projects not only do the job of space efficiency but also add value to your house.
Transforming old ladders into space-saving storage solutions
One of my favorite hobbies is repurposing ladders that I find into a sort of attractive instant storage. I mostly start with getting rid of all the impurities by cleaning and sanding the surface of the ladder. I then, afterward, apply a coat of paint or stain so that I can put it through proper use later on when it is fully dry. Depending on the need and what is available in the area, I will use each rung as a shelf or hang items directly depending on how minimalistic I want the place to be. This does quite well for those looking to hand-potted plants, books, and even pots and pans safely and at an elevated platform. The directing factor is not only useful but also eye-catching and helps grasp attention in that certain small area.
Creating multi-functional furniture from repurposed items
Constructing space-saving furniture pieces from old or used objects is entirely about the imagination. Get started with a discovery of items that are strong enough in shape, like old dressers, pallets, or doors, and work your way up. For instance, one can think of a door as a space-saving dining table with hanging pockets and a pallet as an adequate couch with shelving in the back. The idea is that the pieces you are repurposing should be multi-functional, taking the size and purpose of your room into account. Apart from reducing the number of unused items in the home, such an attitude is original and provides an opportunity for creativity. Recycled objects in the form of modern furniture look absolutely splendid.
Reference
- Architectural Digest – Offers 15 repurposed furniture ideas from upcycling experts.
- Extra Space Storage Blog – Provides various DIY ideas for upcycling and repurposing furniture.
- Valspar Paint UK – Shares inspiration for upcycling old furniture with paint and accessories.
Frequently Asked Questions (FAQs)
Q: What are some easy upcycled furniture ideas for beginners?
A: Some easy upcycled furniture ideas for beginners include painting an old dresser, turning a wooden ladder into a bookshelf, transforming an old door into a coffee table, or repurposing a vintage suitcase into a side table. These projects require minimal tools and skills, making them perfect for those new to DIY furniture upcycling.
Q: How can I give an old table a new look?
A: To give an old table a new look, consider painting it with furniture paint, staining it a different color, or adding a unique pattern using stencils. You could also try distressing techniques for a shabby chic appearance or add new hardware like stylish knobs or pulls. For a more dramatic transformation, consider turning it into a farmhouse table by adding a new top or extending its length.
Q: What are some creative ways to upcycle a bookcase?
A: There are many creative ways to upcycle a bookcase. You could paint it a bold color to make it a statement piece, add wallpaper to the back panels for a pop of pattern, or remove some shelves to create a combination bookcase and display unit. Another idea is to convert it into a bar cabinet by adding wine glass holders and a fold-down surface for mixing drinks.
Q: How can I repurpose an old dresser for bathroom storage?
A: An old dresser can be easily repurposed into a stylish bathroom vanity. Remove the top drawers and install a sink and plumbing. Paint or refinish the dresser to match your bathroom decor, and add a countertop material of your choice. The remaining drawers can be used for storing toiletries and towels, giving you a unique piece of bathroom furniture with ample storage.
Q: What are some upcycling furniture ideas for creating more storage space?
A: To create more storage space through upcycling, consider turning an old ladder into a towel rack or shoe organizer, converting a wooden crate into a rolling storage ottoman, or transforming an old door into a hall tree with hooks and shelves. You could also upcycle a dresser into a kitchen island with added storage or turn wooden pallets into modular shelving units.
Q: How can I give old furniture a new lease of life without painting it?
A: There are several ways to revitalize old furniture without painting. Try reupholstering chairs or sofas with new fabric, adding decorative molding to plain pieces, replacing hardware like knobs and handles, or using wood stain to change the color while maintaining the wood grain. You could also try decoupage techniques, add mirror panels, or use contact paper for a temporary makeover.
Q: What are some good DIY tutorials for upcycling furniture?
A: There are many great DIY tutorials available online for upcycling furniture. Websites like Pinterest, YouTube, and DIY blogs offer step-by-step guides for various projects. Look for tutorials on specific techniques like chalk painting, furniture distressing, or reupholstering. Many interior designers and DIY enthusiasts also share their upcycling processes on social media platforms, providing inspiration and practical tips.
Q: Where can I find unwanted furniture to upcycle?
A: Unwanted furniture for upcycling projects can be found in various places. Check local thrift stores, garage sales, and flea markets for affordable pieces. Online platforms like Facebook Marketplace, Craigslist, or Freecycle often have listings for free or low-cost furniture. Don’t forget to ask friends and family if they have any unwanted items, and keep an eye out for curbside finds in your neighborhood.


