


Keeping drafts out and retaining heating and cooling when needed are two reasons why caulking windows is critical in every house and how energy efficiency is preserved at its best. If all the cracks in the window frames are sealed correctly, it will eliminate cold air from getting in and a lot of sounds from the outside while saving some money on heating, cooling, or the air conditioning elements in the house. This article will discuss the straightforward approach to caulking windows— what and how you will do to caulk the window frames even and adequately achieve a neat finish without any blunders. Be it a pro to home improvement projects or even a starter; this tutorial will give you the basic knowledge to upgrade your window sealing gadgets, which will work for several years.
What is the Best Way to Caulk Windows?

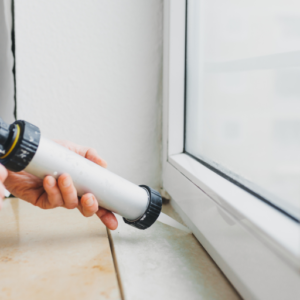
Image source: https://www.thespruce.com/
The most effective way to caulk windows requires a few essential techniques to ensure no leakage. First, you need caulking tools: a caulk gun, silicone or latex caulk, a utility knife, and a caulking tool or finger for smoothing. Clean the area next to the window frame, eliminating foreign particles such as dust, dirt, and old caulk. Then, the next step is to cut the tip of the caulk tube with your knife so that it forms a 45-degree angle, pierce the inner seal, and insert the tube into a caulk gun. Use caulk to fill the seams, leaving no voids at any joints. Finally, allow the caulk to dry per the instructions given by the manufacturer, and do not forget to smooth it out using a caulking tool or a finger.
What Type of Caulk Should I Use?
Regarding window sealing, caulk, silicone, and latex caulk are the better choices. The best option among these is flexible silicone caulk, which does not allow the passage of water and is well adhering to surfaces as it can be used in the exterior parts where exposure to the climate is necessary; it serves well in high places. Moisture-laden as well as having extreme temperatures. It works best when moisture exposure and very high or low temperatures occur. However, it also has the disadvantage of painting over silicone putty; it becomes often tricky.
On the other hand, latex caulk (or acrylic caulk) is preferable in such situations due to its relatively more straightforward installation, painting ability, and application within the room. It is, therefore, ideal in places with minimal moisture, and such gaps can be covered for cosmetic purposes or looking good. Most, if not all, caulking contained in spray guns and caulk is not only massive-covered surfaces but also dishwater. For optimal window caulk filling, hybrid caulk is the best option as it has acyclic and silicone caulks and paintable, flexible, and rigid properties.
How to Apply Caulk Around Windows?
However, to effectively caulk windows, do the following steps briefly.
- Preparation: First, prepare the area surrounding the window frame so that it can be appropriately applied. Remove old caulk, dust, and debris.
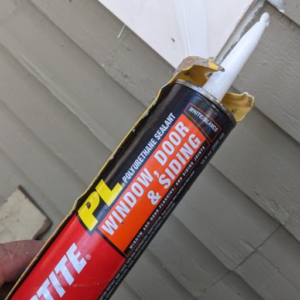
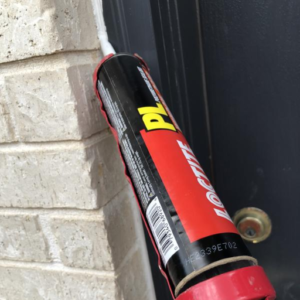
- Picking the Appropriate Caulk: To control permeability in glazing, Loctite PL S10 is recommended for windows, doors, and other exterior elements due to its strong adhesion and climatic resistance properties. Loctite PL Premium Polyurethane Construction Adhesive is the best choice for indoor work as it possesses elasticity, strength, and toughness.
- Using the Caulk Gun: Take one of the caulk tubes and cut off its tip at a 45-degree angle to expose the seal. Cut and pierce the seal, then load it into the caulk gun.
- Application: For example, caulking adhesive can be inserted into the frame’s seams, provided it adheres to the surfaces at the corners of the window.
- Smoothing the Caulk: A caulking tool or your finger can smooth the bead. Peripheral smoothing is done to avoid the accumulation of caulk stains on the surface of the wood frame.
- Curing: Finally, the acrylic caulk must be cured within the recommendations of the manufacturer; this is usually after 24 hours in all instances such.
Suppose one uses a more silicate caulk, especially Loctite, even though it is not intended to survive in unwanted wet environments for a long time. In that case, the performance is still excellent regarding moisture and temperature changes.
When is the Best Time to Caulk?
Caulking is best carried out during temperate periods, particularly between 40°F and 80°F (4-27 degrees Celsius). Such a temperature range enables the caulk to stick and cure effectively. I do not caulk on wet days and prefer to wait for a clear day since too much moisture would cause problems in the drying phase. Also, I like to use seasonal times when local temperature change is as gradual as possible; the caulk mustn’t move due to weather changes. In most circumstances, the best time for carrying out my most extraordinary caulking projects is during late spring or early fall, temperate seasons.
How Do I Remove Old Caulk?
It is quite simple whenever you have to get rid of the old caulk as long as you have the right tools and know the proper procedures. To begin, take a pointy knife or caulk scrapper and follow the edges of the old caulk to cut and loosen that caulk. Don’t damage the underlying surface. Having cut out the caulk, try to pull it away from the surface this time; it should come away in strips. For really hard-to-remove pieces, use a putty knife or scraping tool to assist in getting rid of leftover bits. Lastly, pat the area with rubbing alcohol or any other appropriate cleaning agent so that it is ready for a fresh application of caulk by eliminating dirt or any kind of coating.
What Tools Do I Need for Caulk Removal?
To effectively remove caulk, there are specific tools that you will need:
- Utility Knife or Caulk Removal Tool: When cutting away caulk, a utility knife comes in handy as one will scoop and cut along the edge of the caulk. A caulk removal tool can make this step much easier as it lets you remove the caulking without the risk of damaging the surfaces.
- Putty Knife or Scraper: These are also called scrapers, and they assist in lifting old caulk and removing any remaining tightly bound ones after the first removal procedures. Choose a putty knife scrapper with a flat edge to protect the surface being worked upon.
- Rubbing Alcohol or Cleaner: Once you remove the previously broken caulk, a solvent like rubbing alcohol can help clean the area and remove any remaining debris, which is critical when applying fresh caulking.
- Gloves and Safety Goggles: These are more preventive measures during removal, especially when sharp objects are involved, especially when constructing structures.
These tools will facilitate and maintain high professionalism in any given workspace, making clearing caulk at other times easier and preparing for the next caulking project.
How to Ensure a Clean Surface Before Applying New Caulk?
In preparation for re-caulking, I take several essential steps to prepare the surfaces. First, as stated in an earlier portion of the essay, I ensure it is wholly extracted if there is any old caulk. Next, I use a cloth that has been soaked in rubbing alcohol or a plain cleaning solution to remove dust, dirt, and oils that would interfere with the bonding. I also allow the area to be further dried so that, before tapping, the caulk paste is not in a particularly wet state. Should I feel its presence, I look for and get rid of any mold since it significantly reduces the quality of the new seal if not removed. Last, the surfaces are also scraped and smoothened enough so that there is one proper sealing that is going to be done. After executing the above steps, I know the new caulking will stick and stay longer, unlike the first time.
What are the Benefits of Using Silicone Caulk?
There are benefits associated with the employment of silicone caulk, which makes it popular in most endeavors. First and foremost, silicone caulk is very elastic; as such, it expands and contracts even when temperatures change, which helps ward off cracks and provide a proper seal. It is equally waterproof, perfect for kitchens and bathrooms since it prevents mildew. There are also good bonding properties, such as silicone caulk, which can successfully adhere to glass, tile, metal, and other materials. It is highly resilient and can withstand extreme weather and sun exposure without destruction, making it applicable indoors and outdoors. Finally, caulking silicone creates a tight, coherent, and durable seal that improves the looks and strength of the surfaces worked on.
How Does Silicone Sealant Compare to Latex?
Notably, there are notable differences between silicone sealant and latex sealant. In contrast to the above-mentioned, silicone sealants are pretty flexible and very tough and, as a result, can survive wide temperature ranges without breaking. They are also entirely waterproof, which makes them the preferred choice for wet areas, kitchens, and bathrooms. On the other hand, latex sealants are more convenient to put on and wash by simply using soap and water and can be covered up with paint, which might be considered advantages in relevant circumstances. However, with time, these materials usually become less elastic and more porous in situations with moisture. Though silicon is preferred most of the time because of its ability to withstand very harsh conditions, latex paints can be used for the feasibility of application and paintable surfaces, especially internal surfaces.
When to Use Silicone for Exterior Windows?
You can use a silicone sealant during exterior window installations to achieve an efficient barrier against air and moisture. It suffices in areas with outdoor exposure where the elements require mobility and stability, like in frames of windows, especially in varied temperatures. When fitting or repairing windows, among other products, there is Loctite Clear Silicone Waterproof Sealant, which quickly loads sticks in sturdy and resists getting wet. In cases where a little more versatility is required, or extra paintability is wished, Loctite PL S40 Construction Adhesive could come in handy, holding tight and giving the option to finish the work with paint. Remember to prepare the surfaces by cleaning and drying them before using any silicone to improve efficiency.
How to Use a Caulking Gun Effectively?

A caulking gun can work wonders around your house as an excellent tool for maintenance as long as it is used correctly. First and foremost, you need to select the correct type of caulk for the kind of work that you are doing. When you are all set with your caulk cartridge, you need to get it into the gun, pull back the plunger, and slide in the cartridge. Afterward, with a knife or a scissor, cut the nozzle at approximately 45’ to control how much sealant is released and remove the cap if there is one. Keeping the gun at the same angle towards the surface, depress the switch gently while moving it along the joint you want to be covered. Apply consistent pressure, and do not stop. Start this process in the middle of the line you want to bead. Cleanse or feather the bead with a caulk finishing tool or your fingertip when finished. The nozzle should be wiped using all caulking guns, and caulking guns should be stored in dry compartments for better lifespan.
What are the Steps to Operate a Caulk Gun?
- Choose the Right Caulk: This involves selecting a caulk suitable for your work, whether you fill cracks and joints indoors or outdoors.
- Prepare the Caulk Cartridge: Remove the caulking cartridge’s nozzle lid. Close in the New Caulk, and if there is a plastic seal within, you must perforate the caulk cartridge using a nail or a knife.
- Insert the Cartridge: Get the plunger of the caulk gun back, then slide in the cartridge, ensuring that it is pointed in the right direction.
- Cut the Nozzle: Take the utility knife at a 45° angle and cut the nozzle to make an aperture according to the size of the bead required.
- Load the Caulking Gun: Reposition the plunger to push the cartridge head inside the caulking gun, allowing further action.
- Apply the Caulk: Cautiously place the gun at the same angle regarding the surface and squeeze the trigger, which facilitates the release of the caulk while moving in the direction of the join to be sealed.
- Smooth the Bead: To ensure that the caulk joint looks professional after completion, you can use a caulk tool or your fingers specially shaped to camouflage the caulk bead.
- Clean Up: Remove the extra caulk and remove the caulking gun from the storage. After emptying it, clean it with wet wipes in a dry environment.
How to Choose the Right Caulk for Your Caulking Gun?
There are a few points I take into account while selecting the caulk for my project. To begin with, I will consider the location of the caulk used. For example, latex or acrylic caulks will be primarily suitable for interior applications. However, silicone may be more appropriate for outdoor jobs, whereas polyurethane caulks are employed on surfaces requiring intensive weather exposure due to their moisture resistance. After this step, I examine the type of surfaces that will be sealed; some caulks might have better adherence to wood, and some more to glass. Drying time is another factor I consider, as I am looking for products that will be set quickly since it will be a small project. Lastly, I remember the caulks regarding their elongation recovery or mobility, essential concerning window and door frame movements. While these aspects are well considered, it becomes apparent that there will be no other form of failure regarding the efficiency of the given caulk.
Can I Caulk Around the Interior and Exterior Windows?
Both interior and exterior windows can be caulked, and this is a beneficial procedure that will go a long way in conserving energy and eliminating drafts. For interior windows, paintable latex or acrylic caulk is commonly advised as it can be painted and sticks well to other building components. Conversely, in the case of caulking exterior windows, silicone caulk is used, as it is suitable for use outdoors and can withstand most outdoor conditions. Adequate caulking improves the look of your windows, helps prevent water penetration into the house, and lowers heating and cooling costs.
What is the Difference Between Interior and Exterior Caulk?
Interior caulk functions inside a building, while exterior caulk works outside. The main distinction between these two types of caulk is where they are used and how they are made. For instance, interior caulk, whether in the form of acrylic caulk or latex, is helpful for indoor application, which makes it easy to apply and allows the paint to coat over it. This makes finishing around window panes, doors, and baseboards easy. On the other hand, exterior caulk consists of materials like silicone and polyurethane, which prevent leaks but are designed for application in areas with exposure to sun, extreme cold, or dampness. In addition, exterior caulks also have excellent flexibility and adhesion, enabling them to absorb the stresses caused by the thermal movement of the structure. Knowing these differences is essential for determining the correct caulk for your project to reduce environmental impact while achieving efficiency and durability in sealing joints.
How to Ensure Proper Adhesion of Caulk on Different Surfaces?
There are a few points that should be paid attention to when dealing with caulk for it to stick correctly on different materials:
- Surface Preparation: Start by clearing the area of dust, dirt, or old caulk. Use scraping blades or a putty knife to get rid of any remains of the previous materials. Alcohol and other solvents are recommended for surface cleaning to get the best out of the jump-off points and ensure no greasy or oily patches.
- Drying: This requires ensuring that the surface is dry before caulking steel. Moisture undermines bond development, gumming up the seal too early in its proper lifecycle.
- Application Technique: Take specific care to ensure that the caulk bead is not uneven. It is best to use a caulking gun. This tool is used because one sweep gives one line of caulk without gaps or overlaps in the bead caulk, as in the ingenious preceding way.
- Choosing the Right Product: Loctite PL Premium Polyurethane Construction Adhesive is a reliable source of construction glue for renovations in the house interior and outdoors. Loctite Clear Silicone is suitable for waterproof use in kitchen or bathroom areas for quick applications or repairs.
- Curing Time: As indicated on the product label, adequate curing must be observed before exposing the hotel-g88 or other caulks to moisture or stress. This allows for the proper application and effectiveness of the caulk.
Following these recommendations and using competent products such as Loctite will improve your caulking projects and their longevity.
Do I need a Handyman to crack your windows?

As far as hiring a handyman to caulk your windows is concerned, your comfort level with such do-it-yourself work and the size of the job determine the soothing level. You can employ a handyman who will make sure the application is done correctly, and they will also diagnose the problem and associated damages such as water damage or rot. The only time you will need to call in the professionals and specialists is when you need to fix the problem areas of your home where water often damage or rot occurs after applying these materials. On the other hand, if you are skilled enough and have the necessary materials, caulking windows is simply one of the house renovations you will mug. Evaluate all alternatives available realistically regarding timely completion and effort with related expenses before making an affirmative decision.
What are the Signs That You Should Hire a Handyman?
Sure signs make it appropriate to consider hiring a handyman for your caulking job.
- Visible Damage: When windows and frames show signs of water seepage damage, peeling paint, or mold, they must be attended to quickly. The handyman determines the extent of the damage and what needs to be done prior to caulking the area with new caulk.
- Inexperience with Tools: When you lack some of the tools that would make caulking effective or when the procedure to follow is unclear, a handyman will do an excellent job of providing the tools and skills that will result in a clean and fixed seal.
- Extensive or Complex Areas: When the framings of windows are large or intricate and hence require skills, it is usually advisable to hire a handyman. The handyman is skilled in handling narrow spaces and involving even distribution, which protects one from drafts and moisture.
These indicators will assist you in canceling the project yourself or transferring it to non-professionals for optimal results.
How to Choose a Reliable Handyman for Home Improvement?
Choosing the right handyman is fundamental for peace of mind and the efficient completion of home improvement projects. Therefore, here are some guidelines to help you through the selection process:
- Check Credentials and Experience: The first step is to check the handyman’s license and insurance. It is worth noting that a handyman should have experience performing tasks such as caulking. A reverse marketing system will be utilized, where employees will search for client feedback on websites such as Yelp.
- Get Multiple Quotes: It is, therefore, better to get a minimum of three estimates from handymen. This not only assists in costing but also in the costs of doing the work and the time taken to complete the job. All handymen with honestly done work will be able to explain the charges provided reasonably.
- Ask for References: Feel free to ask their former clients for references. An established handyman will always have a portfolio of his or her work or photo evidence as proof of his or her worth to the customer.
- Discuss Products Used: Ask what materials or products he plans to use. Products such as Loctite PL Premium Max are highly recommended because of their high performance and durability in more than one situation. Loctite manufactures different types of sealants. For instance, Loctite Clear Silicone is used to obtain clear finishes, and Loctite Metal and Glass are used for specific applications.
- Communication Skills: Communication is vital in every working relationship. Make it a point to communicate with the handyman and get her to be willing to discuss your thoughts and concerns at any point during the project.
With these tips, one finds a handyman smart enough to complete all expectations depending on one’s requirements.
References
- How To Caulk Windows (2024 Guide) – This Old House
- Window Caulking DIY Guide – Kraken Bond
- Caulking – Energy.gov
Frequently Asked Questions (FAQ)
Q: What type of caulk should I use for sealing windows?
A: Acrylic latex caulk is recommended for sealing windows. It is suitable for both interior and exterior applications. Brands like DAP and GE offer high-quality options that can withstand extreme weather.
Q: How can I get it fast if I need caulk for my windows?
A: You can get it fast by visiting your local home improvement store, like Home Depot. They often have a variety of caulks available, and you can also buy them online and pick them up in-store today.
Q: Should I remove the old caulk before applying the new caulk?
A: Remove as much of the old caulk as possible to ensure a strong seal. This helps the new caulk adhere better and improves the seal’s longevity.
Q: How do I apply caulk properly around trimmed-out windows?
A: To apply caulk around trimmed-out windows, use a dripless caulk gun to create a smooth, even line. Fill any significant gaps and smooth the caulk with a finger or tool for a clean finish.
Q: Can I use caulk on masonry surfaces as well?
A: You can use caulk on masonry surfaces, but choose one specifically designed for window and masonry applications to ensure proper adhesion and durability.
Q: What should I do if I need caulk in cold temperatures?
A: If you’re caulking in cold temperatures, choose a water-based caulk formulated for low-temperature applications. This will help it cure appropriately despite the cold.
Q: Is there a difference between caulk for windows and caulk for doors?
A: While both types of caulk serve to seal gaps, window caulk is often designed to withstand more extreme weather conditions. Always check the product specifications to ensure they suit the intended application.
Q: How can I get free shipping on qualified window caulk?
A: For free shipping on qualified window caulk, check with retailers like Home Depot for any promotions or offers. You may also find options to buy online and pick up in-store to save on shipping costs.
Q: What is the best way to seal the sill around my windows?
A: The best way to seal the sill is to apply caulk generously along the edge where it meets the window frame. Be sure to smooth it out for a tight seal and allow it to dry according to the manufacturer’s instructions.


