


At first glance, gluing leather to wood seems simple enough. The process requires proper preparation, additional materials, and steps to ensure the durability of the bond. Be it furniture restoration, custom designs, or item repairs, nuances matter. This guide provides detailed instructions to ensure a secure bond while avoiding damage to the materials. Adhering to the tips saves time while achieving desirable results. Continue reading to master wood and leather crafting.
What is the Best Glue for Leather to Wood?
A neoprene-based contact cement or other high-strength adhesives works best when attaching leather to wood. Contact cement goes on both surfaces, and after it dries to a tacky texture, the pieces can be pressed together. This glue works excellently for coating and porous surfaces, so the leather won’t be pulling or slipping off the wooden surface. For more precision, fine-detailed work can be performed with high-grade superglue. In all cases, the surfaces have to be clean and dry.
Choosing the Best Adhesive for Your Project
For each specific project, picking the right kind glue must take into account the surfaces that will be joined, as well as the specifics of the task at hand. For example, epoxy bonds consist of two components and are known best for their strength and durability when they have to join heavy surfaces like metal, stone, or glass. The components are a resin and a hardener glue, so once intertwined, they form a chemical bond which can withstand high levels of force or heat and moisture.
Fabric glue has been designed for use on textile works as it provides a durable yet pliable bond on materials. This glue adhesive works best for costume pieces or upholstery projects that undergo repeated movement or washing.
Moreover, polyurethane adhesives work best for wooden, plastic or metal combinations which require great versatility. They are also useful for projects which require exposure to the outdoors or humid environments due to their waterproof capabilities.
Keep these considerations in mind when making your choice: curing time, bonding strength and the determination of external influence. These factors guarantee reliable adhesion and desired project results. For peak effectiveness, always check the guidelines provided by the manufacturer for your specific use case.
Comparing Common Adhesives for Leather and Wood
|
Adhesive Type |
Bonding Strength |
Curing Time |
Resistance to Conditions |
Compatibility with Leather and Wood |
Key Features |
|---|---|---|---|---|---|
|
PVA Glue |
Moderate |
20-30 minutes |
Low moisture resistance |
Suitable for wood, less ideal for leather |
Easy to use, widely available |
|
Contact Cement |
High |
Immediately after setting |
High moisture resistance |
Ideal for leather and wood |
Flexible, strong bond |
|
Epoxy |
Very High |
5-30 minutes |
Excellent durability |
Works for leather and wood |
Heat and chemical resistant |
|
Polyurethane Glue |
High |
1-2 hours |
Waterproof |
Effective on porous materials |
Expands during curing |
|
Cyanoacrylate Glue |
High |
Seconds to minutes |
Low durability in moisture |
Limited use on smooth non-porous leather |
Quick bond, precise application |
Using Contact Cement for Strong Bonds
Contact cement is exceptionally useful for leather, wood, laminate, and rubber as it creates a durable, permanent bond. It works by applying a thin coat on both surfaces, allowing it to dry until tacky, then fusing both surfaces together by pressing. During most applications, no clamps are needed as contact adhesive forms an immediate bond.
The ability to withstand very high temperatures and humidity is very useful about contact cement, but it makes it usable outdoors and indoors as well. It should be noted that ventilation is very important during contact because of the strong smells and fumes given off due to VOCs. It is advised not to clean the surfaces before as all the surfaces must be clean, dry, and free of particles like dust and grease. There is also a difference in the form in which this cement is available. There is the solvent based and the water based. The water based of contact cement is safe environmentally and dangerous to health, while their solvent counterparts are more powerful and flexible.
How to Attach Leather to Wood Properly?
- Gather the Necessary Materials
Make sure you have all the noted tools and materials before starting, including sandpaper, a clean cloth, rubbing alcohol, and contact cement. An adhesive recommended for leather to wood applications, a brush or clean applicator, and a roller or flat pressing object are also necessary.
- Prepare the Wood Surface
The very first step is sanding down the piece of wood with very fine sandpaper until it has a rough finish. This helps to improve how well the wood bonds with the surface. After sanding, the surface should be wiped down with a clean cloth and rubbing alcohol to get rid of any dust, grease or even water that may have fell on the wood.
- Prepare the Leather
Check the leather for any deformation that could prevent bonding. Adjust the size of the leather piece if required. Use a wet wipe to clean it and let it dry completely before moving forward.
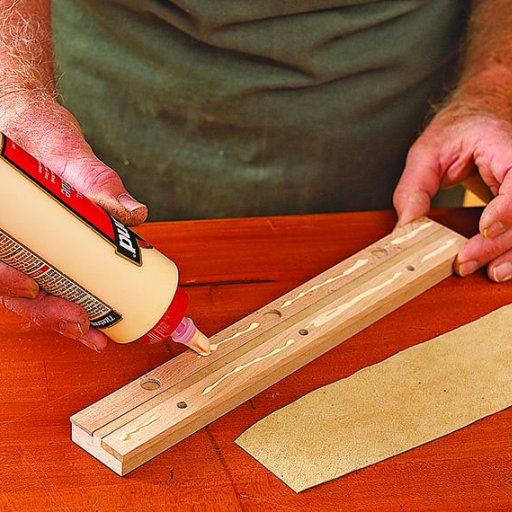
- Apply the Adhesive
With a brush or some sort of tool, put a thin and equal layer of glue to both the wood and back leather. Do this to all the pieces but do not put excess glue since it might flood and create a lot of bonds which can be uneven. With certain glues, it is very important to check the manufacturer’s advice for drying recommendations. A few adhesives require the surface to be tacky before proceeding.
- Position the Leather on the Wood
Place the leather onto the wood piece. Gradually push the piece down, one side to the other to stop air from getting in nor stop wrinkles. Contact cement forms a very strong permanent bond the moment they touch, so proper alignment is important.
- Apply Pressure
After placing the leather on the surface, impress the materials with a hand roller or any flat object. Leather working hand tools can be used. Then, apply steady pressure to all spots to ensure that a good seal is formed and any trapped air is eliminated. It is best to lightly press edges and corners first, as adhesion there is very important.
- Allow Adequate Curing Time
Consult the instructions of the adhesive supplier as to the required curing time. Generally, full bond strength is likely to be achieved in 2-3 days, although some manufacturers claim 24-48 hours. In this case, make sure that the glued items are not moved and placed in a flat position.
- Finish the Edges (Optional)
If needed, using a utility knife, remove any excess leather. For a clean cut, sand the edges lightly. For a neat finish, burning or edging with leather edge paint can be used to seal the exposed edges.
Following the steps will result in a satisfactory and strong bond of leather on wood that will withstand mechanical strain and harsh conditions while looking durable.
Preparing the Surface for a Strong Bond
A dependable bind between wood and leather requires considerable surface preparation, so to begin with, eye both surfaces to check if they are clean, dry, and free of dust, grease, or any other residue that might get in the way of proper bonding. With a clean textile that doesn’t have any lint in it, wipe the wood and leather surfaces using isopropyl alcohol, then let it to dry completely after wiping.
If the wood surface is smooth, it is better to lightly sand it using fine-grade sandpaper (E.g. 120-220 grit). This is done in order to garner small scratches on the surface that bond the wood with the adhesive. For leather, it is best to use coarse sandpaper and gently sand the bottom surface in order to enhance its bond with the glue. Also remember to try to rid all sanding residue using a clean cloth or a vacuum.
Moreover, pick an adhesive that is specially formulated for composite materials where one is porous, wood, and the other one is non-porous like leather. Such epoxy adhesives and contact cement, or leather to wood specific adhesives are often recommended for these types of projects because they provide a firm bond regardless of weather conditions. One fundamental rule to ensure that the joint connection is strong enough for dynamic loads and applied stress is to combine proper surface preparation with the right material choices.
Tips for Using Spray Adhesive
- Surface Preparation
Make sure that surfaces being bonded are clean and dry. Also remove dust along will grease on other surfaces. A clean surface accelerates adhesion and lessens failure of bond formation. For best outcome, make sure to lightly sand surfaces without pores so that additional abrasion improves adhesion.
- Appropriate Ventilation
Health risks and the potential for starting a fire make it critical that spray adhesive is applied in well-ventilated areas. A workspace that is safe while the spray adhesive is active and performs optimally includes one with adequate airflow.
- Uniform Application
Optimal coverage due to uniform spraying prevents weak spots and overall, ensures consistent bonding power. When applying adhesive, step back from the surface between 6 and 8 inches, as the can’s distance and use of even coating shows full effectiveness. Covers all areas with overlapping spray patterns.
- Adhesive Activation Time
The specified product chosen will dictate how long the material takes to properly bond, with some common spans being 30 seconds to a few minutes. The manufacturer’s data sheet will have information specific to timing. Making changes on this step also leads to poor performance when it comes to durability.
- Pressure for Bonding
Depending on the material being bonded, using clamps or rollers will make it possible to fully set the bond if placed under stress. Uniform pressure once both surfaces are pressed together optimally bonds the materials by forcing the interlocked adhesive layers apart.
What is the Best Way to Bond Leather to Wood?
In order to glue leather with wood, make sure to purchase an adhesive meant for both of them. You can use contact cement or polyurethane-based glue. Make sure both surfaces are clean, dry and do not have oils and dirt stuck on them. Apply glue to both leather and wood as per the manufacturer’s instructions for drying time. Wait until the glue gets sticky, then press the items to each other while putting even pressure on the surface with clamps or something heavy. Do not move the materials until the glue cures for a reliable bond.
Understanding the Bond Between Leather and Wood
Multiple factors such as the type of bond, surface treatment, and the environment are crucial for the attachment of leather and wood. It is important to remember that the use of polyurethane-based and cyanoacrylate adhesives whose tensile strength and flexibility guarantees ease of application on porous and non-porous surfaces alike provides further support to surfaces to ensure it is sanded clean. Moreover, the strength of attachment surface treatment provides, when wood is sanded, secondary bond formation undergoes increased along with cleaning the materials. In terms of working conditions, the patient has to consider the relative humidity and temperature of water, which affects the time and speed it takes to properly set the bond; thus, the recommendation on ship must be the limit set by the adhesive manufacturer. An understanding of these factors can aid in making leather and wood last for the periods and durability needed to withstand high levels of functional and aesthetic pressure.
Factors to Consider When Choosing a Kind of Glue
In deciding selection of glue to fulfill the targeted performance requirements, many factors need to be examined alongside the targeted applications and optimal bonding. The blue listing targeted applications and the factors are:
- Material Compatibility
Every surface bonded has a specific glue designed specially for it. Polyurethane glues for example are specifically designed to bond porous surfaces and cyanoacrylate or super glue best used on non-porous surfaces like metal and plastics. It is also critical covering component materials to be joined, because their properties inform glue selection.
- Strength Requirements
Estimate joint load and stresses associated within the bounds of the bond. Request For epoxy type glue for high strength applications like structural bonding, since it provides the highest shear and tensile strength. For lighter loads it is possible to use PVA (Polyvinyl Acetate) glue.
- Environmental Conditions
Adhesives can be affected by the environment in terms of exposure to extreme temperatures, moisture, or even UV radiation. For outdoor purposes, adhesives which have silicone or polyurethane are needed because they can resist water. On the other hand, heat-proof adhesives are preferred when the region has inconsistent temperatures.
- Curing Time
The range of curing times for an adhesive is significant. Cyanoacrylate can set in mere seconds, and epoxy can take several hours to days. For project timelines, the immediacy of adhesive setting must be taken into consideration when selecting the adhesive.
- Application Method
Adhesive can be dispensed in a variety of forms; tape, spray, gel or liquid. The form of adhesive needed all depends on the surface and level of precision required for the bond. A spray adhesive would be best for broad flat surfaces, while intricate blends demand a liquid adhesive.
Assessing all these aspects helps accurately choose the right adhesive for the technical requirements and the environmental conditions of the project.
How to Repair Glued Leather on Wood?
To fix leather that has been glued onto a piece of wood, do the following:
- Check It – Examine the leather piece and the wooden plank for damage and whether the parts to be glued together have received some form of adhesive.
- Surface Preparation – Wipe the leather and wood surface with a clean, soft cloth, soaked in warm, soapy water, to clean it of dirt and grease. You must allow the surfaces to dry fully before the next step.
- Rework the Join Surface – Using a plastic scraper, fine sandpaper, or scissors, get rid of any old adhesive on the face of the wood and leather. Caution should be adhered to avoid damaging the components.
- Apply Fresh Adhesive – Buy leather glue which will bond well with the wood used. Spread a thin film of leather glue on both surfaces to be joined and to the wood.
- Install the leather – Mould leather into required shape and with the help of hands or roller, smoothen the rough and air-filled areas.
- Allow Time To Cure– Use weights or clamps to secure the leather and wood together. Check the instructions provided by the manufacturer of the adhesive used for the curing time.
- Finish and Maintain – After the full curing time, clean as necessary and condition the leather to restore its suppleness and appearance.
Following these steps will ensure that the bond formed preserves the structure, and looks and works like new for the leather-on-wood item.
Identifying the Signs of a Weak Bond
A loose bond between wood and leather may ruin both appearance and structural integrity of the item. Some of the common signs of weak bond include gaps, separation, and lack of adhesion along the joint interface. Furthermore, if the leather moves with respect to the wooden substrate when force is applied, it indicates the bond has most likely failed. Another sign includes discoloration or brittleness of the adhesive, which often results from the heat, moisture, or UV light. Over time, straining the bonded region will induce creaking or cracking noises which indicate slow but progressive structural failure. Proactive checkups will help identify and resolve these issues while avoiding further harm to the leather-on-wood product.
Steps to Reapply Glue on Damaged Areas
- Assess the Damaged Area
Check the bonded area to assess the amount of damage. Relieve the surface by cleaning to eliminate debris, dust, or older glue preventing resurfacing.
- Select the Appropriate Adhesive
Pick an adhesive that will work on both sides, preferably leather and wood. They are known to possess high durability and remaining under varying climates. Polyurethane adhesives and specially designed leather adhesives are highly recommended due to their durability, tensile strength, flexibility, and overall bond strengths for varying environments.
- Prepare the Surfaces
To improve adhesion, lightly sand the bonding area’s wooden surface with fine sandpaper. This helps to create a surface texture. Clean both surfaces with washing and place them where no moisture can get on them to dry off as no moisture can remain while being in contact with the surface.
- Apply the Adhesive
Use a brush, applicator, or other means to apply adhesive on both surfaces evenly using as little as possible. Reference the manufacturer’s guidelines in regard to the amount and method for application. Avoid putting glue in excess as it can create uneven surface tension which will lead to bond gaps.
- Join the Surfaces
Join the leather and wood with as much pressure as they are glued together and steer them into place without them to use excess glue as they set. Positioned supports can be bolts or weighty article which gives identical pressure on all sides. This step is essential to guarantee the adhesive sets properly while still permitting movement ensuring maximum bond strength.
- Allow Adequate Curing Time
The construction should remain motionless until the bond curing time dictates. Depending on the product, adhesion curing time ranges from a couple hours to one whole day. Manage the area around the repair and don’t move them within that time.
- Inspect and Finish
Inspect the glued parts once the adhesive has cured for any gaps or defects. Remove any excess glue that may have ooze out during the clamping phase, and apply any required finishing steps like polishing or protective coatings to restore the outer look of the product.
Achieving a lasting and permanent bond that repairs the structure and beauty of the leather-on-wood piece is possible using these instructions. Regular upkeep coupled with proper storage will improve long-lasting durability even more.
What Are the Different Types of Glue for Leather and Wood?
- PVA Glue (Polyvinyl Acetate)
Whether for crafting or minor DIY projects, PVA glue is a common household adhesive that falls under the category of light-duty bonds. It works best with wood compared to leather, which can be non-flexible portions of fabric surfaces.
- Contact Cement
The glue also performs exceptionally well when gluing together leather and wood. Use of contact cement allows for relatively easy application, but comes with the notable drawback of a dual application step. The glue must be applied to both surfaces and allowed to dry briefly before pressing them together.
- Epoxy Adhesives
Epoxy is a potent adhesive primarily used for heavy-duty construction and repair. It can attach two rigid items together, including leather and wood. When two workpieces need expert fitting, epoxy works wonders and outlasts other adhesives when it comes to sheer stress. However, these qualities make epoxy less ideal when not for use with demanding situations, as it is extremely difficult to remove once set.
- Hot Glue
Typically stronger when affixed to wooden object, hot glue is much weaker in adhesion strength compared to leather. Though many opt to use it as an adhesive for crafts and decorative projects, lacking durability makes this an inappropriate choice in prolonged strain or high temperatures.
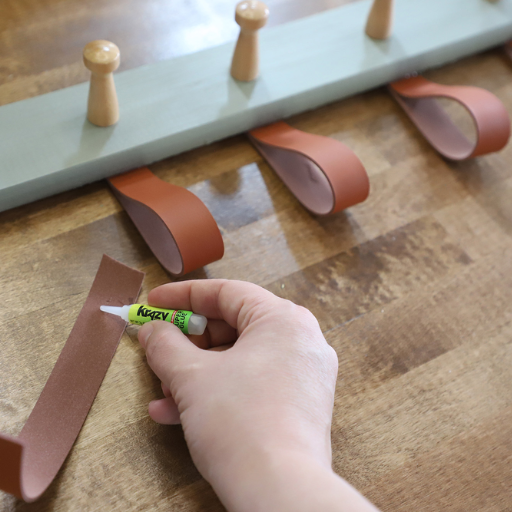
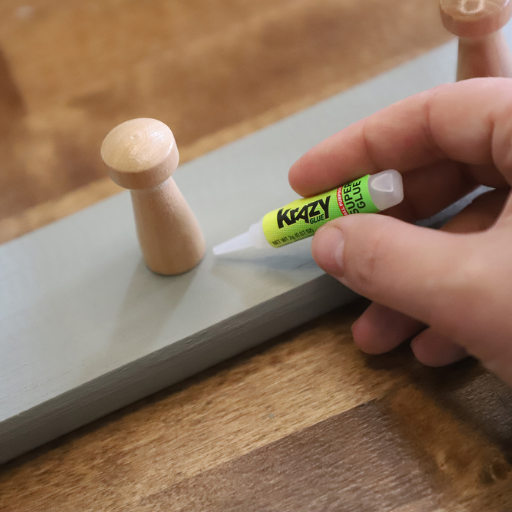
- Cyanoacrylate (Super Glue)
Hot glue can work wonders during quick fix operations, but shouldn’t be relied on in harsh conditions. Tests showed staying power when affixed to wooden objects over leather items. Its loose state makes it prone to failure under stray heat.
Whether hot or super glue, every adhesive comes endowed with unique traits. The choice boils down to the specifics of any given intended project. From flexibility evaluated to tools on parameters measure performance crafted after being fixed in place.
Comparing Wood Glue and Leather Adhesives
|
Key Point |
Wood Glue |
Leather Adhesives |
|---|---|---|
|
Primary Material Bonded |
Wood surfaces |
Leather, flexible fabrics |
|
Flexibility |
Rigid once cured |
Offers varying flexibility |
|
Drying Time |
Moderate to long (varies by type) |
Quick, depending on type |
|
Water Resistance |
Available in waterproof variants |
Some types are water-resistant |
|
Tensile Strength |
High for wood-specific applications |
Strong but varies by product |
|
Application Difficulty |
Easy to apply, requires clamping |
Often requires precision application |
|
Heat Resistance |
Moderate to high |
Varies; some are heat-sensitive |
|
Durability Over Time |
Long-lasting in wood structures |
Durable with proper conditions |
|
Best Application Use |
Carpentry, furniture repair |
Belts, shoes, bags, upholstery |
|
Common Types |
PVA, polyurethane, epoxy |
Contact cement, cyanoacrylate, epoxy |
Reference Sources
-
Assessment of Some Basic Engineering Properties of Fibres Extracted from Thaumatococcus danielli Plant 1: This study explored the use of natural fibers bonded with adhesives like Topbond and Evo-Stik. While the focus was on fibers from the Thaumatococcus danielli plant, the adhesives used (Topbond and Evo-Stik) are also applicable for bonding materials like leather and wood.
-
Wood Adhesion and Adhesives 2: This resource provides a comprehensive overview of adhesive technologies for wood, including their mechanical properties and interfacial bonding mechanisms. While specific details on leather bonding were not highlighted, the principles of adhesive selection and surface preparation are applicable to leather-wood bonding.
Frequently Asked Questions (FAQs)
Q: What is the best method to glue a piece of leather to wood?
A: The best method often involves using a strong adhesive like Weldwood or Barge, which provide a durable bond. It’s essential to apply a good coat evenly across the entire surface of both the leather and the wood for the best results.
Q: Can I use hide glue to attach veg tan leather to wood?
A: While hide glue can be used, it may not provide the strongest bond for veg tan leather. It’s generally better to find the best glue specifically designed for leather and wood, like a rubber-infused adhesive or contact adhesive.
Q: How can I ensure the leather stays flexible after gluing?
A: To ensure the leather stays flexible after gluing, choose adhesives like Gorilla Glue or 3M that are designed to remain flexible once cured. Avoid glues that dry rigid, as they can cause the leather to crack over time.
Q: Is double sided tape a viable option for gluing leather to wood?
A: Double sided tape can work for temporary holds but is generally not strong enough for a permanent bond. For a durable connection, it’s recommended to use glue and contact adhesive.
Q: What should I do if I have drips or runs from the glue?
A: If you have drips or runs from the glue, it’s important to clean up your tools and any drips immediately while the adhesive is still wet. Use a damp cloth to wipe away excess glue before it dries.
Q: How can I reposition the leather if I make a mistake while gluing?
A: If you need to reposition the leather, use a spray-on adhesive like 3M 77 that allows for repositioning within a certain timeframe before it sets. Make sure to follow the manufacturer’s instructions for timing.
Q: What tools do I need for gluing leather to wood?
A: You will need a vise to hold the materials together, a brush for applying the glue, and possibly a strop for smoothing the leather edges. Additionally, having clean-up tools like rags and a solvent for any spills is beneficial.
Q: How long does it take for the glue to dry when bonding leather to wood?
A: Drying times can vary depending on the type of glue used. Generally, it can take anywhere from a few minutes for quick-drying adhesives to several hours for stronger glues like Titebond. Always check the manufacturer’s instructions for specific drying times.


