


From working on DIY projects to professional builds, choosing the adhesive for foams or metals can be very daunting. Styro and foamboards pose their own challenges-they can be very delicate-and metal is always in need of a strong and reliable bond. Could it be making intricate crafts, constructing architectural models, or more industrial uses?-The correct glue must ensure durability and precision through and through. This guide walks you through the best adhesives for joining foam to metal with insights into their advantages, applications, and tips for the best results. Get ready to literally make your project stick!
Understanding Foam Types
Expanded Polystyrene vs. Extruded Polystyrene
Expanded polystyrene and extruded polystyrene are both rigid foams, with unique physical properties suitable for a specific need. EPS is manufactured by expanding small beads of polystyrene through steam and pressure, resulting in a lightweight material having a closed-cell structure. It cannot rival XPS in price and thermal insulation, applying for packaging materials, insulation boards, and crafting. But EPS can be less dense and can absorb water slightly more than XPS.
On the other hand, XPS is prepared by an extrusion process yielding a denser, more uniform closed-cell foam. This density allows it to resist forces and moisture better, and is thus often preferred in construction uses such as insulating foundations, roofs, or anywhere subjected to high stresses. However, XPS costing more, could yield better thermal performance in the long term compared to EPS.
Thus when making a choice between EPS and XPS for your work, think about the demands of the application. EPS is the cheapest option where light stress dominates while XPS overrides when heavy-duty requirements and moisture resistance come into play. These slight differences guarantee reliable and efficient bonding of foam to metal since these properties will inevitably affect the performance of adhesives.
Characteristics of Styrofoam
Styrofoam, or more precisely, expanded polystyrene (EPS), is a lightweight and ideally versatile material used for insulation, packaging, and crafts. Has a closed-cell structure with properties of thermal insulation making it very energy efficient when used in construction. Styrofoam also resists moisture, boosting its popularity in wet environments and applications where waterproofing is essential.
One important feature of Styrofoam is its lightweight property. Densities ranging from 16 to about 40 kg/m³ make it less dense and more lightweight, making Styrofoam easy to transport and handle. Its low compressive strength, however, renders it unsuitable for use in heavy-load scenarios, which varies between 70 and 250 kPa, depending on grade and use.
From an ecological point of view, Styrofoam poses various problems since it is non-biodegradable and difficult to recycle. In any case, advances in recycling have since made it possible to partially recycle it into other products. Styrofoam measures about 3.6-4.2 R-value/inch of thickness in terms of insulation parameters, which assists energy conservation in buildings.
Recent developments suggest the adoption of Styrofoam alternatives or eco-friendly coatings to ensure better environmental compatibility, especially from within increasing regulatory framework on non-recyclables.
Applications of Foamboard
Foamboard is indeed a versatile material, used in various industries for its lightweight yet durable features. First and foremost, in construction, it doubles as insulation boards, so as to increase the heat resistance of buildings. With the average R-value of around 3.6-4.2 per inch, excellent insulation is provided for heat loss, thus inadvertently decreasing the energy costs.
Secondly, foamboard is used greatly in the advertising and design industries. Since this smooth surface is perfect for top-quality full-color graphics, it is widely used in signage, presentation material, and trade show displays. This material can also be easily cut and sculpted, allowing for many creatively customized architectural modeling and crafting opportunities.
Recent advancements allow it to be now used in sustainable packaging. With increasing environmental awareness and regulations, these foamboard alternatives are emerging with environmentally friendly coatings and recyclable compositions.
It also works as a diffuser for lights, backdrops, and props in the film and photography industries. These uses, besides being fairly cheap and easy to handle, keep the foamboard as a common material in several professional and creative fields.
Selecting the Right Adhesive
Overview of Adhesive Options
Selecting an adhesive depends upon the type of application and the specific materials being fastened. Foamboard is a lightweight material, so not every adhesive will engage with its surface or structure successfully. The adhesive must provide a strong bond without compromising the core of foam or damaging its surface.
Used the most for foamboard are rubber sprays, PVA glues, or double-sided tapes. Spray adhesives work the best for an even application, with the adhesive evenly spreading and bonding on the surface; this is particularly good for larger areas. In the case of white glues, the glue should be used sparingly as it could warp the foam; besides, if it gets soaked into the foam, it could create a rigid binding which is also not good for the foamboard. Double-sided tape is quick and neat and is best suited for light applications. Each choice has an advantage depending on whether the bond is eminent or merely temporary.
If an adhesive is chosen, it should first be tested on a small and unnoticeable section of the foamboard to confirm compatibility and prevent any damages that cannot be reversed. Additionally, clean and dry conditions throughout the working environment must be maintained to achieve a strong bond. By remembering the project needs and requirements of the foamboard, an appropriate adhesive can be selected for one’s use.
Gorilla Glue vs 3M Adhesives
In the application of glue on foamboard, the factors of strength, versatility, ease of use, and drying time are considered paramount. Gorilla Glue is the trademark of strong adhesion; it is highly versatile and can stick to many surfaces such as wood, foam, and plastics. The glue’s polyurethane formula expands as it cures so it might be an advantage in filling small gaps but would entail careful application so as to not have excess material. Gorilla Glue requires moisture for activation, which may provide some complications under certain circumstances.
For the other, 3M adhesives treat different substrates with respect to options and applications for foam. Most 3M adhesives are spray-on, thus providing a layer of bonding material that remains even and is easy to apply and easy to handle afterwards. These adhesives may dry quicker than Gorilla Glue and thus prevent expansion issues, especially when the project requires accuracy and later good looks. But, on the downside, they may lack the strength as gap filler that Gorilla Glue can provide.
Conclusion:
In conclusion, whether to go for Gorilla Glue or 3M adhesive will depend on the peculiar demands of your foam board work. If a good strong adhesive, one that can fill gaps or bond materials of all kinds, is needed, Gorilla Glue is just perfect. If your work needs precision with the very fast drying of the glue and clean application, then ideally 3M adhesives are the way to go. Think through the demands of your project and try the adhesive out on a small foamboard piece to be sure of its best performance.
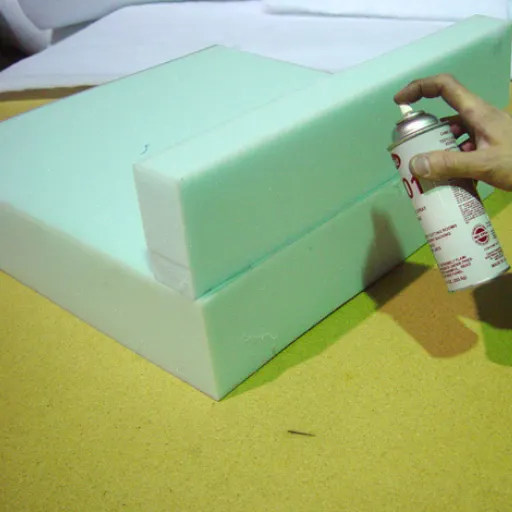
Pros and Cons of Spray Adhesive
These adhesives have the prime factor of versatility and hence are more commonly used universally in crafts, design, and various other forms of industrial applications. The detailed pros and cons might help you in deciding whether spray adhesives will work for your project or not:
✓ Pros:
Application Ease: When spray adhesives are applied, the bonded surfaces receive an equal dosage, preventing clumping and uneven bonding-issues caused in liquid adhesive application. Hence, good for affixing large surfaces quickly.
Fast Drying: Many spray adhesives offer an initial tack time that is quite faster allowing an assembly to be made versus standing around waiting for it.
Multi-Material Compatibility: Can the spray adhesives bond almost any material such as foam boards, fabrics, cardboard, wood, or light metals? Such an advantage makes them highly sought after both in private DIY ventures and in professional undertakings.
Temporary or Permanent Bonding: Those spray adhesives allow you to either place something temporarily or make a final and absolute bond, depending on the requirements of the project at hand. For example, repositionable spray adhesives give you a chance to move materials around until they are set down permanently.
Even Coating Layer: Unlike traditional glues, spray adhesives offer a smooth consistency with minimum residue for a professional finish.
✗ Cons:
Overspray and Cleanup: An inherent disadvantage to spray adhesives comes from overspraying while applying. The product might get wasted and all the more time needs to be given out for cleaning the mess. You will need protective coverings or controlled environments to minimize this risk.
Fumes and Ventilation: Some kinds of spray adhesives release harmful fumes that cause more harm when inhaled. Hence, it is highly recommended to use these adhesives in well-ventilated spaces and also regarded as best practice to don the appropriate safety gear, such as masks.
Limited Heat Resistance: A range of spray adhesives may soften or lose tackiness under high-temperature conditions, making them unsuitable adhesives for a project exposed to heat or outdoor conditions.
Cost and Waste: Cost-wise, spray adhesives will usually be beyond what traditional glues really go for, plus, improper handling or storage could not help but lead to aerosol waste.
Environmental Issues: In most cases, spray adhesives are dispensed from a pressurized can, thus besmirching the environment as they turn to waste, depending on how a given product is chemically composed.
Preparing Surfaces for Bonding
Importance of Cleaning and Degreasing
Cleaning and degreasing surfaces before bonding are fundamental to the strength and longevity of the bonded structure. Interference of dust, grease, oils, or residues over the adhesives may lead to a weak bond or outright failure over time. By fully preparing the surface, one ensures that maximum areas of both adhesive and the materials come into mutual contact, thereby giving a proper good performance.
Cleaning removes visible dirt and particles while degreasing removes any oily films or any contamination unknown to the naked eye. This step is even more critical for materials such as metals or plastics, as these surfaces tend to accumulate oils during the manufacturing and handling processes. Employing the cleaning agents or degreasers suitable for the particular types of materials will thus ensure an efficient cleaning procedure without inflicting any harm to the surface.
Failing to prepare the surfaces properly, foregoing the intermediate steps, will simply leave time, materials, and other resources wasted-all in vain. A clean and degreased surface is the basis for proper adhesion for either industrial applications or small projects at home. For the bond quality to improve and the life of the materials being bonded to increase, the will of adequately preparing the surfaces must account for the update of ensuring a stronger bond.
Techniques for Light Abrasion
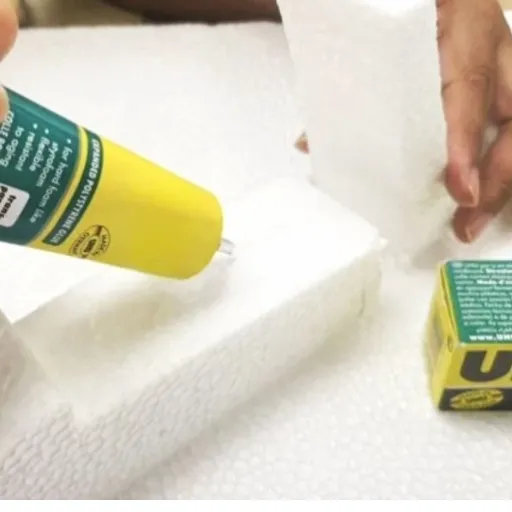
To bond Styrofoam with metal, materials must be clean and properly prepared. Light abrasion techniques help create a surface that would make the adhesive more active, especially while bonding disparate materials like Styrofoam and metal.
Step 1: Abrading the Metal Surface
With fine sandpaper (220 to 320 grit), sand in a circular motion very lightly over the metal surface so that a texture is created offering more human grip to the glue. Do not sand the Styrofoam itself as it may crumble or damage it; preserve its delicate structure.
Step 2: Cleaning the Surfaces
After sanding, clean the surface with a lint-free cloth and degreaser or alcohol content, preferably not less than 70%. All traces of dust, grease, and oil must be removed to maximize adhesion. Styrofoam can be wiped very gently with a dry cloth to remove loose particles, but be very careful not to dissolve it with alcohol or any solvent.
Step 3: Adhesive Selection
One of the most crucial steps in bonding Styrofoam to metal is the selection of the correct adhesive. Acetone or any other type of harsh chemical should not come anywhere near Styrofoam or it will melt! Instead, select from adhesives formulated to work with Styrofoam and those designed for multi-surface compatibility.
Step 4: Application Process
Apply a thin layer of thin glue over the metal part, making sure to spread it evenly and be careful not to use too much glue; in the event of glue oozing out between pressing, it may be hard to clean up. For stronger adhesion, have a light prime over the entire surface of the Styrofoam by just brushing on a thin layer of adhesive and allowing it to become tacky for a few seconds before bringing the two surfaces together.
Step 5: Securing the Bond
Carefully orient the Styrofoam onto the metal surface and hold together for the full drying time specified on the adhesive label. If application cannot be held firmly by hand during this period, one weight or clamp may be appropriate. However, avoid applying too much pressure that could distort the shape of Styrofoam.
Environmental Factors to Consider
In relation to bonding Styrofoam to metal, one needs to consider some factors associated with the environment because the efficiency with which the bond work and its longevity are determined largely by one of the very environmental factors. Among them, humidity, temperature, and ultraviolet (UV) radiation assume utmost importance.
Through proactive treatment of these environmental factors, the strength and functionality of the bond between Styrofoam and metal can be greatly enhanced to constitute a reliable and lasting connection. Every project tends to come with its setting; hence methods should be adjusted accordingly for customer’s satisfaction.
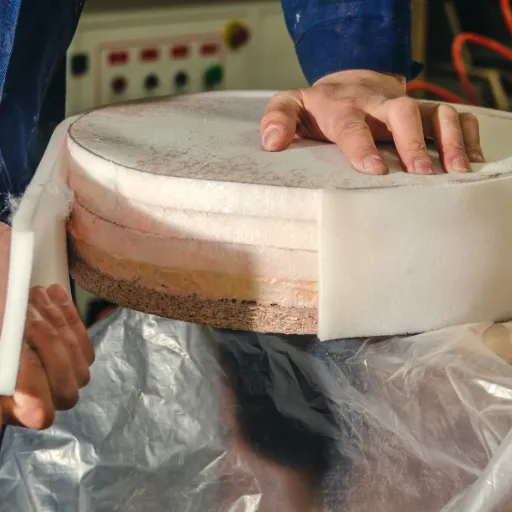
Step-by-Step Guide to Gluing Foam to Metal
Initial Cleaning and Preparation
To allow for the strong bond to form between foam and metal, the surfaces must be properly cleaned and prepared. Begin by cleaning the surfaces to ensure that dirt, grease, or dust does not remain on them. Use a clean cloth and a mild soap solution or mild cleaning agent to clean the surfaces. Ensure that they are dry before proceeding, as humidity or moisture affects the adhesive bond. If needed, use a soft brush or scraper to remove any stubborn debris.
Once clean, even a light sanding of the metal surface can provide the best complement-holding surface for the adhesive. Use fine abrasive paper so that you do not have any destructive indentations on the metal and keep the sanding area evenly across the surface. After sanding, wipe the metal with a lint-free cloth to remove the fine sanding dust so that the final surface remains clean and smooth.
Finally, prepare the foam according to trimming to size and shape for a precise fit. If being irregular or uneven-edged, cut them cleanly with a utility knife or scissors. This preparation ensures perfect alignment of the foam to the metal surface during bonding. Both surfaces being clean, smooth, and well-prepared, you can now proceed confidently with adhesive application for an enduring drug connection.
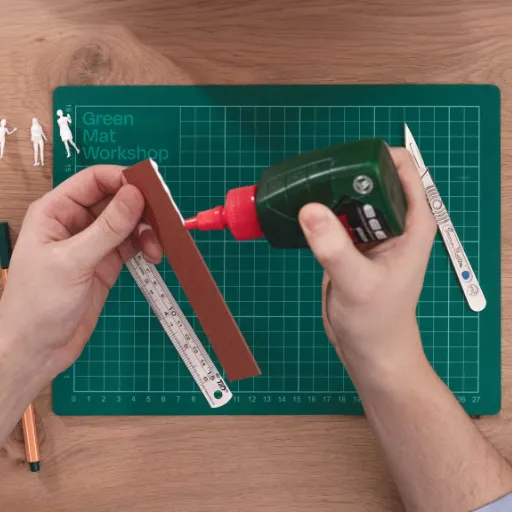
Applying the Adhesive Correctly
At the commencement of the adhesive application, one should maintain both prepared surfaces dry and devoid of any deposits of dirt, dust, or grease. One can then use a clean applicator to apply an even layer of a thin coating of adhesive onto the metal surface. An application of excess amount sometimes causes uneven bonding or seepage; it could adversely affect the connection strength or the looks.
Afterward, the foam is to be lowered onto the metal while the adhesive is still tacky. Gentle placement of the foam has to be made so that the foam matches the exact desired position. Even pressure is to be applied for a firm hold. Such a mechanism would ensure strong bonding and lessen the possibility of air pockets compromising adhesion over a period.
Let the adhesive set, depending on how the manufacturer prescribes the duration for which it needs to be cured. Consider not moving or causing stress to the materials during the curing time. The proper curing time is just right for good adhesion that lasts. Using these steps will give you very good bonding between the foam and the metal surface.
Clamping and Curing Techniques
The entire clamping procedure allows rendering adhesion by applying constant pressure between the foam and metal during the cure time. Setting up the clamps prevents the materials from moving and creates a gap in the bond that may weaken it. The pressure applied should be firm but gentle, as that would damage the foam. Another point is to achieve an even amount of pressure so there is consistent contact along the whole surface.
The curing time is also very important for the adhesion to become durable. If any curing time is specified by the adhesive manufacturer, the cure time should be adequately observed depending on the type of adhesive being used. Equal curing means the hardening of the adhesive and hence forming a strong and durable bond. Furthermore, environmental conditions such as temperature and moisture need to be considered as they have quite an impact on curing times. Work surface must be clean and free from contaminants that can interfere with the adhesion.
Upon the completion of curing, the bond will be inspected to ascertain its integrity. Materials must be confirmed to be adhered, without any indications of detachment or gaps. Proper clamping and curing techniques, causing a successful execution, maximizes the bond strength and assurance so that the foam and metal will stay attached under normal operational use.
Expert Tips for Stronger Bonds
Avoiding Common Mistakes
Ensuring a strong bond between foam and metal requires paying attention to details of an avoidable error and the preparation of the surfaces. One common mistake is not cleaning the surfaces thoroughly before bonding. Any dust, dirt, oil, or even moisture may lessen the adhesion, giving patches of uneven binding, or an outright failure. To prevent this, always clean the foam and metal surfaces, making sure they are dry before applying any adhesive.
Another very common type of error is the incorrect use of adhesives for the job. Different adhesives are meant for certain material combos and environmental factors. Always use an adhesive meant for foam and metal, and verify if it is suitable for the temperature, humidity, and load conditions of the application. Reading the manufacturer’s recommendations is usually a great coach for selection.
Lastly, if clamps are improperly tightened or sufficient curing time is not allowed, it can drastically reduce the strength of the bond. A bond that does not receive consistent or adequate pressure during curing may become weak or partially adhering. If one were to simply remove the clamps before the curing time elapsed, one would likewise endanger the integrity of the bond. To prevent such issues, always pressure the bond uniformly throughout and keep the bond under adhesive cure for the full time recommended in the instructions.
Troubleshooting Adhesion Issues
Common Causes of Adhesion Problems:
Adhesion issues can arise from multiple causes that usually pertain to surface preparation, environmental conditions, and curing procedures. The presence of dirt or oil, or simply incompatibility between the surface and the adhesive, may prevent strong bonding from taking place. Temperatures, too high or too low, or humidity outside the parameter stipulated, in fact, will affect the performance adversely. Always make sure the surfaces to be glued are sufficiently clean and dry and compatible to each other in terms of bonding. Best adhesion and curing can be achieved only under these stringent requirements.
How to Assess and Resolve Issues:
Before adhesion problems can be solved, the surface preparation should be carefully examined. Clean the area with the right method to get rid of contamination such as dust, grease, or moisture. If any problem persists or recurs, check the instructions for the adhesive to make sure the correct one is being paired with the material in question. Then check temperature and humidity as environmental factors, adjusting them if settings specified for application are not met. Any inconsistencies in pressure during application should also be corrected to improve uniformity.
How to Prevent Future Problems:
Preventing adhesion problems requires good proactive measures. Follow all instructions set forth by the adhesive manufacturer, giving special consideration to surface preparation, environmental conditions, and curing times. Use test applications on a few small samples to confirm that the procedure is compatible with your materials before proceeding with any large-scale jobs. Also, make sure adhesives are stored properly while keeping all tools and workstations dust-free, ensuring that your end results are consistent. By preemptively tackling the problem, chances of adhesion failure can usually be bypassed.
Optimal Conditions for Curing
Adhesives are to be cured under controlled environmental conditions so that strong and durable bonds may be formed. The residues of temperature, humidity, and time need to be considered while evaluating environmental conditions. Most adhesives do well when cured at a moderately warm temperature, normally in the range of 65°F (18°C) to 85°F (29°C). Temperatures lower than those will slow the cure time; temperatures higher than those considered stable for the adhesives will permit rapid curing, thereby affecting the performance of the adhesive. Depending on the temperature range recommended for any adhesive, it should be used accordingly.
Humidity levels and curing have teamed together for their share of influencing factors. Moderate humidity, approximately 50 percent relative humidity, is most conducive to curing for many adhesives. Too much moisture residing in the air can ruin proper curing or bond strength, and too little humidity may slow the cure. Always look for a well-ventilated, controlled environment to help retain the delicate balance required for curing to grow properly.
Time is a key factor as well. Some adhesives can be fast curing, taking only some minutes in which to cure, whereas others can take hours. Thus, rushing the process by either heating the glue excessively or just cutting short the curing time will produce adhesion failure. Allow sufficient time to cure and dry according to the manufacturer’s instruction to ensure a dependable and long-lasting bond. Close observation of all three factors—temperature, humidity, and time—would surely help an adhesive bond to turn out very well.
Frequently Asked Questions (FAQ)
Q: What is the best method for sticking styrofoam to metals?
A: To stick styrofoam to metal efficiently, use a strong construction adhesive or contact cement. These glue types form a strong bond and can work on any surface, whether porous or non-porous. If you want something quick, you can always try hot glue; it’s good enough to glue styrofoam to metal, but not perhaps the strongest or most durable option there is.
Q: Can hot glue attach styrofoam to metal?
A: Hot glue may indeed be used to mount styrofoam to metal. It is perfect for small and light projects that require immediate attachment. However, do keep in mind that although hot glue has a strong initial bonding strength, it is not the greatest for heavy duty and outdoor applications.
Q: What kinds of adhesives are recommended for polystyrene foam?
A: Recommended adhesives for polystyrene foam include construction adhesive, contact cement, and specific foamboard adhesives like Loctite PL 300. These adhesives are designed to bond well with foams as well as not dissolving them. Water-based adhesive contact is also considered if you want a less toxic application.
Q: Is silicone a great adhesive to glue styrofoam onto metal?
A: Silicone can be used to glue styrofoam onto metal, but it might not be as strong of a bond as with construction adhesive or contact cement. With greater flexibility, it would be the right kind of bond if movement were needed. For a more permanent solution, though, using an adhesive formulated for foam is better.
Q: How long does the glue take to dry when tricking styrofoam onto metal?
A: Drying time of glue in bonding Styrofoam to metal varies depending on the gluing agent. Typically hot glue sets quickly; however, you should allow it to completely dry, which can be some hours. Heavier glues such as construction glue or contact cement, on the other hand, are best suited for drying overnight for the best result.
Q: Can I use super glue to bond styrofoam to metal?
A: Yes, super glue can hold together the styrofoam and metal, but this is not the perfect option for larger projects. Being very quick to dry, super glue will make the bond brittle and cannot hold under any stress. If you want a bond that will stand up, use contact adhesives or construction adhesives instead.
Q: What should I do if my adhesive is dissolving the foam?
A: If your solvent somehow dissolves the foam, it is most probably because you have a solvent-based adhesive not suited for styrofoam. To avoid this, always opt for adhesives made especially for foam, such as water-based contact adhesive, or foamboard adhesive. If the problem is encountered, clean the area and regenerate it with an appropriate adhesive.
Q: Are there any pressure-sensitive adhesives that are good for styrofoam?
A: Indeed, Pressure-Sensitive Adhesives work well with styrofoam. These adhesives allow for repositioning before setting and create a strong bond without using heat. They work best for applications that involve thin layers where you may want to readjust positioning before the adhesive sets.
Q: How different are contact cement and construction adhesive for styrofoam?
A: Contact cement acts instantly in bonding surfaces and is considered excellent for smooth and nonporous surfaces. Construction adhesives rank higher in terms of strength and larger still in the gap-filling abilities, thus making them ideal for heavy applications. Both kinds of adhesives can stick styrofoam onto metal, but construction adhesive bonds may be more dependable for big projects.
References
-
This to That – A guide on gluing Styrofoam to metal, including preparation tips like cleaning the metal surface.
-
Bob is the Oil Guy Forum – A discussion on adhesives for attaching foam to metal, with user recommendations like white Gorilla Glue.
-
PopUp Portal Forum – Suggestions for adhesives such as LockTite PL Premium or PL 300 for Styrofoam-to-metal applications.
-
Foam Workshop Facebook Group – Community insights on using adhesives like Zap-a-Gap for gluing foam to metal, including surface preparation tips.


